Triton User Manual Addendum - English, French, Spanish
Page 1
... the MENU button. The Triton receiver can set a user grid... Triton User Manual Addendum This addendum applies to Triton GPS receivers that... have a software version that you can now access the Main Menu on any of the Navigational screens by your track. This will initiate a new track beginning at the top of the User Grid. When you move, the Triton..., point B. Triton 300 Triton 400 Triton 500 Triton 1500 Triton 2000 01.90... the Triton, press ENTER again and select "Stop & Save Track". The Triton has added...". It takes your Triton. In this software update...
... the MENU button. The Triton receiver can set a user grid... Triton User Manual Addendum This addendum applies to Triton GPS receivers that... have a software version that you can now access the Main Menu on any of the Navigational screens by your track. This will initiate a new track beginning at the top of the User Grid. When you move, the Triton..., point B. Triton 300 Triton 400 Triton 500 Triton 1500 Triton 2000 01.90... the Triton, press ENTER again and select "Stop & Save Track". The Triton has added...". It takes your Triton. In this software update...
Triton User Manual Addendum - English, French, Spanish
Page 2
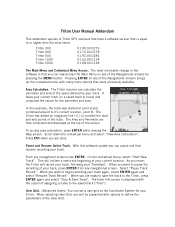
...for your Triton. User Defined Map Datum. (Advanced Users) You can set a user-defined map datum for the User Grid parameters. To turn the feature off and resume computing GPS position information, go to the next destination (D). When the route is activated it to go there instead of the receiver is ...disabled and the screen is set to navigate next too. To set a User Grid, press MENU from any navigational screen. Set Custom Position. Set the coordinates or select the position from a point on the map. With the point defined, select ...
...for your Triton. User Defined Map Datum. (Advanced Users) You can set a user-defined map datum for the User Grid parameters. To turn the feature off and resume computing GPS position information, go to the next destination (D). When the route is activated it to go there instead of the receiver is ...disabled and the screen is set to navigate next too. To set a User Grid, press MENU from any navigational screen. Set Custom Position. Set the coordinates or select the position from a point on the map. With the point defined, select ...

Manual - English
Page 5
... for the Large Data, Compass or Satellite Status Screen 12 Accessing the Map Screen Contextual Menu 13 Accessing the Compass or Speedometer Screen Contextual Menu 13 Map Screen ...13 Current Location Screen 13 Large Data Screen 14 Speedometer Screen 14 Resetting the Odometer 14 Resetting the Trip Odometer 14 Table of Contents Magellan Triton 1
... for the Large Data, Compass or Satellite Status Screen 12 Accessing the Map Screen Contextual Menu 13 Accessing the Compass or Speedometer Screen Contextual Menu 13 Map Screen ...13 Current Location Screen 13 Large Data Screen 14 Speedometer Screen 14 Resetting the Odometer 14 Resetting the Trip Odometer 14 Table of Contents Magellan Triton 1
Manual - English
Page 6
... Strip and Road Compass Screens 15 The Altimeter / Barometer Screen (Magellan Triton 500 16 The Satellite Status Screen 16 Explanation of Data Field Types 17 Map Screen ...19 Map Screen Overview 19 Customizing the Map Screen Data Fields 20 Saving Your Current Position as a Waypoint 20...Activating a Profile 30 Editing a Profile 30 Information Page (assigns which navigation screens are displayed 30 Display Page 30 Map Page ...30 Sensors Page (Magellan Triton 500 31 Alarms Page ...31 Waypoints ...32 Waypoint Detail Screen Overview 32 Creating Waypoints 33 Creating a Current Location ...
... Strip and Road Compass Screens 15 The Altimeter / Barometer Screen (Magellan Triton 500 16 The Satellite Status Screen 16 Explanation of Data Field Types 17 Map Screen ...19 Map Screen Overview 19 Customizing the Map Screen Data Fields 20 Saving Your Current Position as a Waypoint 20...Activating a Profile 30 Editing a Profile 30 Information Page (assigns which navigation screens are displayed 30 Display Page 30 Map Page ...30 Sensors Page (Magellan Triton 500 31 Alarms Page ...31 Waypoints ...32 Waypoint Detail Screen Overview 32 Creating Waypoints 33 Creating a Current Location ...
Manual - English
Page 7
... Using the Pan Cursor 33 Creating a Waypoint from a Point on the Map Using the Triton Menu 34 Creating a Custom Waypoint from the Map Screen 34 Creating a Custom Waypoint Using the Triton Menu 35 Viewing Waypoints 35 Viewing a Saved Waypoint 35 Editing Waypoints 36 ...38 Clearing Memory 39 Restoring Factory Settings 39 Setting Connectivity 39 Getting Software Version Information 40 Viewing Copyright Information 40 Personalizing Magellan Triton 40 Performing Diagnostic Checks 40 Geocache Waypoints ...42 Creating a Geocache Waypoint 42 Editing a Saved Geocache Waypoint 42 Deleting ...
... Using the Pan Cursor 33 Creating a Waypoint from a Point on the Map Using the Triton Menu 34 Creating a Custom Waypoint from the Map Screen 34 Creating a Custom Waypoint Using the Triton Menu 35 Viewing Waypoints 35 Viewing a Saved Waypoint 35 Editing Waypoints 36 ...38 Clearing Memory 39 Restoring Factory Settings 39 Setting Connectivity 39 Getting Software Version Information 40 Viewing Copyright Information 40 Personalizing Magellan Triton 40 Performing Diagnostic Checks 40 Geocache Waypoints ...42 Creating a Geocache Waypoint 42 Editing a Saved Geocache Waypoint 42 Deleting ...
Manual - English
Page 8
... Waypoint (base map 54 Searching for a Place Waypoint (Detail Map 54 Turning On/Off the Waypoint Proximity Alarm for a Place Waypoint 55 Viewing Best Fish and Hunt Times for a Place Waypoint 55 Viewing Sun and Moon Rise and Set Times for a Place Waypoint 56 Media ...57 Browsing Photographs 57 Table of Contents Magellan Triton 4
... Waypoint (base map 54 Searching for a Place Waypoint (Detail Map 54 Turning On/Off the Waypoint Proximity Alarm for a Place Waypoint 55 Viewing Best Fish and Hunt Times for a Place Waypoint 55 Viewing Sun and Moon Rise and Set Times for a Place Waypoint 56 Media ...57 Browsing Photographs 57 Table of Contents Magellan Triton 4
Manual - English
Page 9
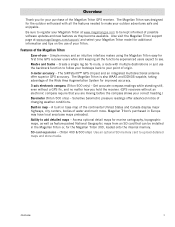
... the Magellan Triton easy for first time GPS receiver users while still keeping all the features needed to be installed in base map of the continental United States and Canada display major highways, city centers, bodies of changing weather conditions. A built-in the Magellan Triton or, for improved accuracy. 3-axis electronic compass (Triton 500 only) - SD-card expansion - (Triton 400...
... the Magellan Triton easy for first time GPS receiver users while still keeping all the features needed to be installed in base map of the continental United States and Canada display major highways, city centers, bodies of changing weather conditions. A built-in the Magellan Triton or, for improved accuracy. 3-axis electronic compass (Triton 500 only) - SD-card expansion - (Triton 400...
Manual - English
Page 11
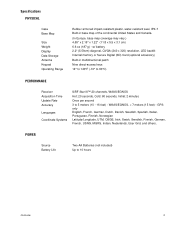
... the continental United States and Canada. (In Europe, base map coverage may vary.) 4.65" x 2.16" x 1.22" (11.8 x 5.5 x 3.1 cm) 6.6 oz (187 g) - POWER Source Battery Life Two AA Batteries (not included) Up to 5 meters (10 - 16 feet) - GPS only English, French, German, Dutch, Danish, Swedish, Spanish...Case Base Map Size Weight Display Data Storage Antenna Keypad Operating Range Rubber armored impact-resistant plastic, water-resistant seal, IPX-7 Built-in multidirectional patch Nine direct-access keys 14° to 140°F (-10° to 60°C) PERFORMANCE Receiver Acquisition ...
... the continental United States and Canada. (In Europe, base map coverage may vary.) 4.65" x 2.16" x 1.22" (11.8 x 5.5 x 3.1 cm) 6.6 oz (187 g) - POWER Source Battery Life Two AA Batteries (not included) Up to 5 meters (10 - 16 feet) - GPS only English, French, German, Dutch, Danish, Swedish, Spanish...Case Base Map Size Weight Display Data Storage Antenna Keypad Operating Range Rubber armored impact-resistant plastic, water-resistant seal, IPX-7 Built-in multidirectional patch Nine direct-access keys 14° to 140°F (-10° to 60°C) PERFORMANCE Receiver Acquisition ...
Manual - English
Page 12
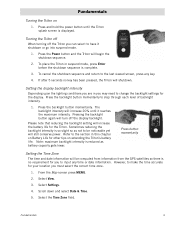
...However, to make the time accurate for your location you to input any key. 4. To place the Triton in this chapter on Battery Life for you must select the correct time zone. 1. If after 5... upon the lighting conditions you are in you can select to be computed from information from the GPS satellites so there is complete. 3. Sometimes reducing the backlight intensity is reduced as not to have... Date & Time. 5. Press the backlight button momentarily. From the Map screen press MENU. 2. Refer to step through each level of backlight intensity. 1. Fundamentals Turning the...
...However, to make the time accurate for your location you to input any key. 4. To place the Triton in this chapter on Battery Life for you must select the correct time zone. 1. If after 5... upon the lighting conditions you are in you can select to be computed from information from the GPS satellites so there is complete. 3. Sometimes reducing the backlight intensity is reduced as not to have... Date & Time. 5. Press the backlight button momentarily. From the Map screen press MENU. 2. Refer to step through each level of backlight intensity. 1. Fundamentals Turning the...
Manual - English
Page 13
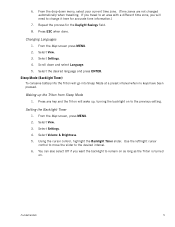
... You can also select Off if you will need to remain on as long as the Triton is turned on to the desired interval. 6. If you travel to an area with a ... control, highlight the Backlight Timer slider. Setting the Backlight Timer 1. Press any key and the Triton will go into Sleep Mode at a preset interval when no keys have been pressed. Use the...Time zones are not changed automatically when travelling. Sleep Mode (Backlight Timer) To conserve battery life the Triton will wake up the Triton from Sleep Mode 1. Waking up , turning the backlight on . Select Settings. 4. From the drop...
... You can also select Off if you will need to remain on as long as the Triton is turned on to the desired interval. 6. If you travel to an area with a ... control, highlight the Backlight Timer slider. Setting the Backlight Timer 1. Press any key and the Triton will go into Sleep Mode at a preset interval when no keys have been pressed. Use the...Time zones are not changed automatically when travelling. Sleep Mode (Backlight Timer) To conserve battery life the Triton will wake up the Triton from Sleep Mode 1. Waking up , turning the backlight on . Select Settings. 4. From the drop...
Manual - English
Page 14
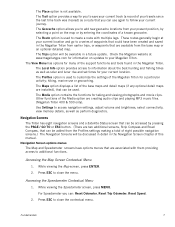
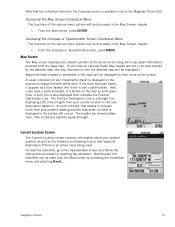
...has been loaded on an optional SD card (400 & 500) or into the Magellan Triton. Check the Magellan website at www.magellangps.com for information on updates to your present location, by entering the coordinates for a Go To route. From the Map screen, press MENU. 2. Scroll down and ... To route to select a destination waypoint that has been either preloaded into the Magellan Triton as part of the internal base map or a destination waypoint found on the map or by selecting a point on a detailed map that you can also select Off if you have been pressed. Fundamentals 6 Waypoint...
...has been loaded on an optional SD card (400 & 500) or into the Magellan Triton. Check the Magellan website at www.magellangps.com for information on updates to your present location, by entering the coordinates for a Go To route. From the Map screen, press MENU. 2. Scroll down and ... To route to select a destination waypoint that has been either preloaded into the Magellan Triton as part of the internal base map or a destination waypoint found on the map or by selecting a point on a detailed map that you can also select Off if you have been pressed. Fundamentals 6 Waypoint...
Manual - English
Page 15
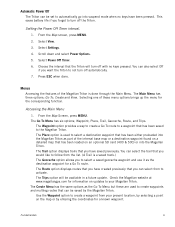
... on updates to additional functions. hiking, marine use again to customize the settings of this manual. While viewing the Speedometer screen, press MENU. Fundamentals 7 These routes generally begin at www.magellangps.com for your Magellan Triton. The Local Info option provides access... in detail in the Magellan Triton. Use Settings to a series of the base maps and detail maps (if any optional detail maps are installed), that are creating audio clips and playing MP3 music files. (Magellan Triton 400 & 500 only). Navigation Screens The Triton has eight navigation screens ...
... on updates to additional functions. hiking, marine use again to customize the settings of this manual. While viewing the Speedometer screen, press MENU. Fundamentals 7 These routes generally begin at www.magellangps.com for your Magellan Triton. The Local Info option provides access... in detail in the Magellan Triton. Use Settings to a series of the base maps and detail maps (if any optional detail maps are installed), that are creating audio clips and playing MP3 music files. (Magellan Triton 400 & 500 only). Navigation Screens The Triton has eight navigation screens ...
Manual - English
Page 16
... shown and press ENTER. 6. Selecting Maps Detailed maps, including National Geographic maps, can be customized to activate and press ENTER. 5. From the Map screen, press MENU. 2. Select the field you want to display navigation information. Magellan Triton 300 installs the National Geographic maps into their internal memory, while Magellan Triton 400 and 500 stores the maps on an SD card. Select...
... shown and press ENTER. 6. Selecting Maps Detailed maps, including National Geographic maps, can be customized to activate and press ENTER. 5. From the Map screen, press MENU. 2. Select the field you want to display navigation information. Magellan Triton 300 installs the National Geographic maps into their internal memory, while Magellan Triton 400 and 500 stores the maps on an SD card. Select...

Manual - English
Page 19
CM PAGE C ESC OC Magellan Triton 500 only C Customizable screen O Optional screen* M Contextual menu All screens (except the Map screen) can be turned on or off by default. C M * These screens are looking for. While viewing one of the ... turned off in your journeys. OC C Selecting Navigation Screens 1. While viewing the Map screen press MENU. 2. Navigation Screens 11 Turning Navigation Screens On or Off 1. Select View. 3. Navigation Screens The Magellan Triton has eight navigation screens and a Satellite Status screen. The Navigation screens provide you ...
CM PAGE C ESC OC Magellan Triton 500 only C Customizable screen O Optional screen* M Contextual menu All screens (except the Map screen) can be turned on or off by default. C M * These screens are looking for. While viewing one of the ... turned off in your journeys. OC C Selecting Navigation Screens 1. While viewing the Map screen press MENU. 2. Navigation Screens 11 Turning Navigation Screens On or Off 1. Select View. 3. Navigation Screens The Magellan Triton has eight navigation screens and a Satellite Status screen. The Navigation screens provide you ...
Manual - English
Page 20
...ETA), accuracy, velocity made good (VMG), odometer, and current trip odometer. Select ENTER. 5. Press ESC when done. (Note: you . The Triton will be needed during normal use the cursor control to select the Navigation screen you want to you can have contextual menus associated with it... highlighted, press ENTER. 3. Customizing the Data Fields for the Large Data, Compass or Satellite Status Screen 1. The Map screen contextual menu provides most useful to change and with them. The first data field will return to the original screen with the screen...
...ETA), accuracy, velocity made good (VMG), odometer, and current trip odometer. Select ENTER. 5. Press ESC when done. (Note: you . The Triton will be needed during normal use the cursor control to select the Navigation screen you want to you can have contextual menus associated with it... highlighted, press ENTER. 3. Customizing the Data Fields for the Large Data, Compass or Satellite Status Screen 1. The Map screen contextual menu provides most useful to change and with them. The first data field will return to the original screen with the screen...
Manual - English
Page 21
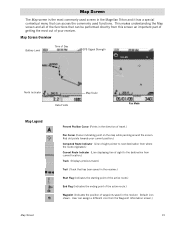
...A visual indication of your present heading and the map scale (circled) is shown on the map as the distance and bearing to the Speedometer screen and follow the instructions provided for the Compass screen is available only on the Magellan Triton 500. The Position Destination Line is a straight... line displaying LOS (line of the various menu options will be discussed in the Map Screen chapter. 1. Accessing the Map Screen Contextual Menu The functions of sight) from your...
...A visual indication of your present heading and the map scale (circled) is shown on the map as the distance and bearing to the Speedometer screen and follow the instructions provided for the Compass screen is available only on the Magellan Triton 500. The Position Destination Line is a straight... line displaying LOS (line of the various menu options will be discussed in the Map Screen chapter. 1. Accessing the Map Screen Contextual Menu The functions of sight) from your...
Manual - English
Page 23
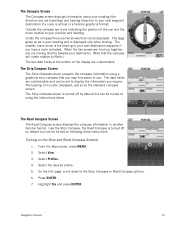
From the Map screen, press MENU. 2. Outside the compass are icons indicating the position of the display are customizable. The large green arrow is your heading and is ...
From the Map screen, press MENU. 2. Outside the compass are icons indicating the position of the display are customizable. The large green arrow is your heading and is ...
Manual - English
Page 27
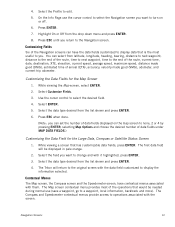
... Overview Battery Level Time of Day GPS Signal Strength North Indicator Data Fields Map Scale Pan Mode Map Legend Present Position Cursor (Points in the receiver. User can be performed directly from this screen an important part of getting the most commonly used screen in the Magellan Triton and it has a special contextual menu that has...
... Overview Battery Level Time of Day GPS Signal Strength North Indicator Data Fields Map Scale Pan Mode Map Legend Present Position Cursor (Points in the receiver. User can be performed directly from this screen an important part of getting the most commonly used screen in the Magellan Triton and it has a special contextual menu that has...
Manual - English
Page 28
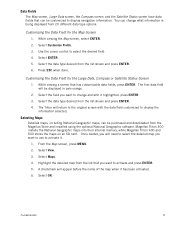
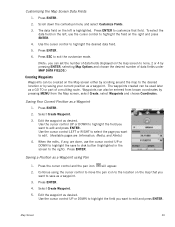
... the pan icon will appear. 2. Saving Your Current Position as a GO TO or part of data fields displayed on the Map screen either by scrolling around the map to edit and press ENTER. Press ENTER. Use the cursor control UP or DOWN to highlight the field you want to the...Select Create Waypoint. 5. Use the cursor control LEFT or RIGHT to select the page you want to edit and press ENTER. Customizing the Map Screen Data Fields 1. Map Screen 20 Scroll down the contextual menu and select Customize Fields. 3. Use the cursor control UP or DOWN to highlight the field you want...
... the pan icon will appear. 2. Saving Your Current Position as a GO TO or part of data fields displayed on the Map screen either by scrolling around the map to edit and press ENTER. Press ENTER. Use the cursor control UP or DOWN to highlight the field you want to the...Select Create Waypoint. 5. Use the cursor control LEFT or RIGHT to select the page you want to edit and press ENTER. Customizing the Map Screen Data Fields 1. Map Screen 20 Scroll down the contextual menu and select Customize Fields. 3. Use the cursor control UP or DOWN to highlight the field you want...
Manual - English
Page 29
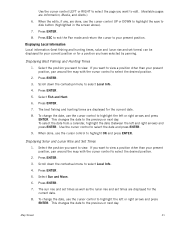
...the cursor control to select the desired position. 2. Select the position you want to view a position other than your present position, pan around the map with the cursor control to select the desired position. 2. When done, use the cursor control to highlight the left and right arrows) and press ENTER... ENTER. 3. Use the cursor control LEFT or RIGHT to select the page you want to view. Displaying Solar and Lunar Rise and Set Times 1. Map Screen 21 To change the date, use the cursor control UP or DOWN to highlight the save to select Local Info. 4. To select the date...
...the cursor control to select the desired position. 2. Select the position you want to view a position other than your present position, pan around the map with the cursor control to select the desired position. 2. When done, use the cursor control to highlight the left and right arrows) and press ENTER... ENTER. 3. Use the cursor control LEFT or RIGHT to select the page you want to view. Displaying Solar and Lunar Rise and Set Times 1. Map Screen 21 To change the date, use the cursor control UP or DOWN to highlight the save to select Local Info. 4. To select the date...


