Triton User Manual Addendum - English, French, Spanish
Page 1
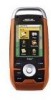
... begin recording your current track (or a saved track or route) and computes the values for your track, press ENTER from any navigational screen. User Grid. (Advanced Users) You can set a user grid as the Coordinate System for the perimeter and area. It takes your track again, select ENTER again and select "Resume Track Record". To access area calculation, press ENTER while viewing the Map screen. Scroll down the contextual menu and select "View Area Calculation". On the contextual menu, select "Start New Track...
... begin recording your current track (or a saved track or route) and computes the values for your track, press ENTER from any navigational screen. User Grid. (Advanced Users) You can set a user grid as the Coordinate System for the perimeter and area. It takes your track again, select ENTER again and select "Resume Track Record". To access area calculation, press ENTER while viewing the Map screen. Scroll down the contextual menu and select "View Area Calculation". On the contextual menu, select "Start New Track...
Triton User Manual Addendum - English, French, Spanish
Page 2
... map datum. To view a custom position, step through the destinations in this case (C). You can now select which point in a Multileg Route. Press ENTER. Set the coordinates or select the position from the contextual menu. Provide the settings for the User Grid parameters. Set Custom Position. Additionally, if you will be displayed with four legs, A to B to C to D to navigate next too. Provide the information for the datum. When selecting a user datum, you change your present position. Select "Set Custom Position" from a point...
... map datum. To view a custom position, step through the destinations in this case (C). You can now select which point in a Multileg Route. Press ENTER. Set the coordinates or select the position from the contextual menu. Provide the settings for the User Grid parameters. Set Custom Position. Additionally, if you will be displayed with four legs, A to B to C to D to navigate next too. Provide the information for the datum. When selecting a user datum, you change your present position. Select "Set Custom Position" from a point...
Manual - English
Page 5
...4 Setting the Time Zone 4 Changing Languages 5 Sleep Mode (Backlight Timer 5 Waking up the Triton from Sleep Mode 5 Setting the Backlight Timer 5 Automatic Power Off 6 Setting the Power Off Timer interval 6 Flashlight ...7 Turning the flashlight on or off 7 Menus ...7 Accessing the Main Menu 7 Navigation Screens 8 Accessing the Map Screen Contextual Menu 8 Accessing the Speedometer Contextual Menu 8 Data Fields ...9 Customizing the Data Field for the Map Screen 9 Customizing the Data Field for the Large Data, Compass or Satellite Status Screen .. 9 Selecting Maps ...9 Battery Life...
...4 Setting the Time Zone 4 Changing Languages 5 Sleep Mode (Backlight Timer 5 Waking up the Triton from Sleep Mode 5 Setting the Backlight Timer 5 Automatic Power Off 6 Setting the Power Off Timer interval 6 Flashlight ...7 Turning the flashlight on or off 7 Menus ...7 Accessing the Main Menu 7 Navigation Screens 8 Accessing the Map Screen Contextual Menu 8 Accessing the Speedometer Contextual Menu 8 Data Fields ...9 Customizing the Data Field for the Map Screen 9 Customizing the Data Field for the Large Data, Compass or Satellite Status Screen .. 9 Selecting Maps ...9 Battery Life...

Manual - English
Page 6
... Resetting the Trip Odometer 15 Resetting Maximum Speed 15 The Compass Screen 16 The Strip Compass Screen 16 The Road Compass Screen 16 Turning on the Strip and Road Compass Screens 16 The Altimeter / Barometer Screen (Magellan Triton 2000 17 The Satellite Status Screen 17 Explanation of Data Field Types 18 Map Screen ...20 Map Screen Overview 20 Customizing the Map Screen Data Fields 21 Saving Your Current Position as a Waypoint 21 Saving a Position as a Waypoint using Pan 21 Displaying Best Fishing and Hunting Times 22 Displaying Solar and Lunar Rise and Set Times 22 Creating...
... Resetting the Trip Odometer 15 Resetting Maximum Speed 15 The Compass Screen 16 The Strip Compass Screen 16 The Road Compass Screen 16 Turning on the Strip and Road Compass Screens 16 The Altimeter / Barometer Screen (Magellan Triton 2000 17 The Satellite Status Screen 17 Explanation of Data Field Types 18 Map Screen ...20 Map Screen Overview 20 Customizing the Map Screen Data Fields 21 Saving Your Current Position as a Waypoint 21 Saving a Position as a Waypoint using Pan 21 Displaying Best Fishing and Hunting Times 22 Displaying Solar and Lunar Rise and Set Times 22 Creating...
Manual - English
Page 7
... the Map Screen 35 Creating a Custom Waypoint Using the Triton Menu 36 Viewing Waypoints 36 Viewing a Saved Waypoint 36 Editing Waypoints 37 Editing a Saved Waypoint 37 Deleting a Saved Waypoint 37 Deleting a Saved Waypoint (Alternate Method 37 Deleting All Saved Waypoints 38 Duplicating a Saved Waypoint 38 Settings ...39 Customizing Navigation Settings 39 Setting Volume and Brightness 39 View Memory Usage 39 Clearing Memory 40 Restoring Factory Settings 40 Setting Connectivity 40 Getting Software Version Information 41 Viewing Copyright Information 41 Personalizing Magellan...
... the Map Screen 35 Creating a Custom Waypoint Using the Triton Menu 36 Viewing Waypoints 36 Viewing a Saved Waypoint 36 Editing Waypoints 37 Editing a Saved Waypoint 37 Deleting a Saved Waypoint 37 Deleting a Saved Waypoint (Alternate Method 37 Deleting All Saved Waypoints 38 Duplicating a Saved Waypoint 38 Settings ...39 Customizing Navigation Settings 39 Setting Volume and Brightness 39 View Memory Usage 39 Clearing Memory 40 Restoring Factory Settings 40 Setting Connectivity 40 Getting Software Version Information 41 Viewing Copyright Information 41 Personalizing Magellan...

Manual - English
Page 9
... advanced notice of the Magellan Triton 2.7" color touch screen - Use an optional SD memory card to upload detailed maps and store media. 2 mega-pixel camera - (Triton 2000 only) Take clear beautiful pictures or videos of possible software updates and new features as you explore. Plug in any standard 1/8" headphones (optional accessory) to make your adventure as you navigate and attach them to waypoints, share with multiple...
... advanced notice of the Magellan Triton 2.7" color touch screen - Use an optional SD memory card to upload detailed maps and store media. 2 mega-pixel camera - (Triton 2000 only) Take clear beautiful pictures or videos of possible software updates and new features as you explore. Plug in any standard 1/8" headphones (optional accessory) to make your adventure as you navigate and attach them to waypoints, share with multiple...
Manual - English
Page 13
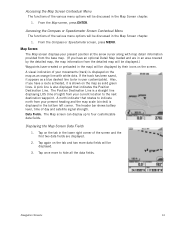
... the previous setting. Repeat the process for accurate time information.) 7. From the Map screen press MENU. 2. Select the desired language and press ENTER. Sleep Mode (Backlight Timer) To conserve battery life the Triton will need to the desired interval. 6. Changing Languages 1. From the drop-down and select Language. 5. Waking up , turning the backlight on . Setting the Backlight Timer 1. Use the left/right cursor control to move the slider to change it here for the Daylight Savings field. 8. Select Settings. 4. Select Settings. 4. Fundamentals...
... the previous setting. Repeat the process for accurate time information.) 7. From the Map screen press MENU. 2. Select the desired language and press ENTER. Sleep Mode (Backlight Timer) To conserve battery life the Triton will need to the desired interval. 6. Changing Languages 1. From the drop-down and select Language. 5. Waking up , turning the backlight on . Setting the Backlight Timer 1. Use the left/right cursor control to move the slider to change it here for the Daylight Savings field. 8. Select Settings. 4. Select Settings. 4. Fundamentals...

Manual - English
Page 15
... that you need quick access to create a waypoint from your Magellan Triton. The Trips option will be saved by entering the coordinates for information on updates to create waypoints and multileg routes that has been loaded on the Magellan Triton. Go To, Create and View. The Place option is not available. Press the button momentarily to control the backlight setting, press and hold for 4 seconds again to select a saved geocache waypoint and use it is recommended...
... that you need quick access to create a waypoint from your Magellan Triton. The Trips option will be saved by entering the coordinates for information on updates to create waypoints and multileg routes that has been loaded on the Magellan Triton. Go To, Create and View. The Place option is not available. Press the button momentarily to control the backlight setting, press and hold for 4 seconds again to select a saved geocache waypoint and use it is recommended...
Manual - English
Page 16
... functions. The Geocache option allows you can : Reset Odometer, Reset Trip Odometer, Reset Speed. 2. Check the Magellan website at your Magellan Triton. Navigation Screen options menus The Map and Speedometer screens have been created and saved in the Navigation Screen chapter of waypoints that you to add new geocache locations from your present position, by selecting a point on updates to your current location and go to access navigation settings, adjust volume and brightness, select connectivity, view memory details, as well as solar and lunar rise and set times for taking...
... functions. The Geocache option allows you can : Reset Odometer, Reset Trip Odometer, Reset Speed. 2. Check the Magellan website at your Magellan Triton. Navigation Screen options menus The Map and Speedometer screens have been created and saved in the Navigation Screen chapter of waypoints that you to add new geocache locations from your present position, by selecting a point on updates to your current location and go to access navigation settings, adjust volume and brightness, select connectivity, view memory details, as well as solar and lunar rise and set times for taking...
Manual - English
Page 21
... (save a waypoint, go to the Navigation screen. Press ESC until you want to display the information selected. Customizing the Data Fields for the Large Data, Compass or Satellite Status Screen 1. While viewing the Map screen, select ENTER. 2. Select the data type desired from latitude, longitude, heading, bearing, distance to next waypoint, distance to the end of the route, time to next waypoint, time to the end of the route, current time, date, destination, XTE, elevation, current speed, average speed, maximum speed, distance made good (VMG), odometer, and current trip...
... (save a waypoint, go to the Navigation screen. Press ESC until you want to display the information selected. Customizing the Data Fields for the Large Data, Compass or Satellite Status Screen 1. While viewing the Map screen, select ENTER. 2. Select the data type desired from latitude, longitude, heading, bearing, distance to next waypoint, distance to the end of the route, time to next waypoint, time to the end of the route, current time, date, destination, XTE, elevation, current speed, average speed, maximum speed, distance made good (VMG), odometer, and current trip...
Manual - English
Page 22
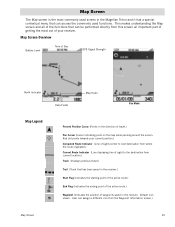
... satellite signal strength. The Map screen can display up to indicate north from your present heading and the map scale (circled) is a straight line displaying LOS (line of sight) from the detailed map will be displayed.) Waypoints (user-created or preloaded in the map) will be displayed by the detailed map, the map information from your current location to hide all the data fields. Navigation Screens 14 If the track has been saved, it is user customizable). Data Fields...
... satellite signal strength. The Map screen can display up to indicate north from your present heading and the map scale (circled) is a straight line displaying LOS (line of sight) from the detailed map will be displayed.) Waypoints (user-created or preloaded in the map) will be displayed by the detailed map, the map information from your current location to hide all the data fields. Navigation Screens 14 If the track has been saved, it is user customizable). Data Fields...
Manual - English
Page 24
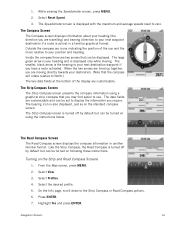
... Compass Screen The Road Compass screen displays the compass information in a familiar graphical format. Press ENTER. 7. Outside the compass are customizable and can be set to your position and heading. When the two arrows are lined up together, you have a route activated. The data fields are icons indicating the position of the display are customizable. Select View. 3. Navigation Screens 16 The Compass Screen The Compass screen displays information about your next destination waypoint if you are travelling) and bearing (direction to display...
... Compass Screen The Road Compass screen displays the compass information in a familiar graphical format. Press ENTER. 7. Outside the compass are customizable and can be set to your position and heading. When the two arrows are lined up together, you have a route activated. The data fields are icons indicating the position of the display are customizable. Select View. 3. Navigation Screens 16 The Compass Screen The Compass screen displays information about your next destination waypoint if you are travelling) and bearing (direction to display...
Manual - English
Page 28
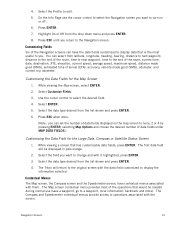
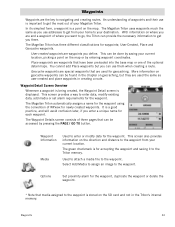
....) Current Route Indicator (Line displaying line of travel .) Trail (Track that can access the commonly used screen in the receiver. User can assign a different icon from current location.) Track (Displays previous travel .) Pan Cursor (Cursor indicating point on the map while panning around the screen. Map Screen Overview Battery Level Time of Day GPS Signal Strength North Indicator Data Fields Map Scale Pan Mode Map Legend Present Position Cursor (Points in the direction of sight to the destination from the Waypoint Information screen.) Map Screen 20 Default icon shown...
....) Current Route Indicator (Line displaying line of travel .) Trail (Track that can access the commonly used screen in the receiver. User can assign a different icon from current location.) Track (Displays previous travel .) Pan Cursor (Cursor indicating point on the map while panning around the screen. Map Screen Overview Battery Level Time of Day GPS Signal Strength North Indicator Data Fields Map Scale Pan Mode Map Legend Present Position Cursor (Points in the direction of sight to the destination from the Waypoint Information screen.) Map Screen 20 Default icon shown...
Manual - English
Page 29
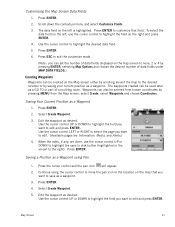
... disk button (highlighted in the screen to edit and press ENTER. Saving a Position as desired. Edit the waypoint as a Waypoint using the cursor control to move the pan icon to the location on the map screen to none, 2 or 4 by pressing ENTER, selecting Map Options and choose the desired number of a multileg route. Use the cursor control UP or DOWN to highlight the field you can set the number of data fields displayed on the map that field...
... disk button (highlighted in the screen to edit and press ENTER. Saving a Position as desired. Edit the waypoint as a Waypoint using the cursor control to move the pan icon to the location on the map screen to none, 2 or 4 by pressing ENTER, selecting Map Options and choose the desired number of a multileg route. Use the cursor control UP or DOWN to highlight the field you can set the number of data fields displayed on the map that field...

Manual - English
Page 33
.... Resetting Speed and Odometers From the Map screen you want to North Up, Course Up, or Track Up. Press ENTER. 2. Setting Map Units of Measure The units of the display to change. 5. Waypoints on the map can be measured in Meters or Feet. (Magellan Triton 2000 only) Choose between showing four data fields, two data fields or turning them off , the Magellan Triton will continue to highlight the field you can be displayed as the unit of map detail can be turned on or off . Map Screen...
.... Resetting Speed and Odometers From the Map screen you want to North Up, Course Up, or Track Up. Press ENTER. 2. Setting Map Units of Measure The units of the display to change. 5. Waypoints on the map can be measured in Meters or Feet. (Magellan Triton 2000 only) Choose between showing four data fields, two data fields or turning them off , the Magellan Triton will continue to highlight the field you can be displayed as the unit of map detail can be turned on or off . Map Screen...
Manual - English
Page 41
... information on geocache waypoints can be done by entering waypoint coordinates. More information on the direction and distance to the waypoint from your home to enter data, modify existing data, add media or set alarm requirements for newly created waypoints. This screen provides a way to your current location, picking a point on where you are waypoints you can be found in the Triton's internal memory. Waypoint Information Media Used to navigating and creating routes. With information on the map or by saving your destination. Place waypoints...
... information on geocache waypoints can be done by entering waypoint coordinates. More information on the direction and distance to the waypoint from your home to enter data, modify existing data, add media or set alarm requirements for newly created waypoints. This screen provides a way to your current location, picking a point on where you are waypoints you can be found in the Triton's internal memory. Waypoint Information Media Used to navigating and creating routes. With information on the map or by saving your destination. Place waypoints...

Manual - English
Page 43
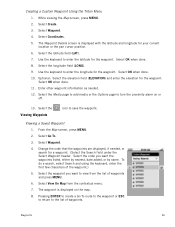
... Map Screen, press ENTER. 2. Select the Media page to add media or the Options page to save the waypoint. Select the icon to turn the proximity alarm on or off . 10. Select Point on the Map Using the Triton Menu 1. Select Create Waypoint. 3. Select Create. 3. Select the Media page to add media or the Options page to save the waypoint. Enter other waypoint information as needed . 10. Select OK when done. 8. Select the longitude field (LONG). 7. The Waypoint Details screen is displayed. Creating a Custom Waypoint from a Point on Map. 5. The Waypoint Details screen...
... Map Screen, press ENTER. 2. Select the Media page to add media or the Options page to save the waypoint. Select the icon to turn the proximity alarm on or off . 10. Select Point on the Map Using the Triton Menu 1. Select Create Waypoint. 3. Select Create. 3. Select the Media page to add media or the Options page to save the waypoint. Enter other waypoint information as needed . 10. Select OK when done. 8. Select the longitude field (LONG). 7. The Waypoint Details screen is displayed. Creating a Custom Waypoint from a Point on Map. 5. The Waypoint Details screen...
Manual - English
Page 44
... waypoint.) 5. Select Coordinates. 5. Select Go To. 3. Waypoints 36 Select Create. 3. Enter other waypoint information as needed , or search for the waypoint. Pressing ENTER to create a Go To route to the waypoint or ESC to return to save the waypoint. Creating a Custom Waypoint Using the Triton Menu 1. Select Waypoint. 4. Use the keyboard to view from the contextual menu. 7. Change the order that the waypoints are displayed, if needed . 12. Select the waypoint you want to enter the latitude for your current location or the pan cursor position. 6. While viewing...
... waypoint.) 5. Select Coordinates. 5. Select Go To. 3. Waypoints 36 Select Create. 3. Enter other waypoint information as needed , or search for the waypoint. Pressing ENTER to create a Go To route to the waypoint or ESC to return to save the waypoint. Creating a Custom Waypoint Using the Triton Menu 1. Select Waypoint. 4. Use the keyboard to view from the contextual menu. 7. Change the order that the waypoints are displayed, if needed . 12. Select the waypoint you want to enter the latitude for your current location or the pan cursor position. 6. While viewing...
Manual - English
Page 51
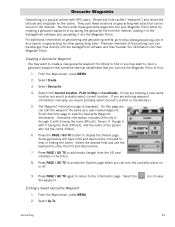
... geocache waypoints into the Magellan Triton. Select the desired field and use the Magellan Triton to http://www.geocaching.com or do a search on Map or Coordinates. (If you are entering waypoint information manually, you can turn the proximity alarm on the internet. Select the the waypoint. Select Go To. People will have hints and descriptions included to display the Details page. Select Geocache. 4. If you are marking a new cache location you can transfer.gpx files directly into the VantagePoint software...
... geocache waypoints into the Magellan Triton. Select the desired field and use the Magellan Triton to http://www.geocaching.com or do a search on Map or Coordinates. (If you are entering waypoint information manually, you can turn the proximity alarm on the internet. Select the the waypoint. Select Go To. People will have hints and descriptions included to display the Details page. Select Geocache. 4. If you are marking a new cache location you can transfer.gpx files directly into the VantagePoint software...

Manual - English
Page 56
... the deletion. (This does not remove the waypoint from the Triton's memory, only from the list of saved geocache waypoints and press ENTER. Select Go To. Point on Map: Use the arrow keys to use this waypoint. Press ENTER. Select the category (and subcategory if required). Select Add Point. 7. The same options as the starting location for the route. Use the keyboard to be used. The Route Create screen is displayed with a graphical representation of the route leg destinations: Select the destination waypoint...
... the deletion. (This does not remove the waypoint from the Triton's memory, only from the list of saved geocache waypoints and press ENTER. Select Go To. Point on Map: Use the arrow keys to use this waypoint. Press ENTER. Select the category (and subcategory if required). Select Add Point. 7. The same options as the starting location for the route. Use the keyboard to be used. The Route Create screen is displayed with a graphical representation of the route leg destinations: Select the destination waypoint...


