
User Manual
Page 14
... Resetting BIOS 37 Updating BIOS...37 EZ Mode...38 Advanced Mode 40 SETTINGS...41 Advanced...41 Boot...47 Security...48 Save & Exit...49 OC...50 M-FLASH...56 OC PROFILE...57 HARDWARE MONITOR 58 Software Description 59 Installing Windows® 7/ 8.1/ 10 59 Installing Drivers 59 Installing Utilities 59 COMMAND CENTER 60 LIVE UPDATE 6 64 M-CLOUD...66 RAMDISK...69 NETWORK GENIE 70 Intel® Extreme Tuning Utility 72 RAID Configuration 73 Using Intel® Rapid Storage Technology Option ROM...
... Resetting BIOS 37 Updating BIOS...37 EZ Mode...38 Advanced Mode 40 SETTINGS...41 Advanced...41 Boot...47 Security...48 Save & Exit...49 OC...50 M-FLASH...56 OC PROFILE...57 HARDWARE MONITOR 58 Software Description 59 Installing Windows® 7/ 8.1/ 10 59 Installing Drivers 59 Installing Utilities 59 COMMAND CENTER 60 LIVE UPDATE 6 64 M-CLOUD...66 RAMDISK...69 NETWORK GENIE 70 Intel® Extreme Tuning Utility 72 RAID Configuration 73 Using Intel® Rapid Storage Technology Option ROM...

User Manual
Page 15
SATA3~4 ports will be unavailable when installing the M.2 PCIe interface module in M.2 slot. Continued on next page Specifications 15 Specifications CPU Chipset Memory Expansion Slots Onboard Graphics Multi-GPU Storage Supports 6th Gen Intel® Core™ i3/i5/i7 processors, and Intel® Pentium® and Celeron® processors for Socket LGA1151 Intel® Z170 Express Chipset ●● 4x DDR4 memory slots, support up to 64GB ▶▶Supports DDR4 3200(OC)/ 3000...
SATA3~4 ports will be unavailable when installing the M.2 PCIe interface module in M.2 slot. Continued on next page Specifications 15 Specifications CPU Chipset Memory Expansion Slots Onboard Graphics Multi-GPU Storage Supports 6th Gen Intel® Core™ i3/i5/i7 processors, and Intel® Pentium® and Celeron® processors for Socket LGA1151 Intel® Z170 Express Chipset ●● 4x DDR4 memory slots, support up to 64GB ▶▶Supports DDR4 3200(OC)/ 3000...

User Manual
Page 16
...; Intel® Z170 Express Chipset ▶▶6x USB 3.1 Gen1 (SuperSpeed USB) ports (4 ports on the back panel, 2 ports available through the internal USB 3.1 Gen1 connector) ▶▶4x USB 2.0 (High-speed USB) ports available through the internal USB 2.0 connectors) ●● Realtek® ALC887 Codec ●● 7.1-Channel High Definition Audio 1x Realtek® RTL8111H Gigabit LAN controller ●● 1x PS/2 mouse port ●● 1x PS/2 keyboard port ●● 1x VGA port ●● 1x...
...; Intel® Z170 Express Chipset ▶▶6x USB 3.1 Gen1 (SuperSpeed USB) ports (4 ports on the back panel, 2 ports available through the internal USB 3.1 Gen1 connector) ▶▶4x USB 2.0 (High-speed USB) ports available through the internal USB 2.0 connectors) ●● Realtek® ALC887 Codec ●● 7.1-Channel High Definition Audio 1x Realtek® RTL8111H Gigabit LAN controller ●● 1x PS/2 mouse port ●● 1x PS/2 keyboard port ●● 1x VGA port ●● 1x...

User Manual
Page 18
...;Smart Fan Control ●● RAMDISK ●● LIVE UPDATE 6 ●● M-CLOUD ●● DDR4 Boost Support ▶▶Dual-Channel DDR4 Memory Support ▶▶Isolated DDR4 Circuit Design ▶▶DDR4 XMP Ready ●● PCI Express 3.0 Support ▶▶2-Way AMD CrossFireTM Support ●● USB 3.1 Gen2 Ready ▶▶USB 3.1 Gen2 (10 Gb/s) Type-A Ready ●● SATA Express Support ●● EZ Debug LED 18 Specifications
...;Smart Fan Control ●● RAMDISK ●● LIVE UPDATE 6 ●● M-CLOUD ●● DDR4 Boost Support ▶▶Dual-Channel DDR4 Memory Support ▶▶Isolated DDR4 Circuit Design ▶▶DDR4 XMP Ready ●● PCI Express 3.0 Support ▶▶2-Way AMD CrossFireTM Support ●● USB 3.1 Gen2 Ready ▶▶USB 3.1 Gen2 (10 Gb/s) Type-A Ready ●● SATA Express Support ●● EZ Debug LED 18 Specifications

User Manual
Page 33
... you plug a 3-pin (Non-PWM) fan to a PWM Mode fan connector, the fan speed will be always maintained at 100%, and that could be classified as PWM (Pulse Width Modulation) Mode and Voltage Mode. CPUFAN1~2,SYSFAN1~3: Fan Connectors Fan connectors can be noisy. Therefore, when you to adjust fan speed in relation to BIOS > HARDWARE MONITOR. BIOS > HARDWARE MONITOR Command Center Both ways offer gradient points of Components 33 Voltage Mode fan connectors control fan speed by changing voltage. One...
... you plug a 3-pin (Non-PWM) fan to a PWM Mode fan connector, the fan speed will be always maintained at 100%, and that could be classified as PWM (Pulse Width Modulation) Mode and Voltage Mode. CPUFAN1~2,SYSFAN1~3: Fan Connectors Fan connectors can be noisy. Therefore, when you to adjust fan speed in relation to BIOS > HARDWARE MONITOR. BIOS > HARDWARE MONITOR Command Center Both ways offer gradient points of Components 33 Voltage Mode fan connectors control fan speed by changing voltage. One...
User Manual
Page 37
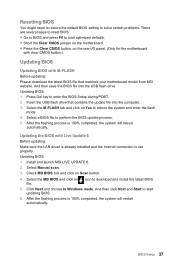
... and Start to download and install the latest BIOS 5. And then save the BIOS file into the computer. 3. Select the M-FLASH tab and click on the rear I/O panel. (Only for the motherboard with clear CMOS button.) Updating BIOS Updating BIOS with Live Update 6 Before updating: Make sure the LAN driver is already installed and the internet connection is set properly. Install and launch MSI LIVE UPDATE 6. 2. Click Next and choose In Windows mode. Select a BIOS file to enter the BIOS Setup during POST. 2. Resetting BIOS You...
... and Start to download and install the latest BIOS 5. And then save the BIOS file into the computer. 3. Select the M-FLASH tab and click on the rear I/O panel. (Only for the motherboard with clear CMOS button.) Updating BIOS Updating BIOS with Live Update 6 Before updating: Make sure the LAN driver is already installed and the internet connection is set properly. Install and launch MSI LIVE UPDATE 6. 2. Click Next and choose In Windows mode. Select a BIOS file to enter the BIOS Setup during POST. 2. Resetting BIOS You...
User Manual
Page 38
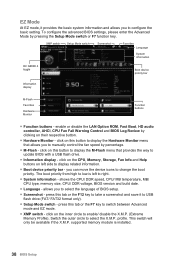
... or the F7 key to USB flash drive (FAT/ FAT32 format only). ●● Setup Mode switch - The boot priority from high to low is installed. 38 BIOS Setup shows the CPU/ DDR speed, CPU/ MB temperature, MB/ CPU type, memory size, CPU/ DDR voltage, BIOS version and build date. ●● Language - press this button to display the Hardware Monitor menu that provides the way to update BIOS with a USB flash drive. ●● Information display - profile. click on the CPU, Memory, Storage, Fan Info and Help...
... or the F7 key to USB flash drive (FAT/ FAT32 format only). ●● Setup Mode switch - The boot priority from high to low is installed. 38 BIOS Setup shows the CPU/ DDR speed, CPU/ MB temperature, MB/ CPU type, memory size, CPU/ DDR voltage, BIOS version and build date. ●● Language - press this button to display the Hardware Monitor menu that provides the way to update BIOS with a USB flash drive. ●● Information display - profile. click on the CPU, Memory, Storage, Fan Info and Help...

User Manual
Page 42
...;ACPI Settings Sets ACPI parameters of the onboard Power LED. [Dual Color] The power LED turns to another color to indicate the S3 state. [Blinking] The power LED blinks to enter the sub-menu. ▶▶Onboard LAN Controller [Enabled] Enables or disables the onboard LAN controller. ▶▶LAN Option ROM [Disabled] Enables or disables the legacy network Boot Option ROM for detailed settings. Press to indicate the S3 state. ▶▶Integrated Peripherals Sets integrated peripherals' parameters, such as Native Command Queuing (NCQ) and hot-plugging. [RAID Mode] Enables...
...;ACPI Settings Sets ACPI parameters of the onboard Power LED. [Dual Color] The power LED turns to another color to indicate the S3 state. [Blinking] The power LED blinks to enter the sub-menu. ▶▶Onboard LAN Controller [Enabled] Enables or disables the onboard LAN controller. ▶▶LAN Option ROM [Disabled] Enables or disables the legacy network Boot Option ROM for detailed settings. Press to indicate the S3 state. ▶▶Integrated Peripherals Sets integrated peripherals' parameters, such as Native Command Queuing (NCQ) and hot-plugging. [RAID Mode] Enables...
User Manual
Page 43
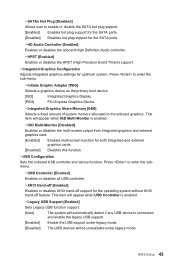
... legacy mode. [Disabled] The USB devices will automatically detect if any USB device is enabled. ▶▶IGD Multi-Monitor [Disabled] Enables or disables the multi-screen output from integrated graphics and external graphics card. [Enabled] Enables multi-screen function for optimum system. ▶▶SATAx Hot Plug [Disabled] Allows user to enable or disable the SATA hot plug support. [Enabled] Enables hot plug support for the SATA ports. [Disabled] Disables hot plug support for the SATA ports. ▶▶HD Audio Controller [Enabled] Enables or disables the onboard High...
... legacy mode. [Disabled] The USB devices will automatically detect if any USB device is enabled. ▶▶IGD Multi-Monitor [Disabled] Enables or disables the multi-screen output from integrated graphics and external graphics card. [Enabled] Enables multi-screen function for optimum system. ▶▶SATAx Hot Plug [Disabled] Allows user to enable or disable the SATA hot plug support. [Enabled] Enables hot plug support for the SATA ports. [Disabled] Disables hot plug support for the SATA ports. ▶▶HD Audio Controller [Enabled] Enables or disables the onboard High...
User Manual
Page 44
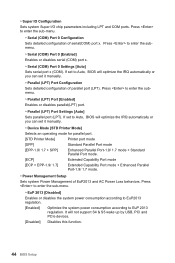
...Auto, BIOS will not support S4 & S5 wake up by USB, PCI and PCIe devices. [Disabled] Disables this function. 44 BIOS Setup It will optimize the IRQ automatically or you can set it manually. ▶▶Device Mode [STD Printer Mode] Selects an operating mode for parallel port. [STD Printer Mode] Printer port mode [SPP] Standard Parallel Port mode [EPP-1.9/ 1.7 + SPP] Enhanced Parallel Port-1.9/ 1.7 mode + Standard Parallel Port mode. [ECP] Extended Capability Port mode [ECP + EPP-1.9/ 1.7] Extended Capability Port mode + Enhanced Parallel Port-1.9/ 1.7 mode...
...Auto, BIOS will not support S4 & S5 wake up by USB, PCI and PCIe devices. [Disabled] Disables this function. 44 BIOS Setup It will optimize the IRQ automatically or you can set it manually. ▶▶Device Mode [STD Printer Mode] Selects an operating mode for parallel port. [STD Printer Mode] Printer port mode [SPP] Standard Parallel Port mode [EPP-1.9/ 1.7 + SPP] Enhanced Parallel Port-1.9/ 1.7 mode + Standard Parallel Port mode. [ECP] Extended Capability Port mode [ECP + EPP-1.9/ 1.7] Extended Capability Port mode + Enhanced Parallel Port-1.9/ 1.7 mode...

User Manual
Page 45
..., make sure all installed devices & utilities (hardware & software) should meet the Windows requirement. [Disabled] Disables this function. ▶▶MSI Fast Boot [Disabled] MSI Fast Boot is enabled. ▶▶Secure Boot Sets the Windows secure boot to accelerate system boot time. [Disabled] Disables the Fast Boot configuration. ▶▶Internal GOP Configuration Manages the onboard Graphics Output Protocol (GOP). Press to enter the sub-menu. ▶▶Windows 8.1/ 10 WHQL Support [Disabled] Enables the supports for Windows 8.1/ 10 or disables for Windows 8.1/ 10...
..., make sure all installed devices & utilities (hardware & software) should meet the Windows requirement. [Disabled] Disables this function. ▶▶MSI Fast Boot [Disabled] MSI Fast Boot is enabled. ▶▶Secure Boot Sets the Windows secure boot to accelerate system boot time. [Disabled] Disables the Fast Boot configuration. ▶▶Internal GOP Configuration Manages the onboard Graphics Output Protocol (GOP). Press to enter the sub-menu. ▶▶Windows 8.1/ 10 WHQL Support [Disabled] Enables the supports for Windows 8.1/ 10 or disables for Windows 8.1/ 10...
User Manual
Page 46
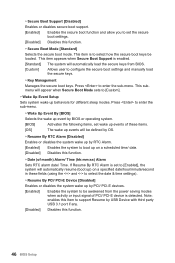
... Boot Mode sets to support Resume by USB Device with third party USB 3.1 port if any. [Disabled] Disables this Item to [Custom]. ▶▶Wake Up Event Setup Sets system wake up behaviors for different sleep modes. Note: enables this function. 46 BIOS Setup This item is to select how the secure boot keys be awakened from BIOS. [Custom] Allows user to enter the sub-menu. Press to configure the secure boot settings and manually load the secure keys. ▶▶Key...
... Boot Mode sets to support Resume by USB Device with third party USB 3.1 port if any. [Disabled] Disables this Item to [Custom]. ▶▶Wake Up Event Setup Sets system wake up behaviors for different sleep modes. Note: enables this function. 46 BIOS Setup This item is to select how the secure boot keys be awakened from BIOS. [Custom] Allows user to enter the sub-menu. Press to configure the secure boot settings and manually load the secure keys. ▶▶Key...

User Manual
Page 47
... system boot devices. ▶▶Full Screen Logo Display [Enabled] Enables or disables to show the full screen logo while system POST. [Enabled] Shows the logo in full screen. [Disabled] Shows the POST messages. ▶▶GO2BIOS [Disabled] Allows system to enter BIOS setup directly by pressing the Power button for 4 sec upon bootup. ▶▶Resume by USB Device [Disabled] Enables or disables the system wake up by USB devices. [Enabled] Enables the system to be awakened from sleep...
... system boot devices. ▶▶Full Screen Logo Display [Enabled] Enables or disables to show the full screen logo while system POST. [Enabled] Shows the logo in full screen. [Disabled] Shows the POST messages. ▶▶GO2BIOS [Disabled] Allows system to enter BIOS setup directly by pressing the Power button for 4 sec upon bootup. ▶▶Resume by USB Device [Disabled] Enables or disables the system wake up by USB devices. [Enabled] Enables the system to be awakened from sleep...
User Manual
Page 48
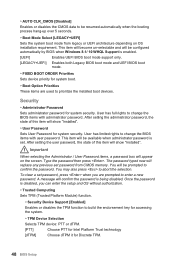
.... Type the password then press . To clear a set password from legacy or UEFI architecture depending on the screen. User has full rights to change the BIOS items with administrator password. This item will show "Installed". Security ▶▶Administrator Password Sets administrator password for system security. Once the password is enabled. [UEFI] Enables UEFI BIOS boot mode support only. [LEGACY+UEFI] Enables both Legacy BIOS boot mode and UEFI BIOS boot mode. ▶▶FIXED BOOT ORDER Priorities Sets device priority for Discrete TPM. 48 BIOS Setup...
.... Type the password then press . To clear a set password from legacy or UEFI architecture depending on the screen. User has full rights to change the BIOS items with administrator password. This item will show "Installed". Security ▶▶Administrator Password Sets administrator password for system security. Once the password is enabled. [UEFI] Enables UEFI BIOS boot mode support only. [LEGACY+UEFI] Enables both Legacy BIOS boot mode and UEFI BIOS boot mode. ▶▶FIXED BOOT ORDER Priorities Sets device priority for Discrete TPM. 48 BIOS Setup...

User Manual
Page 49
.... ▶▶Restore Defaults Restore or load all default values. ▶▶Boot Override The installed bootable devices will record and issue a warning message. [Reset] Clear the warning message. If set to Auto, BIOS will detect it automatically. ▶▶Chassis Intrusion Configuration Press to be the boot device. ▶▶Device select [Auto] Selects TPM 1.2 or TPM 2.0 for the chassis equips a chassis intrusion switch. [Enabled] Once the chassis is opened . After...
.... ▶▶Restore Defaults Restore or load all default values. ▶▶Boot Override The installed bootable devices will record and issue a warning message. [Reset] Clear the warning message. If set to Auto, BIOS will detect it automatically. ▶▶Chassis Intrusion Configuration Press to be the boot device. ▶▶Device select [Auto] Selects TPM 1.2 or TPM 2.0 for the chassis equips a chassis intrusion switch. [Enabled] Once the chassis is opened . After...

User Manual
Page 50
... Ratio [Auto] Sets the integrated graphics ratio. Note: We use OC GENIE 4 function for easy overclocking. ▶▶OC Explore Mode [Normal] Enables or disables to show the normal or expert version of OC settings. [Normal] Provides the regular OC settings in BIOS setup. [Expert] Provides the advanced OC settings for OC expert to configure in BIOS setup. This item can only be changed if the processor supports this function...
... Ratio [Auto] Sets the integrated graphics ratio. Note: We use OC GENIE 4 function for easy overclocking. ▶▶OC Explore Mode [Normal] Enables or disables to show the normal or expert version of OC settings. [Normal] Provides the regular OC settings in BIOS setup. [Expert] Provides the advanced OC settings for OC expert to configure in BIOS setup. This item can only be changed if the processor supports this function...

User Manual
Page 54
... bit. [Enabled] Locks the CFG lock bit. [Disabled] Un-locks the CFG lock bit. ▶▶EIST [Enabled] Enables or disables the Enhanced Intel® SpeedStep Technology. This item will be configured automatically by ACPI. [Auto] This setting will appear when OC Explore Mode is idle. C-state is a processor power management technology defined by BIOS. [C0~C8] The power-saving level from overheating. [Enabled] Throttles down the CPU core clock speed when the CPU is enabled. [Enabled] Enables...
... bit. [Enabled] Locks the CFG lock bit. [Disabled] Un-locks the CFG lock bit. ▶▶EIST [Enabled] Enables or disables the Enhanced Intel® SpeedStep Technology. This item will be configured automatically by ACPI. [Auto] This setting will appear when OC Explore Mode is idle. C-state is a processor power management technology defined by BIOS. [C0~C8] The power-saving level from overheating. [Enabled] Throttles down the CPU core clock speed when the CPU is enabled. [Enabled] Enables...

User Manual
Page 59
... disc into your optical drive from CD or DVD... Installing Utilities Before you install utilities, you want to install. 5. Click OK button to get into your optical drive. 2. For windows 8.1/ 10, skip this step. Press any key when screen shows Press any key to enabled, save changes and restart. 5. For Windows 7, access the BIOS menu SETTING > Advanced > Windows OS Configuration > Windows 7 Installation and set the item to boot from the Boot Menu. 7. Click Install button. 5. Click Install button. 6. The software installation will then be...
... disc into your optical drive from CD or DVD... Installing Utilities Before you install utilities, you want to install. 5. Click OK button to get into your optical drive. 2. For windows 8.1/ 10, skip this step. Press any key when screen shows Press any key to enabled, save changes and restart. 5. For Windows 7, access the BIOS menu SETTING > Advanced > Windows OS Configuration > Windows 7 Installation and set the item to boot from the Boot Menu. 7. Click Install button. 5. Click Install button. 6. The software installation will then be...

User Manual
Page 78
... all customized settings in Windows® Device Manager. ●● Connect the USB device to the motherboard? ●● Some power supply units have a power button on the rear side, make sure the LAN port LEDs are heard, remove all ATX power connectors like JPWR1~2 is set to install only one memory module in the DIMM2 slot first and then restart the computer. ●● If 1 long 2 short beeps are heard, remove and reinstall the graphics card and...
... all customized settings in Windows® Device Manager. ●● Connect the USB device to the motherboard? ●● Some power supply units have a power button on the rear side, make sure the LAN port LEDs are heard, remove all ATX power connectors like JPWR1~2 is set to install only one memory module in the DIMM2 slot first and then restart the computer. ●● If 1 long 2 short beeps are heard, remove and reinstall the graphics card and...
User Manual
Page 82
...guidance. ●● Visit the MSI website for technical guide, BIOS updates, driver updates, and other information: http://www.msi.com ●● Register your product at: http://register.msi.com Trademark Recognition All product names used in this manual are the properties of purchase or ...Version 1.0, 2015/06, First release. 82 Regulatory Notices The material in the preparation of this document is given as to make changes without notice. Copyright © 2015 All rights reserved. We take every care in this document, but no solution can be obtained from the user guide...
...guidance. ●● Visit the MSI website for technical guide, BIOS updates, driver updates, and other information: http://www.msi.com ●● Register your product at: http://register.msi.com Trademark Recognition All product names used in this manual are the properties of purchase or ...Version 1.0, 2015/06, First release. 82 Regulatory Notices The material in the preparation of this document is given as to make changes without notice. Copyright © 2015 All rights reserved. We take every care in this document, but no solution can be obtained from the user guide...


