
User Manual
Page 14
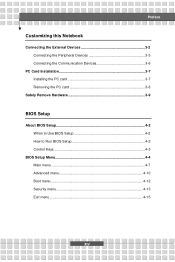
Preface Customizing this Notebook Connecting the External Devices 3-2 Connecting the Peripheral Devices 3-3 Connecting the Communication Devices 3-6 PC Card Installation 3-7 Installing the PC card 3-7 Removing the PC card 3-8 Safely Remove Hardware 3-9 BIOS Setup About BIOS Setup 4-2 When to Use BIOS Setup 4-2 How to Run BIOS Setup 4-2 Control Keys 4-3 BIOS Setup Menu 4-4 Main menu 4-7 Advanced menu 4-10 Boot menu 4-12 Security menu 4-13 Exit menu 4-15 XIV
Preface Customizing this Notebook Connecting the External Devices 3-2 Connecting the Peripheral Devices 3-3 Connecting the Communication Devices 3-6 PC Card Installation 3-7 Installing the PC card 3-7 Removing the PC card 3-8 Safely Remove Hardware 3-9 BIOS Setup About BIOS Setup 4-2 When to Use BIOS Setup 4-2 How to Run BIOS Setup 4-2 Control Keys 4-3 BIOS Setup Menu 4-4 Main menu 4-7 Advanced menu 4-10 Boot menu 4-12 Security menu 4-13 Exit menu 4-15 XIV
User Manual
Page 17
General Introductions Chapter 3, Customizing this Notebook, gives instructions not only in connecting the mouse, keyboard, webcam, printer, external monitor, IEEE 1394 devices, and communication devices, but also in installing and removing the PC card. Chapter 4, BIOS setup, provides information on BIOS Setup program and allows you to configure the system for optimum use. 1-3
General Introductions Chapter 3, Customizing this Notebook, gives instructions not only in connecting the mouse, keyboard, webcam, printer, external monitor, IEEE 1394 devices, and communication devices, but also in installing and removing the PC card. Chapter 4, BIOS setup, provides information on BIOS Setup program and allows you to configure the system for optimum use. 1-3
User Manual
Page 25
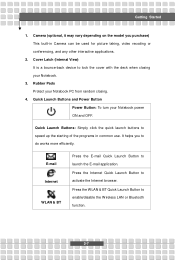
Rubber Pads Protect your Notebook PC from random closing your Notebook power ON and OFF. Camera (optional, it may vary depending on the model you to speed up the starting of the programs in Camera can ... Bluetooth function. 2-7 Press the WLAN & BT Quick Launch Button to activate the Internet browser. Quick Launch Buttons and Power Button Power Button: To turn your Notebook. 3. It helps you purchase) This built-in common use. Quick Launch Buttons: Simply click the quick launch buttons to do works more efficiently. Getting Started...
Rubber Pads Protect your Notebook PC from random closing your Notebook power ON and OFF. Camera (optional, it may vary depending on the model you to speed up the starting of the programs in Camera can ... Bluetooth function. 2-7 Press the WLAN & BT Quick Launch Button to activate the Internet browser. Quick Launch Buttons and Power Button Power Button: To turn your Notebook. 3. It helps you purchase) This built-in common use. Quick Launch Buttons: Simply click the quick launch buttons to do works more efficiently. Getting Started...
User Manual
Page 26
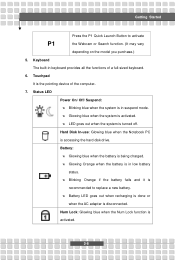
... disconnected. w Battery LED goes out when recharging is done or when the AC adapter is being charged. Hard Disk In-use: Glowing blue when the Notebook PC is activated. 2-8 w Blinking Orange if the battery fails and it is in suspend mode. Getting Started P1 Press the P1 Quick Launch Button to replace...
... disconnected. w Battery LED goes out when recharging is done or when the AC adapter is being charged. Hard Disk In-use: Glowing blue when the Notebook PC is activated. 2-8 w Blinking Orange if the battery fails and it is in suspend mode. Getting Started P1 Press the P1 Quick Launch Button to replace...

User Manual
Page 63
For more information, please refer to install comprehensive Type-II PC cards that support various functions for the PC card, including how to install and remove it first. 2. Installing the PC Card 1. Insert the PC card into the slot (usually with a basic installation for your necessary, ... card. If there is firmly seated. 3-7 Locate the PC card slot on your PC card. Customizing this Notebook PC Card Installation The PC card slot of your notebook. The following instruction provides you to the manual of your Notebook allows you with its label facing up) and push it...
For more information, please refer to install comprehensive Type-II PC cards that support various functions for the PC card, including how to install and remove it first. 2. Installing the PC Card 1. Insert the PC card into the slot (usually with a basic installation for your necessary, ... card. If there is firmly seated. 3-7 Locate the PC card slot on your PC card. Customizing this Notebook PC Card Installation The PC card slot of your notebook. The following instruction provides you to the manual of your Notebook allows you with its label facing up) and push it...
User Manual
Page 64
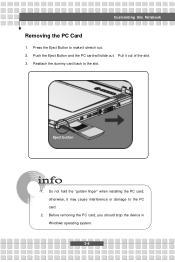
Customizing this Notebook Removing the PC Card 1. Eject button 1. otherwise, it out of the slot. 3. Reattach the dummy card back to make it stretch out. 2. Push the Eject Button and the PC card will slide out. Pull it may cause interference or damage to the PC card. 2. Press the Eject Button to the slot. Do not hold the "golden finger" when installing the PC card; Before removing the PC card, you should stop the device in Windows operating system. 3-8
Customizing this Notebook Removing the PC Card 1. Eject button 1. otherwise, it out of the slot. 3. Reattach the dummy card back to make it stretch out. 2. Push the Eject Button and the PC card will slide out. Pull it may cause interference or damage to the PC card. 2. Press the Eject Button to the slot. Do not hold the "golden finger" when installing the PC card; Before removing the PC card, you should stop the device in Windows operating system. 3-8


