User Guide
Page 22
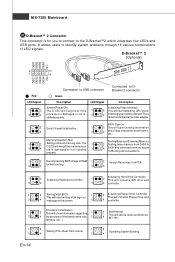
..., detect and initializethe video adapter. 1 2 EarlyChipset Initialization 3 4 BIOS Sign On 1 2 This will start detecting CPU clock, 4 checking type ofvideo onboard. properly. 1 2 Decompressing BIOS image to RAM 1 2 Assign Resources to all ISA. 3 4 for you to connect to the D-Bracket™2 which integrates four LEDs and USB ports. Memory Detection Test Testing Base...
..., detect and initializethe video adapter. 1 2 EarlyChipset Initialization 3 4 BIOS Sign On 1 2 This will start detecting CPU clock, 4 checking type ofvideo onboard. properly. 1 2 Decompressing BIOS image to RAM 1 2 Assign Resources to all ISA. 3 4 for you to connect to the D-Bracket™2 which integrates four LEDs and USB ports. Memory Detection Test Testing Base...
User Guide
Page 23
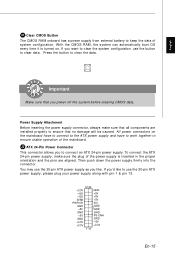
... +5V PWR OK NC GND GND +5V GND GND GND +5V PS-ON# GND +3.3V GND -12V +3.3V +3.3V 1 13 En-15 W ith the CMOS RAM, the system can autom atically boot OS every time it is inserted in the proper orientation and the pins are installed properly to clear the... from external battery to keep the data of the power supply is turned on nec t or . To connect the ATX 24-pin power supply, make sure that you to connect an ATX 24-pin power supply. Power Supply Attachment Before inserting the power supply connector, always make sure the plug of system...
... +5V PWR OK NC GND GND +5V GND GND GND +5V PS-ON# GND +3.3V GND -12V +3.3V +3.3V 1 13 En-15 W ith the CMOS RAM, the system can autom atically boot OS every time it is inserted in the proper orientation and the pins are installed properly to clear the... from external battery to keep the data of the power supply is turned on nec t or . To connect the ATX 24-pin power supply, make sure that you to connect an ATX 24-pin power supply. Power Supply Attachment Before inserting the power supply connector, always make sure the plug of system...


