User Manual
Page 2
... this document, but no solution can be obtained from the user's manual, please contact your place of purchase or local distributor. Alternatively, please try the following help resources for further guidance. ◙ Visit the MSI website for PCB 1.X Date July 2009 Technical Support If a problem...continual improvement and we reserve the right to the correctness of its contents. Our products are the properties of their respective owners. ■ MSI® is registered trademark of Micro-Star Int'l Co.,Ltd. ■ NVIDIA® is registered trademark of NVIDIA Corporation. ■ ATI...
... this document, but no solution can be obtained from the user's manual, please contact your place of purchase or local distributor. Alternatively, please try the following help resources for further guidance. ◙ Visit the MSI website for PCB 1.X Date July 2009 Technical Support If a problem...continual improvement and we reserve the right to the correctness of its contents. Our products are the properties of their respective owners. ■ MSI® is registered trademark of Micro-Star Int'l Co.,Ltd. ■ NVIDIA® is registered trademark of NVIDIA Corporation. ■ ATI...
User Manual
Page 3
...it up. ■ The openings on it. MS-7612 Safety Instructions ■ Always read the safety instructions carefully. ■ Keep this User's Manual for future reference. ■ Keep this equipment away from overheating. DO NOT COVER THE OPENINGS. ■ Make sure the voltage of the power ...source and adjust properly 110/220V before connecting the equipment to User's Manual. ◯ The equipment has dropped and damaged. ◯ The equipment has obvious sign of explosion if battery is incorrectly replaced. Do not...
...it up. ■ The openings on it. MS-7612 Safety Instructions ■ Always read the safety instructions carefully. ■ Keep this User's Manual for future reference. ■ Keep this equipment away from overheating. DO NOT COVER THE OPENINGS. ■ Make sure the voltage of the power ...source and adjust properly 110/220V before connecting the equipment to User's Manual. ◯ The equipment has dropped and damaged. ◯ The equipment has obvious sign of explosion if battery is incorrectly replaced. Do not...

User Manual
Page 22
... the center and will automatically close when the memory module is properly seated. 3. MS-7612 Installing Memory Modules 1. Then push it in the DIMM slot. Manually check if the memory module has been locked in place by the DIMM slot clips at each side of the DIMM slot will only fit...
... the center and will automatically close when the memory module is properly seated. 3. MS-7612 Installing Memory Modules 1. Then push it in the DIMM slot. Manually check if the memory module has been locked in place by the DIMM slot clips at each side of the DIMM slot will only fit...
User Manual
Page 24
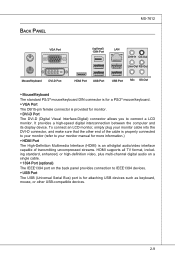
... cable into the DVI-D connector, and make sure that the other end of the cable is properly connected to your monitor (refer to your monitor manual for more information.) ▶ HDMI Port The High-Definition Multimedia Interface (HDMI) is an all-digital audio/video interface capable of transmitting uncompressed streams. HDMI...
... cable into the DVI-D connector, and make sure that the other end of the cable is properly connected to your monitor (refer to your monitor manual for more information.) ▶ HDMI Port The High-Definition Multimedia Interface (HDMI) is an all-digital audio/video interface capable of transmitting uncompressed streams. HDMI...

User Manual
Page 33
Please refer to a TPM (Trusted Platform Module) module (optional). ▍ Hardware Setup TPM Module connector: JTPM1 (optional) This connector connects to the TPM security platform manual for more details and usages. 2.34V.36S..3tS8aVe.n15Prd0iVaob1.NlwyP2I1o.eRopG4rwoPQ.rwGeionreurornudnd 1.L3P.L5CP.LCC7P.loLRC9cP.eLka1CsPd1e1ad.CtL3drPea.dLsdCrPsedasCr&edsFdsd&sraraedt&amsasdpteaa&intpa0dinap1tian2pin3 2-18
Please refer to a TPM (Trusted Platform Module) module (optional). ▍ Hardware Setup TPM Module connector: JTPM1 (optional) This connector connects to the TPM security platform manual for more details and usages. 2.34V.36S..3tS8aVe.n15Prd0iVaob1.NlwyP2I1o.eRopG4rwoPQ.rwGeionreurornudnd 1.L3P.L5CP.LCC7P.loLRC9cP.eLka1CsPd1e1ad.CtL3drPea.dLsdCrPsedasCr&edsFdsd&sraraedt&amsasdpteaa&intpa0dinap1tian2pin3 2-18
User Manual
Page 38
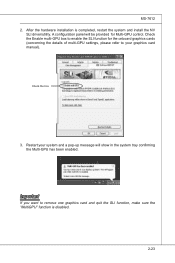
... the hardware installation is disabled. 2-23 Check the Enable multi-GPU box to enable the SLI function for Multi-GPU control. Restart your graphics card manual). Check the box 3.
... the hardware installation is disabled. 2-23 Check the Enable multi-GPU box to enable the SLI function for Multi-GPU control. Restart your graphics card manual). Check the box 3.
User Manual
Page 52
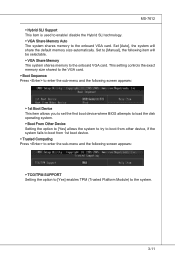
...; VGA Share Memory The system shares memory to enter the sub-menu and the following item will share the default memory size automatically. Set to [Manual], the following screen appears: ▶ TCG/TPM SUPPORT Setting the option to [Yes] enables TPM (Trusted Platform Module) to the onboard VGA card...
...; VGA Share Memory The system shares memory to enter the sub-menu and the following item will share the default memory size automatically. Set to [Manual], the following screen appears: ▶ TCG/TPM SUPPORT Setting the option to [Yes] enables TPM (Trusted Platform Module) to the onboard VGA card...
User Manual
Page 118
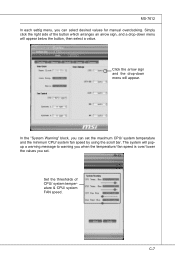
... bar. Simply click the right side of CPU/ system temperature & CPU/ system FAN speed. In the "System Warning" block, you can select desired values for manual overclocking. MS-7612 In each settig menu, you can set .
... bar. Simply click the right side of CPU/ system temperature & CPU/ system FAN speed. In the "System Warning" block, you can select desired values for manual overclocking. MS-7612 In each settig menu, you can set .


