

User Manual
Page 20
Release History Version 1.0 Revision Note First Release Date 09, 2008 Windows® 2000/ XP/ Vista are registered trademarks of Microsoft Corporation. „ NVIDIA®, the NVIDIA logo, DualNet, and nForce are registered trademarks of Microsoft Corporation. ...
Release History Version 1.0 Revision Note First Release Date 09, 2008 Windows® 2000/ XP/ Vista are registered trademarks of Microsoft Corporation. „ NVIDIA®, the NVIDIA logo, DualNet, and nForce are registered trademarks of Microsoft Corporation. ...

User Manual
Page 55
Enable or disable the touchpad function. Getting Started 3-16 Function Keys „ Windows Keys You can find the Windows Logo key ( ) and one Application Logo key ( ) on the system + configuration). Decrease the LCD brightness. + Increase the LCD brightness. + Disable the... computer's audio + function. Force the computer into suspend mode (depending on the keyboard, which are used to your Windows manual or online help. „ [Fn] Key + + Switch the display output mode between the LCD, external monitor and both. Increase the built-in...
Enable or disable the touchpad function. Getting Started 3-16 Function Keys „ Windows Keys You can find the Windows Logo key ( ) and one Application Logo key ( ) on the system + configuration). Decrease the LCD brightness. + Increase the LCD brightness. + Disable the... computer's audio + function. Force the computer into suspend mode (depending on the keyboard, which are used to your Windows manual or online help. „ [Fn] Key + + Switch the display output mode between the LCD, external monitor and both. Increase the built-in...
User Manual
Page 57
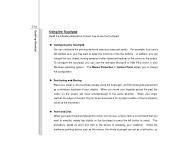
... pad, lift your display. When you can act as a left button to select. For example, if you are a left-handed user, you to meet your Windows operating system. The Mouse Properties in your personal needs. In addition, you want to the same direction. Getting Started 3-18 Using the Touchpad Read the...
... pad, lift your display. When you can act as a left button to select. For example, if you are a left-handed user, you to meet your Windows operating system. The Mouse Properties in your personal needs. In addition, you want to the same direction. Getting Started 3-18 Using the Touchpad Read the...
User Manual
Page 65
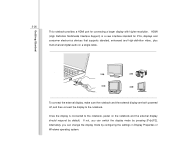
Alternately, you can change the display mode by configuring the settings in Display Properties of Windows operating system. To connect the external display, make sure the notebook and the external display are both powered off, and then connect the display to ...
Alternately, you can change the display mode by configuring the settings in Display Properties of Windows operating system. To connect the external display, make sure the notebook and the external display are both powered off, and then connect the display to ...
User Manual
Page 69
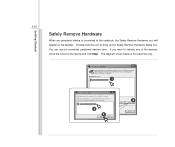
...Properties 2 Stop Close Safely Remove Hardware Select the device you that it is safe to do so unplug the device from your computer. When Windows notifies you want to remove any peripheral device is for reference only. Hardware Devices: 1 USB Mass Storage Device Stop a Hardware device Confirm ...To continue. Double-click the icon to bring up the Safely Remove Hardware dialog box. You can see all connected peripheral devices here. Windows will appear on the taskbar. The diagram shown below is connected to the notebook, the Safely Remove Hardware icon will attempt to stop ...
...Properties 2 Stop Close Safely Remove Hardware Select the device you that it is safe to do so unplug the device from your computer. When Windows notifies you want to remove any peripheral device is for reference only. Hardware Devices: 1 USB Mass Storage Device Stop a Hardware device Confirm ...To continue. Double-click the icon to bring up the Safely Remove Hardware dialog box. You can see all connected peripheral devices here. Windows will appear on the taskbar. The diagram shown below is connected to the notebook, the Safely Remove Hardware icon will attempt to stop ...
User Manual
Page 74
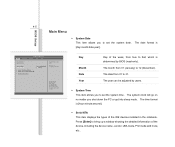
The date from 01 (January) to 12 (December). Press [Enter] to bring up a window showing the detailed information of the week, from Sun to Sat, which is determined by users. Š System Time This item allows you to set ...
The date from 01 (January) to 12 (December). Press [Enter] to bring up a window showing the detailed information of the week, from Sun to Sat, which is determined by users. Š System Time This item allows you to set ...
User Manual
Page 80
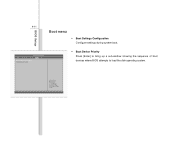
Main Advanced BIOS SETUP UTILITY Security Boot Exit Boot Setting Configuration Š Boot Device Priority Press [Enter] to bring up a sub-window showing the sequence of boot devices where BIOS attempts to load the disk operating system. :Select Screen :Select Item Enter: Select +/-: Change Opt. F1: General Help F2: Previous Values F9: Optimized Default F4: Save BIOS Setup 4-11 Boot menu Š Boot Settings Configuration Configure settings during system boot.
Main Advanced BIOS SETUP UTILITY Security Boot Exit Boot Setting Configuration Š Boot Device Priority Press [Enter] to bring up a sub-window showing the sequence of boot devices where BIOS attempts to load the disk operating system. :Select Screen :Select Item Enter: Select +/-: Change Opt. F1: General Help F2: Previous Values F9: Optimized Default F4: Save BIOS Setup 4-11 Boot menu Š Boot Settings Configuration Configure settings during system boot.

