
User Manual
Page 3
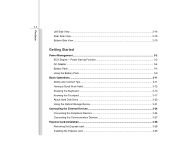
... View ...2-19 Getting Started Power Management ...3-2 ECO Engine -- Power Saving Function 3-2 AC Adapter ...3-4 Battery Pack ...3-6 Using the Battery Pack...3-9 Basic Operations ...3-11 Safety and Comfort Tips...3-11 Having a Good Work Habit...3-12 Knowing the Keyboard ...3-13 Knowing the Touchpad ...3-17 About Hard Disk Drive...3-20 Using the Optical Storage Device 3-21 Connecting the External Devices 3-24 Connecting the Peripheral Devices 3-24 Connecting the Communication Devices 3-27 Express Card Installation...3-28 Removing the Express card 3-28 Installing the Express card ...3-28
... View ...2-19 Getting Started Power Management ...3-2 ECO Engine -- Power Saving Function 3-2 AC Adapter ...3-4 Battery Pack ...3-6 Using the Battery Pack...3-9 Basic Operations ...3-11 Safety and Comfort Tips...3-11 Having a Good Work Habit...3-12 Knowing the Keyboard ...3-13 Knowing the Touchpad ...3-17 About Hard Disk Drive...3-20 Using the Optical Storage Device 3-21 Connecting the External Devices 3-24 Connecting the Peripheral Devices 3-24 Connecting the Communication Devices 3-27 Express Card Installation...3-28 Removing the Express card 3-28 Installing the Express card ...3-28
User Manual
Page 8
...cable to the TV Tuner, it is necessary to ensure that people are unlikely to protective earthing system of the building. Always keep the strong magnetic or electrical objects away from the equipment. Do not place anything on card or module. To prevent explosion caused by improper battery replacement, use the same or equivalent type of the power.... Š The equipment has not worked well or you can not get the equipment checked by a service personnel: Š The power cord or plug is reliable connected to step on it work according to User's Manual. Š The equipment was dropped ...
...cable to the TV Tuner, it is necessary to ensure that people are unlikely to protective earthing system of the building. Always keep the strong magnetic or electrical objects away from the equipment. Do not place anything on card or module. To prevent explosion caused by improper battery replacement, use the same or equivalent type of the power.... Š The equipment has not worked well or you can not get the equipment checked by a service personnel: Š The power cord or plug is reliable connected to step on it work according to User's Manual. Š The equipment was dropped ...
User Manual
Page 22
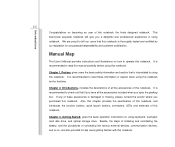
... box. Manual Map This User's Manual provides instructions and illustrations on using notebook. If any of this notebook. Also, this chapter provides the specification of this notebook, and introduces the function buttons, quick launch buttons, connectors, LEDs and externals of installing and uninstalling the battery; Chapter 3, Getting Started, gives the basic operation instructions on how to tell our users that if you a delightful and professional experience in using keyboard, touchpad, hard disk drive, and optical storage drive. Beside...
... box. Manual Map This User's Manual provides instructions and illustrations on using notebook. If any of this notebook. Also, this chapter provides the specification of this notebook, and introduces the function buttons, quick launch buttons, connectors, LEDs and externals of installing and uninstalling the battery; Chapter 3, Getting Started, gives the basic operation instructions on how to tell our users that if you a delightful and professional experience in using keyboard, touchpad, hard disk drive, and optical storage drive. Beside...

User Manual
Page 23
... version of user's manual, drivers, utilities, and optional recovery function, etc.. If any item contained is damaged or missing, please contact your local dealer immediately. Introductions 2-3 Chapter 4, BIOS Setup, provides information on BIOS Setup program and allows you need to configure the system for optimum use. The package should contain the following items: Notebook Quick Start Manual High-capacity Li-ion battery AC adapter and power cord Carry bag (optional) All-in...
... version of user's manual, drivers, utilities, and optional recovery function, etc.. If any item contained is damaged or missing, please contact your local dealer immediately. Introductions 2-3 Chapter 4, BIOS Setup, provides information on BIOS Setup program and allows you need to configure the system for optimum use. The package should contain the following items: Notebook Quick Start Manual High-capacity Li-ion battery AC adapter and power cord Carry bag (optional) All-in...
User Manual
Page 26
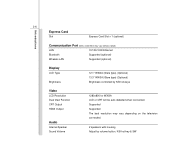
... 10/100/1000 Ethernet Bluetooth Supported (optional) Wireless LAN Supported (optional) Display LCD Type Brightness 12.1" WXGA (Glare type) (Optional) 13.3" WXGA (Glare type) (Optional) Brightness controlled by volume button, K/B hot-key & SW Introductions 2-6 Express Card Slot Express Card Slot x 1 (optional) Communication Port (Items listed here may vary depending on the television connected. 2 speakers with housing Adjust by K/B hot-keys Video LCD Resolution Dual View Function CRT Output HDMI Output Audio Internal Speaker Sound Volume 1280x800 for WXGA LCD or CRT will be auto...
... 10/100/1000 Ethernet Bluetooth Supported (optional) Wireless LAN Supported (optional) Display LCD Type Brightness 12.1" WXGA (Glare type) (Optional) 13.3" WXGA (Glare type) (Optional) Brightness controlled by volume button, K/B hot-key & SW Introductions 2-6 Express Card Slot Express Card Slot x 1 (optional) Communication Port (Items listed here may vary depending on the television connected. 2 speakers with housing Adjust by K/B hot-keys Video LCD Resolution Dual View Function CRT Output HDMI Output Audio Internal Speaker Sound Volume 1280x800 for WXGA LCD or CRT will be auto...
User Manual
Page 31
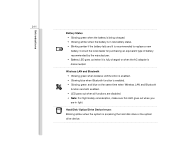
... when Bluetooth function is accessing the hard disk drive or the optical drive device. Hard Disk/ Optical Drive Device In-use: Blinking amber when the system is enabled. Š Glowing green and blue at the same time when Wireless LAN and Bluetooth function are both enabled. Š LED goes out when all functions are disabled. Š Note: For flight safety consideration, make sure this LED goes out when you are in low battery status. Š Blinking amber...
... when Bluetooth function is accessing the hard disk drive or the optical drive device. Hard Disk/ Optical Drive Device In-use: Blinking amber when the system is enabled. Š Glowing green and blue at the same time when Wireless LAN and Bluetooth function are both enabled. Š LED goes out when all functions are disabled. Š Note: For flight safety consideration, make sure this LED goes out when you are in low battery status. Š Blinking amber...
User Manual
Page 36
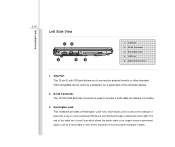
... VGA port allows you to connect an external monitor or other similar equipment, thus securing the notebook in place with a key or some mechanical PIN device and attached through a rubberised metal cable. USB Port 5. Kensington Lock This notebook provides a Kensington Lock hole, which allows the whole cable to secure the notebook in place. RJ-45 Connector The 10/100/1000 Ethernet connector is used to connect a LAN cable for...
... VGA port allows you to connect an external monitor or other similar equipment, thus securing the notebook in place with a key or some mechanical PIN device and attached through a rubberised metal cable. USB Port 5. Kensington Lock This notebook provides a Kensington Lock hole, which allows the whole cable to secure the notebook in place. RJ-45 Connector The 10/100/1000 Ethernet connector is used to connect a LAN cable for...
User Manual
Page 46
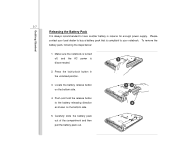
Press the lock/unlock button in reserve for enough power supply. Locate the battery release button on the bottom side. 5. To remove the battery pack, following the steps below: 1. Make sure the notebook is turned off, and the AC power is compliant to your notebook. Push and hold the release button to buy a battery pack that is 2 disconnected. 2. Carefully slide the battery pack out of the compartment and...
Press the lock/unlock button in reserve for enough power supply. Locate the battery release button on the bottom side. 5. To remove the battery pack, following the steps below: 1. Make sure the notebook is turned off, and the AC power is compliant to your notebook. Push and hold the release button to buy a battery pack that is 2 disconnected. 2. Carefully slide the battery pack out of the compartment and...
User Manual
Page 48
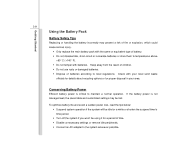
... waste officials for details about recycling options or for a period of time. Š Disable unnecessary settings or remove idle peripherals. Š Connect an AC adapter to the system whenever possible. If the battery power is critical to local regulations. To optimize battery life and avoid a sudden power loss, read the tips below: Š Suspend system operation if the system will be...
... waste officials for details about recycling options or for a period of time. Š Disable unnecessary settings or remove idle peripherals. Š Connect an AC adapter to the system whenever possible. If the battery power is critical to local regulations. To optimize battery life and avoid a sudden power loss, read the tips below: Š Suspend system operation if the system will be...

User Manual
Page 55
... Windows-specific functions, such as opening the Start menu and launching the shortcut menu. Decrease the built-in speaker's + volume. Increase the built-in speaker's + volume. Force the computer into suspend mode (depending on the keyboard, which are used to your Windows manual or online help. „ [Fn] Key + + Switch the display output mode between the LCD, external monitor and both. Enable or disable the touchpad function. Decrease the LCD brightness. + Increase the LCD brightness. + Disable the computer's audio + function. Getting Started 3-16 Function Keys...
... Windows-specific functions, such as opening the Start menu and launching the shortcut menu. Decrease the built-in speaker's + volume. Increase the built-in speaker's + volume. Force the computer into suspend mode (depending on the keyboard, which are used to your Windows manual or online help. „ [Fn] Key + + Switch the display output mode between the LCD, external monitor and both. Enable or disable the touchpad function. Decrease the LCD brightness. + Increase the LCD brightness. + Disable the computer's audio + function. Getting Started 3-16 Function Keys...

User Manual
Page 56
... the notebook that users purchased Getting Started Knowing the Touchpad The touchpad integrated in your finger. 2. Right / Left Buttons Acts as the mouse's right/ left button. 1 2 2 3. Cursor Movement Area This pressure-sensitive area of the touchpad, allows you to place your finger on and control the cursor on the screen and making selection with standard mouse, allowing you to control the notebook by pointing the location...
... the notebook that users purchased Getting Started Knowing the Touchpad The touchpad integrated in your finger. 2. Right / Left Buttons Acts as the mouse's right/ left button. 1 2 2 3. Cursor Movement Area This pressure-sensitive area of the touchpad, allows you to place your finger on and control the cursor on the screen and making selection with standard mouse, allowing you to control the notebook by pointing the location...
User Manual
Page 57
... slightly on the touchpad or press the left button, so When you can use the touchpad: „ Configuring the Touchpad You can act as point and click is the basics of operating your notebook. Getting Started 3-18 Using the Touchpad Read the following description to learn how to use the standard Microsoft or IBM PS/2 driver in Control Panel allows you to change the size, shape...
... slightly on the touchpad or press the left button, so When you can use the touchpad: „ Configuring the Touchpad You can act as point and click is the basics of operating your notebook. Getting Started 3-18 Using the Touchpad Read the following description to learn how to use the standard Microsoft or IBM PS/2 driver in Control Panel allows you to change the size, shape...
User Manual
Page 63
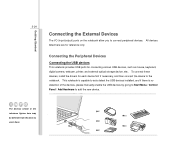
... the USB devices by going to Start Menu / Control Panel / Add Hardware to the notebook. Connecting the Peripheral Devices Connecting the USB devices This notebook provides USB ports for reference only. To connect these devices, install the drivers for each device first if necessary, and then connect the device to add the new device. Getting Started 3-24 Connecting the External Devices The I/O (input/output) ports on the notebook allow you to connect peripheral devices. All devices listed here are for connecting various USB devices, such as mouse, keyboard, digital camera, webcam...
... the USB devices by going to Start Menu / Control Panel / Add Hardware to the notebook. Connecting the Peripheral Devices Connecting the USB devices This notebook provides USB ports for reference only. To connect these devices, install the drivers for each device first if necessary, and then connect the device to add the new device. Getting Started 3-24 Connecting the External Devices The I/O (input/output) ports on the notebook allow you to connect peripheral devices. All devices listed here are for connecting various USB devices, such as mouse, keyboard, digital camera, webcam...
User Manual
Page 64
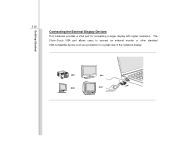
Getting Started 3-25 Connecting the External Display Devices This notebook provides a VGA port for a great view of the notebook display. The 15-pin-D-sub VGA port allows users to connect an external monitor or other standard VGA-compatible device (such as a projector) for connecting a larger display with higher resolution.
Getting Started 3-25 Connecting the External Display Devices This notebook provides a VGA port for a great view of the notebook display. The 15-pin-D-sub VGA port allows users to connect an external monitor or other standard VGA-compatible device (such as a projector) for connecting a larger display with higher resolution.
User Manual
Page 65
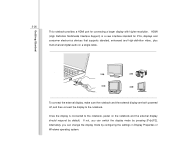
... can switch the display mode by pressing [Fn]+[F2]. To connect the external display, make sure the notebook and the external display are both powered off, and then connect the display to the notebook, power on a single cable. Alternately, you can change the display mode by configuring the settings in Display Properties of Windows operating system. HDMI (High Definition Multimedia Interface Support) is connected to the notebook. Getting Started 3-26 This notebook provides a HDMI port for PCs, displays and consumer electronics devices that supports standard...
... can switch the display mode by pressing [Fn]+[F2]. To connect the external display, make sure the notebook and the external display are both powered off, and then connect the display to the notebook, power on a single cable. Alternately, you can change the display mode by configuring the settings in Display Properties of Windows operating system. HDMI (High Definition Multimedia Interface Support) is connected to the notebook. Getting Started 3-26 This notebook provides a HDMI port for PCs, displays and consumer electronics devices that supports standard...
User Manual
Page 73
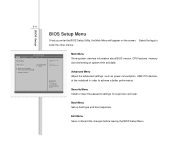
... Menu Show system overview information about BIOS version, CPU features, memory size and setting of the notebook in order to select a field. Exit Menu Save or discard the changes before leaving the BIOS Setup Menu. Security Menu Install or clear the password settings for supervisor and user. Select the tags to configure system Date. :Select Screen :Select Item Enter: Select +/-: Change Opt. BIOS Setup 4-4 BIOS Setup Menu Once you enter the BIOS Setup Utility, the Main Menu will appear on the screen. Use [+], [-] to enter...
... Menu Show system overview information about BIOS version, CPU features, memory size and setting of the notebook in order to select a field. Exit Menu Save or discard the changes before leaving the BIOS Setup Menu. Security Menu Install or clear the password settings for supervisor and user. Select the tags to configure system Date. :Select Screen :Select Item Enter: Select +/-: Change Opt. BIOS Setup 4-4 BIOS Setup Menu Once you enter the BIOS Setup Utility, the Main Menu will appear on the screen. Use [+], [-] to enter...
User Manual
Page 74
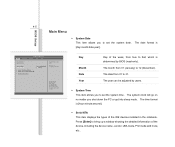
... Advanced BIOS SETUP UTILITY Security Boot Exit Market Name Model Name System Date System Time Serial ATA [Hard Disk] Serial ATA [ATAPI CDROM] System Infomation [Wed 06/08/2008] [18:08:53] Use [ENTER] to configure system Date. :Select Screen :Select Item Enter: Select +/-: Change Opt. The month from Sun to Sat, which is determined by users. Š System Time This item allows you to set the...
... Advanced BIOS SETUP UTILITY Security Boot Exit Market Name Model Name System Date System Time Serial ATA [Hard Disk] Serial ATA [ATAPI CDROM] System Infomation [Wed 06/08/2008] [18:08:53] Use [ENTER] to configure system Date. :Select Screen :Select Item Enter: Select +/-: Change Opt. The month from Sun to Sat, which is determined by users. Š System Time This item allows you to set the...
User Manual
Page 76
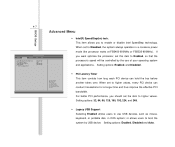
... Screen :Select Item Enter: Select +/-: Change Opt. For better PCI performance, you to enable or disable Intel SpeedStep technology. Setting options: 32, 64, 96, 128, 160, 192, 224, and 248. Š Legacy USB Support Selecting Enabled allows users to Disabled, the system always operates in DOS system; 4-7 BIOS Setup Main Advanced BIOS SETUP UTILITY Security Boot Exit Intel (R) Speedstep (tm) tech PCI Legacy Timer Legacy USB Support AHCI Mode IGD Configuration [Enabled] [64] [Enabled] [Enabled] Advanced Menu...
... Screen :Select Item Enter: Select +/-: Change Opt. For better PCI performance, you to enable or disable Intel SpeedStep technology. Setting options: 32, 64, 96, 128, 160, 192, 224, and 248. Š Legacy USB Support Selecting Enabled allows users to Disabled, the system always operates in DOS system; 4-7 BIOS Setup Main Advanced BIOS SETUP UTILITY Security Boot Exit Intel (R) Speedstep (tm) tech PCI Legacy Timer Legacy USB Support AHCI Mode IGD Configuration [Enabled] [64] [Enabled] [Enabled] Advanced Menu...
User Manual
Page 78
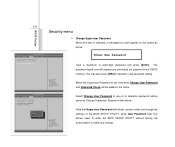
... on the screen as Change Supervisor Password item above. Main Advanced BIOS SETUP UTILITY Security Boot Exit Supervisor Password: Installed User Password : Installed Change Supervisor Password Change User Password Password Check [Setup] Options Setup Always :Select Screen :Select Item Enter: Select +/-: Change Opt. F1: General Help F2: Previous Values F9: Optimized Default F4: Save Enter New Password Type a maximum of the BIOS SETUP UTILITY, while User Password field only allows users to enter the BIOS SETUP UTILITY without having the authorization to enter and change . F1...
... on the screen as Change Supervisor Password item above. Main Advanced BIOS SETUP UTILITY Security Boot Exit Supervisor Password: Installed User Password : Installed Change Supervisor Password Change User Password Password Check [Setup] Options Setup Always :Select Screen :Select Item Enter: Select +/-: Change Opt. F1: General Help F2: Previous Values F9: Optimized Default F4: Save Enter New Password Type a maximum of the BIOS SETUP UTILITY, while User Password field only allows users to enter the BIOS SETUP UTILITY without having the authorization to enter and change . F1...
User Manual
Page 80
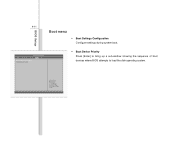
BIOS Setup 4-11 Boot menu Š Boot Settings Configuration Configure settings during system boot. F1: General Help F2: Previous Values F9: Optimized Default F4: Save Main Advanced BIOS SETUP UTILITY Security Boot Exit Boot Setting Configuration Š Boot Device Priority Press [Enter] to bring up a sub-window showing the sequence of boot devices where BIOS attempts to load the disk operating system. :Select Screen :Select Item Enter: Select +/-: Change Opt.
BIOS Setup 4-11 Boot menu Š Boot Settings Configuration Configure settings during system boot. F1: General Help F2: Previous Values F9: Optimized Default F4: Save Main Advanced BIOS SETUP UTILITY Security Boot Exit Boot Setting Configuration Š Boot Device Priority Press [Enter] to bring up a sub-window showing the sequence of boot devices where BIOS attempts to load the disk operating system. :Select Screen :Select Item Enter: Select +/-: Change Opt.


