
User Manual
Page 24
...and certified by our reputation for the first time. Chapter 2, Introductions, includes the descriptions of all the accessories included when you purchased this notebook. We are also provided to using keyboard, touchpad, hard disk drive, and optical storage drive. If any of these accessories is recommended... to read these information or caution when using this notebook. and the procedures of connecting the various external devices, communication devices, and so on, are proud to tell our users that this...
...and certified by our reputation for the first time. Chapter 2, Introductions, includes the descriptions of all the accessories included when you purchased this notebook. We are also provided to using keyboard, touchpad, hard disk drive, and optical storage drive. If any of these accessories is recommended... to read these information or caution when using this notebook. and the procedures of connecting the various external devices, communication devices, and so on, are proud to tell our users that this...
User Manual
Page 25
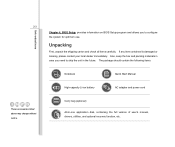
... Setup, provides information on BIOS Setup program and allows you need to configure the system for optimum use. The package should contain the following items: Notebook Quick Start Manual High-capacity Li-ion battery AC adapter and power cord Carry bag (optional) All-in the future. Unpacking First, unpack the shipping...
... Setup, provides information on BIOS Setup program and allows you need to configure the system for optimum use. The package should contain the following items: Notebook Quick Start Manual High-capacity Li-ion battery AC adapter and power cord Carry bag (optional) All-in the future. Unpacking First, unpack the shipping...

User Manual
Page 26
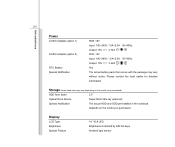
....8(H) mm < 2.2 kg (with 6-cell battery) CPU Support Processor TDP Special Notification Intel Sandy Bridge (Dual Core & Quad Core) 35W The actual processor preinstalled in the notebook depends on the model you purchased. Memory Technology Memory Maximum DDR3 1333 MHz DDR3 SO-DIMM X 2 slots Up to 8 GB Please contact the local dealer...
....8(H) mm < 2.2 kg (with 6-cell battery) CPU Support Processor TDP Special Notification Intel Sandy Bridge (Dual Core & Quad Core) 35W The actual processor preinstalled in the notebook depends on the model you purchased. Memory Technology Memory Maximum DDR3 1333 MHz DDR3 SO-DIMM X 2 slots Up to 8 GB Please contact the local dealer...
User Manual
Page 27
... the model users purchased) HDD form factor 2.5" Optical Drive Device Super Multi / Blu-ray (optional) Special Notification The actual HDD and ODD preinstalled in the notebook depends on the model you purchased. Storage (Items listed here may vary without notice.
... the model users purchased) HDD form factor 2.5" Optical Drive Device Super Multi / Blu-ray (optional) Special Notification The actual HDD and ODD preinstalled in the notebook depends on the model you purchased. Storage (Items listed here may vary without notice.

User Manual
Page 30
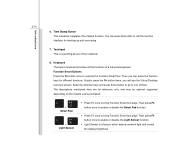
Please be aware that the notebook shown in this notebook before using it. Top-open View The figure of top-open view and description shown below will help you to know more about the appearance ... from the actual one that users purchased. Stereo Speakers 5. Time Stamp Button 7. Touchpad 8. It will lead you to browse the main operating area of the notebook. Webcam 3. Keyboard / Function Smart Buttons Internal Microphone 2. Power Button/ Power LED/ Battery Status LED 6. 2-8 The figures show here are for reference only. Introductions Product Overview...
Please be aware that the notebook shown in this notebook before using it. Top-open View The figure of top-open view and description shown below will help you to know more about the appearance ... from the actual one that users purchased. Stereo Speakers 5. Time Stamp Button 7. Touchpad 8. It will lead you to browse the main operating area of the notebook. Webcam 3. Keyboard / Function Smart Buttons Internal Microphone 2. Power Button/ Power LED/ Battery Status LED 6. 2-8 The figures show here are for reference only. Introductions Product Overview...

User Manual
Page 31
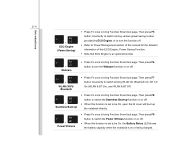
...3. Power LED & Battery Status LED ♦ Power LED and Battery Status LED glow in green when notebook is turned on. ♦ Battery Status LED blinks in microphone and its function is turned off when the notebook is the same with stereo system and Hi-Fi function supported. 5. Ambient Light Sensor Light Sensor... is being charged; it tells the battery capacity and charging process. ♦ Power LED and Battery Status LED blink in green when notebook is in Webcam can be used for eye comfort and power saving. 4. Power Button/ ♦ Press the power button to turn the...
...3. Power LED & Battery Status LED ♦ Power LED and Battery Status LED glow in green when notebook is turned on. ♦ Battery Status LED blinks in microphone and its function is turned off when the notebook is the same with stereo system and Hi-Fi function supported. 5. Ambient Light Sensor Light Sensor... is being charged; it tells the battery capacity and charging process. ♦ Power LED and Battery Status LED blink in green when notebook is in Webcam can be used for eye comfort and power saving. 4. Power Button/ ♦ Press the power button to turn the...
User Manual
Page 32
...This is a feature which detects ambient light and control the display brightness. Keyboard The built-in keyboard provides all the functions of the notebook. 8. Then you will see the Virtual Desktop overview screen. The descriptions mentioned here are for reference only, and may be optional supported...recovering. 7. Quickly press the Fn button twice, you can press this button to bring Function Smart tool page. Time Stamp Button This notebook integrates Time Stamp function. Select by direction keys and press Enter button to go to bring Function Smart tool page. Then press F3 ...
...This is a feature which detects ambient light and control the display brightness. Keyboard The built-in keyboard provides all the functions of the notebook. 8. Then you will see the Virtual Desktop overview screen. The descriptions mentioned here are for reference only, and may be optional supported...recovering. 7. Quickly press the Fn button twice, you can press this button to bring Function Smart tool page. Time Stamp Button This notebook integrates Time Stamp function. Select by direction keys and press Enter button to go to bring Function Smart tool page. Then press F3 ...
User Manual
Page 33
... is set to bring Function Smart tool page. 2-11 Introductions Š Press Fn once to be On, open the lid cover will boot up the notebook directly. + Power Witness Š Press Fn once to bring Function Smart tool page. Then press F7 button recurrently to switch among various power saving modes... button to turn this function off . Š When this function is set to be On, the Battery Status LED shows the battery capacity when the notebook is on or being charged. Then press F8 button to switch the Seamless Boot-up Š Press Fn once to bring Function Smart tool page.
... is set to bring Function Smart tool page. 2-11 Introductions Š Press Fn once to be On, open the lid cover will boot up the notebook directly. + Power Witness Š Press Fn once to bring Function Smart tool page. Then press F7 button recurrently to switch among various power saving modes... button to turn this function off . Š When this function is set to be On, the Battery Status LED shows the battery capacity when the notebook is on or being charged. Then press F8 button to switch the Seamless Boot-up Š Press Fn once to bring Function Smart tool page.

User Manual
Page 37
Optical Drive Device This notebook is equipped with an optical drive device. The actual device preinstalled in the notebook depends on the model you purchased. Introductions 2-15 3.
Optical Drive Device This notebook is equipped with an optical drive device. The actual device preinstalled in the notebook depends on the model you purchased. Introductions 2-15 3.
User Manual
Page 38
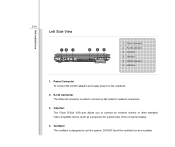
Power Connector 2. Ventilator The ventilator is used to connect a LAN cable for the notebook. 2. 2-16 Left Side View Introductions 12 3 4 56 1. VGA Port 4. Ventilator 5. USB Port 1. VGA Port The 15-pin D-Sub VGA port allows you to cool the ...
Power Connector 2. Ventilator The ventilator is used to connect a LAN cable for the notebook. 2. 2-16 Left Side View Introductions 12 3 4 56 1. VGA Port 4. Ventilator 5. USB Port 1. VGA Port The 15-pin D-Sub VGA port allows you to cool the ...
User Manual
Page 40
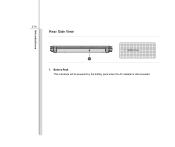
Battery Pack This notebook will be powered by the battery pack when the AC adapter is disconnected. Battery Pack 1 1. Introductions 2-18 Rear Side View 1.
Battery Pack This notebook will be powered by the battery pack when the AC adapter is disconnected. Battery Pack 1 1. Introductions 2-18 Rear Side View 1.

User Manual
Page 41
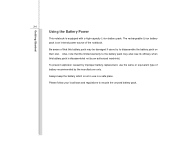
Battery Release Button 4. Battery Pack 3. Ventilator 1. Once the button is slid to unlock position, the battery is positioned on lock status. Battery Lock/ Unlock Button Battery cannot be powered by the battery pack when the AC adapter is disconnected. Battery Pack This notebook will be moved when the button is removable. 2. Introductions 2-19 Bottom Side View 1 2 4 3 1. Battery Lock/ Unlock Button 2.
Battery Release Button 4. Battery Pack 3. Ventilator 1. Once the button is slid to unlock position, the battery is positioned on lock status. Battery Lock/ Unlock Button Battery cannot be powered by the battery pack when the AC adapter is disconnected. Battery Pack This notebook will be moved when the button is removable. 2. Introductions 2-19 Bottom Side View 1 2 4 3 1. Battery Lock/ Unlock Button 2.

User Manual
Page 44
...for the first time. Note that the AC/DC adapter included in use. Do not cover the AC/DC adapter since it . using this notebook for your notebook; Always be aware of heat coming from the AC/DC adapter in use. Getting Started 3-2 Power Management Connecting the AC power It is ...strongly recommended to connect the AC/DC adapter to the notebook and use the AC power while using other adapter model may damage either the notebook or other devices attached to it may produce a certain heat while in the package is connected, recharging ...
...for the first time. Note that the AC/DC adapter included in use. Do not cover the AC/DC adapter since it . using this notebook for your notebook; Always be aware of heat coming from the AC/DC adapter in use. Getting Started 3-2 Power Management Connecting the AC power It is ...strongly recommended to connect the AC/DC adapter to the notebook and use the AC power while using other adapter model may damage either the notebook or other devices attached to it may produce a certain heat while in the package is connected, recharging ...

User Manual
Page 45
Unplug the power cord from the notebook. 6. Unpack the package to the electrical outlet. Disconnect the power cord and the connector of the cord. Getting Started 3-3 Connecting the AC Power 1. Disconnecting the ... power cord, always hold the connector part of AC/DC adapter. 7. Never pull the cord directly! 4 2 6 3 5 3 Plug the DC end of the adapter to the notebook, and the male end of the AC/DC adapter. 3. Unplug the connector from the electrical outlet first. 5. Attach the power cord to the connector of...
Unplug the power cord from the notebook. 6. Unpack the package to the electrical outlet. Disconnect the power cord and the connector of the cord. Getting Started 3-3 Connecting the AC Power 1. Disconnecting the ... power cord, always hold the connector part of AC/DC adapter. 7. Never pull the cord directly! 4 2 6 3 5 3 Plug the DC end of the adapter to the notebook, and the male end of the AC/DC adapter. 3. Unplug the connector from the electrical outlet first. 5. Attach the power cord to the connector of...
User Manual
Page 46
... users try to recycle the unused battery pack. The rechargeable Li-ion battery pack is disassembled not by the manufacturer only. Be aware of the notebook. Getting Started 3-4 Using the Battery Power This...
... users try to recycle the unused battery pack. The rechargeable Li-ion battery pack is disassembled not by the manufacturer only. Be aware of the notebook. Getting Started 3-4 Using the Battery Power This...

User Manual
Page 48
Push and hold the release button to the unlocked position. 3. Make sure the notebook is turned off, and the AC power is disconnected. 2. Carefully slide the battery pack out of the compartment and then pull the battery pack out. 2 4 3 5 Locate the battery release button on the bottom side. 5. Press the lock/unlock button to the battery releasing direction as shown on the bottom side. 4. Getting Started 3-6 Releasing the Battery Pack To release the battery pack, following the steps below: 1.
Push and hold the release button to the unlocked position. 3. Make sure the notebook is turned off, and the AC power is disconnected. 2. Carefully slide the battery pack out of the compartment and then pull the battery pack out. 2 4 3 5 Locate the battery release button on the bottom side. 5. Press the lock/unlock button to the battery releasing direction as shown on the bottom side. 4. Getting Started 3-6 Releasing the Battery Pack To release the battery pack, following the steps below: 1.
User Manual
Page 50
...The battery pack uses Lithium-ion battery cells that consuming the battery power completely once a month is necessary. Š If you do not use the notebook for a long time, it is suggested to -Disk. Š Plug in an external AC/DC adapter. Š You can be determined by the... applications in use. This may be helpful to extend your notebook. Please pay attention to the following tips before recharging. However, to discharge the battery before recharging the battery: Š If a charged battery pack is...
...The battery pack uses Lithium-ion battery cells that consuming the battery power completely once a month is necessary. Š If you do not use the notebook for a long time, it is suggested to -Disk. Š Plug in an external AC/DC adapter. Š You can be determined by the... applications in use. This may be helpful to extend your notebook. Please pay attention to the following tips before recharging. However, to discharge the battery before recharging the battery: Š If a charged battery pack is...

User Manual
Page 51
..., Office mode, and Turbo Battery mode, to switch among the different modes of each mode appearing on behalf of ECO Engine, or to turn this notebook. Read the instructions bellow to bring Function Smart tool page. 2. Press the F5 button repeatedly to extend the battery running time while performing different tasks...
..., Office mode, and Turbo Battery mode, to switch among the different modes of each mode appearing on behalf of ECO Engine, or to turn this notebook. Read the instructions bellow to bring Function Smart tool page. 2. Press the F5 button repeatedly to extend the battery running time while performing different tasks...

User Manual
Page 56
... a long period of the LCD panel to have to work with great care to assure your notebook in the space where may cause you to work anywhere. Safety and Comfort Tips The notebook is a portable platform that your knees and elbows have the proper position (about 90-degree) when operating. Š Put... your back comfortably. Š Place you feet flat and naturally on the floor, so that allows you discomfort (such as on the bed). Š The notebook is important if you have an optimal view. Š Avoid using your own safety, and make yourself comfortable during the operations.
... a long period of the LCD panel to have to work with great care to assure your notebook in the space where may cause you to work anywhere. Safety and Comfort Tips The notebook is a portable platform that your knees and elbows have the proper position (about 90-degree) when operating. Š Put... your back comfortably. Š Place you feet flat and naturally on the floor, so that allows you discomfort (such as on the bed). Š The notebook is important if you have an optimal view. Š Avoid using your own safety, and make yourself comfortable during the operations.

User Manual
Page 57
... time. 3-15 Getting Started 1. Adjust the chair's height. 5 Having a Good Work Habit Have a good work with your hands and feet with 4 optimal comfort. 2 1 2. Keep your notebook for a period of LCD panel. 3.
... time. 3-15 Getting Started 1. Adjust the chair's height. 5 Having a Good Work Habit Have a good work with your hands and feet with 4 optimal comfort. 2 1 2. Keep your notebook for a period of LCD panel. 3.

