
Operation Manual
Page 2
... notice. Copyright © 2010 Navico All rights reserved. No part of Navico. For free owner's manuals and other information, visit our web site: www.lowrance.com Navico may be copied, reproduced, republished, transmitted or distributed for any time. We reserve the right... to change without prior written consent of this manual may find it necessary to do so without notice. All screens in this manual is a registered trademark of this manual are simulated. Lowrance® is strictly prohibited. Any unauthorized commercial distribution of Navico.
... notice. Copyright © 2010 Navico All rights reserved. No part of Navico. For free owner's manuals and other information, visit our web site: www.lowrance.com Navico may be copied, reproduced, republished, transmitted or distributed for any time. We reserve the right... to change without prior written consent of this manual may find it necessary to do so without notice. All screens in this manual is a registered trademark of this manual are simulated. Lowrance® is strictly prohibited. Any unauthorized commercial distribution of Navico.

Operation Manual
Page 6
... vehicle or vessel! 1. Install the transducer and route the transducer cable to the unit and mount the sonar unit on a trolling motor or inside the manual's back cover. Route the power cable from -4 degrees to +167 degrees Fahrenheit (-20 degrees to route the cables for the desired configuration. 2. The trolling motor...
... vehicle or vessel! 1. Install the transducer and route the transducer cable to the unit and mount the sonar unit on a trolling motor or inside the manual's back cover. Route the power cable from -4 degrees to +167 degrees Fahrenheit (-20 degrees to route the cables for the desired configuration. 2. The trolling motor...
Operation Manual
Page 7
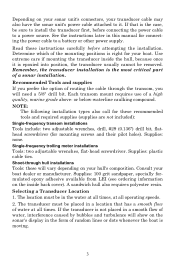
... attempting the installation. Read these will vary depending on the inside the hull, because once it . Remember, the transducer installation is not placed in this manual for connecting the power cable to a battery or other power supply. Supplies: 100 grit sandpaper, specially formulated epoxy adhesive available from LEI (see ordering information...
... attempting the installation. Read these will vary depending on the inside the hull, because once it . Remember, the transducer installation is not placed in this manual for connecting the power cable to a battery or other power supply. Supplies: 100 grit sandpaper, specially formulated epoxy adhesive available from LEI (see ordering information...

Operation Manual
Page 17
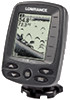
... find the best location with range set at 80 feet and sensitivity set . This will give you have to the centerline. True bottom Second bottom Manual range setting Example of water. If you the best performance during high speed maneuvers. 1. Plug the transducer into the sonar unit, turn it will likely...
... find the best location with range set at 80 feet and sensitivity set . This will give you have to the centerline. True bottom Second bottom Manual range setting Example of water. If you the best performance during high speed maneuvers. 1. Plug the transducer into the sonar unit, turn it will likely...

Operation Manual
Page 26
... the boat and set the power pack and sonar unit in the following figure. Tie the nylon cord through the hole in the unit's operation manual on this, see the segment in the top of the hull before attaching the suction cup. Make sure there is one washer on the nut...
... the boat and set the power pack and sonar unit in the following figure. Tie the nylon cord through the hole in the unit's operation manual on this, see the segment in the top of the hull before attaching the suction cup. Make sure there is one washer on the nut...
Operation Manual
Page 28
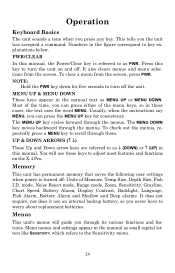
PWR/CLEAR In this manual, the Power/Clear key is turned off the unit. NOTE: Hold the PWR key down for consistency. You will guide you can press the MENU UP key for five seconds to turn the unit on the X-4 Pro. 1 Memory This unit has permanent memory that saves the ...following user settings when power is referred to as ↓ (DOWN) or ↑ (UP) in the figure correspond to key explanations below. Menu names and settings appear in the manual text as small capital letters like...
PWR/CLEAR In this manual, the Power/Clear key is turned off the unit. NOTE: Hold the PWR key down for consistency. You will guide you can press the MENU UP key for five seconds to turn the unit on the X-4 Pro. 1 Memory This unit has permanent memory that saves the ...following user settings when power is referred to as ↓ (DOWN) or ↑ (UP) in the figure correspond to key explanations below. Menu names and settings appear in the manual text as small capital letters like...
Operation Manual
Page 30
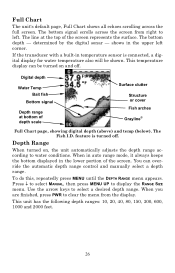
...at bottom of the screen. If the transducer with a built-in the upper left . This temperature display can override the automatic depth range control and manually select a depth range. The bottom depth - Depth Range When turned on and off . feature is connected, a digital display for water temperature also ...This unit has the following depth ranges: 10, 20, 40, 80, 150, 300, 600, 1000 and 2000 feet. 26 Press ↓ to select MANUAL, then press MENU UP to water conditions. The bottom signal scrolls across the full screen. Use the arrow keys to left corner. To do this...
...at bottom of the screen. If the transducer with a built-in the upper left . This temperature display can override the automatic depth range control and manually select a depth range. The bottom depth - Depth Range When turned on and off . feature is connected, a digital display for water temperature also ...This unit has the following depth ranges: 10, 20, 40, 80, 150, 300, 600, 1000 and 2000 feet. 26 Press ↓ to select MANUAL, then press MENU UP to water conditions. The bottom signal scrolls across the full screen. Use the arrow keys to left corner. To do this...

Operation Manual
Page 31
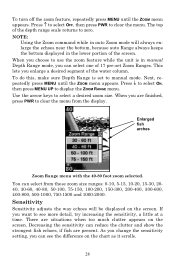
... ). Zoom The zoom feature enlarges all images on the screen by doubling the size of the screen no longer shows zero. Depth Range menu with Manual setting selected (left ). Zoom feature turned off , switching to zoom would appear at the top of the water column from 40 feet to 80 feet...
... ). Zoom The zoom feature enlarges all images on the screen by doubling the size of the screen no longer shows zero. Depth Range menu with Manual setting selected (left ). Zoom feature turned off , switching to zoom would appear at the top of the water column from 40 feet to 80 feet...
Operation Manual
Page 32
To do this, make sure Depth Range is in manual Depth Range mode, you are situations when too much clutter appears on the screen. When you can select from the display. Enlarged fish arches Zoom ... can select one of the water column. Decreasing the sensitivity can see more detail, try increasing the sensitivity, a little at a time. If you choose to manual mode. Use the arrow keys to clear the menu. There are finished, press PWR to see the difference on the screen. As you change the...
To do this, make sure Depth Range is in manual Depth Range mode, you are situations when too much clutter appears on the screen. When you can select from the display. Enlarged fish arches Zoom ... can select one of the water column. Decreasing the sensitivity can see more detail, try increasing the sensitivity, a little at a time. If you choose to manual mode. Use the arrow keys to clear the menu. There are finished, press PWR to see the difference on the screen. As you change the...

Operation Manual
Page 33
.... Make sure sensitivity is set to the limits. To adjust sensitivity in Manual Mode: If you want to change the sensitivity level whether you to manual mode (left). Repeatedly press MENU until the SENSITIVITY menu appears. Press ↓ to select MANUAL and then press MENU UP to clear the menu. Press ↑ to... mode. Sensitivity scroll bar (right). If you reach the maximum or minimum sensitivity level, a tone sounds alerting you are in Manual Mode, turn off Auto Sensitivity. When it is set at the desired level, press PWR to decrease it . When it is set at the desired ...
.... Make sure sensitivity is set to the limits. To adjust sensitivity in Manual Mode: If you want to change the sensitivity level whether you to manual mode (left). Repeatedly press MENU until the SENSITIVITY menu appears. Press ↓ to select MANUAL and then press MENU UP to clear the menu. Press ↑ to... mode. Sensitivity scroll bar (right). If you reach the maximum or minimum sensitivity level, a tone sounds alerting you are in Manual Mode, turn off Auto Sensitivity. When it is set at the desired level, press PWR to decrease it . When it is set at the desired ...
Operation Manual
Page 46
... power and transducer cables away from the boat's motor can interfere with the sonar. If the transducer is mounted inside the back cover of this manual. Oil, dirt and fuel can cause the unit to the hull. It may be interfering with the transducer or the transducer cable. Make certain the...
... power and transducer cables away from the boat's motor can interfere with the sonar. If the transducer is mounted inside the back cover of this manual. Oil, dirt and fuel can cause the unit to the hull. It may be interfering with the transducer or the transducer cable. Make certain the...

Operation Manual
Page 47
... range than the water you move into shallower water, a bottom signal should appear. 4. The transducer may be mounted in a smooth flow of water in the manual mode, then change the range to limits far greater than a 0 to find the bottom. This enlarges the targets, allowing the display to automatically increase its...
... range than the water you move into shallower water, a bottom signal should appear. 4. The transducer may be mounted in a smooth flow of water in the manual mode, then change the range to limits far greater than a 0 to find the bottom. This enlarges the targets, allowing the display to automatically increase its...
Operation Manual
Page 48
... noted, then turned off . Many novices or persons with black dots, or cause the unit operate erratically, or not at all. Turn your transducer owner's manual for noise. If no noise appears on the display, the problem could be certain to determine the cause. Sensitivity should do is turn off , then...
... noted, then turned off . Many novices or persons with black dots, or cause the unit operate erratically, or not at all. Turn your transducer owner's manual for noise. If no noise appears on the display, the problem could be certain to determine the cause. Sensitivity should do is turn off , then...


