

Cisco SPA9000 Voice System Administration Guide
Page 28
... verify the upgrade, complete the following steps: a. The Software Version field should show the firmware version that the correct device information and product number appear. Review the Router > Status page. SPA9000 Voice System Administration Guide 26 Basic Administration of the SPA9000 Upgrading Firmware for the SPA9000 2 STEP 4 In the Confirm Upgrade...
... verify the upgrade, complete the following steps: a. The Software Version field should show the firmware version that the correct device information and product number appear. Review the Router > Status page. SPA9000 Voice System Administration Guide 26 Basic Administration of the SPA9000 Upgrading Firmware for the SPA9000 2 STEP 4 In the Confirm Upgrade...
Cisco SPA9000 Voice System Administration Guide
Page 30
... advanced features by clicking the Advanced link in the top right corner or lower left corner of the administrative GUI. This feature allows you to review the saved settings in all the web profile parameters and can also modify the passwords of both Administrator and User account. • Advanced: Administrators and...
... advanced features by clicking the Advanced link in the top right corner or lower left corner of the administrative GUI. This feature allows you to review the saved settings in all the web profile parameters and can also modify the passwords of both Administrator and User account. • Advanced: Administrators and...
Cisco SPA9000 Voice System Administration Guide
Page 38
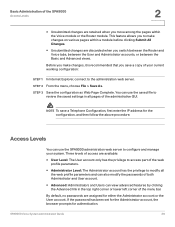
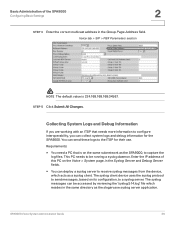
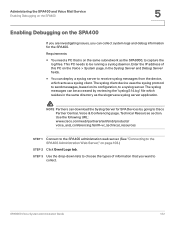
..., based on the same subnetwork as the SPA9000, to capture the log files. STEP 5 Click Submit All Changes. This PC needs to be accessed by reviewing the "syslog.514.log" file which acts as a syslog client. SPA9000 Voice System Administration Guide 36 Enter the IP address of the SPA9000 Configuring Basic...
..., based on the same subnetwork as the SPA9000, to capture the log files. STEP 5 Click Submit All Changes. This PC needs to be accessed by reviewing the "syslog.514.log" file which acts as a syslog client. SPA9000 Voice System Administration Guide 36 Enter the IP address of the SPA9000 Configuring Basic...
Cisco SPA9000 Voice System Administration Guide
Page 42
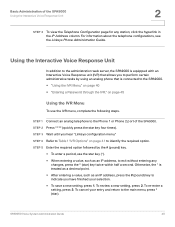
...(pound) key to the main menu, press * (star). STEP 3 Wait until you have finished your entry and return to indicate you hear "Linksys configuration menu." To re-enter a setting, press 3. SPA9000 Voice System Administration Guide 40 Otherwise, the * is connected to the SPA9000. •...Address column. STEP 5 Enter the required option followed by using an analog phone that is treated as a decimal point. • After entering a value, such as an IP address, to identify the required option. To review a new setting, press 2. STEP 2 Press **** (quickly press the ...
...(pound) key to the main menu, press * (star). STEP 3 Wait until you have finished your entry and return to indicate you hear "Linksys configuration menu." To re-enter a setting, press 3. SPA9000 Voice System Administration Guide 40 Otherwise, the * is connected to the SPA9000. •...Address column. STEP 5 Enter the required option followed by using an analog phone that is treated as a decimal point. • After entering a value, such as an IP address, to identify the required option. To review a new setting, press 2. STEP 2 Press **** (quickly press the ...
Cisco SPA9000 Voice System Administration Guide
Page 46
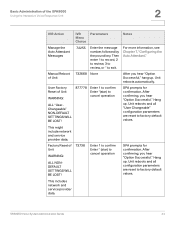
...Option Successful." Hang up . Enter 1 to confirm Enter * (star) to factory default values. Then enter 1 to record, 2 to review, 3 to review, or * to factory default values. User Factory Reset of 73738 Unit WARNING: ALL NONDEFAULT SETTINGS WILL BE LOST! Unit reboots and all... "User Changeable" configuration parameters are reset to cancel operation SPA prompts for confirmation. After confirming, you hear "Option ...
...Option Successful." Hang up . Enter 1 to confirm Enter * (star) to factory default values. Then enter 1 to record, 2 to review, 3 to review, or * to factory default values. User Factory Reset of 73738 Unit WARNING: ALL NONDEFAULT SETTINGS WILL BE LOST! Unit reboots and all... "User Changeable" configuration parameters are reset to cancel operation SPA prompts for confirmation. After confirming, you hear "Option ...
Cisco SPA9000 Voice System Administration Guide
Page 47
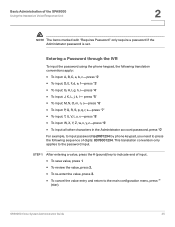
...press "8' • To input: W, X, Y, Z, w, x, y, z-press "9' • To input all other characters in the Administrator account password, press "0' For example, to input password test#@1234 by phone keypad, you need to press the following translation conventions apply: • To input: A, B, C, a, b, c-press "2' • To input: D, E, F, d, e, f-press "3' • To ...convention only applies to the password input. Basic Administration of input. • To save value, press 1. • To review the value, press 2. • To re-enter the value, press 3. • To cancel the value entry and...
...press "8' • To input: W, X, Y, Z, w, x, y, z-press "9' • To input all other characters in the Administrator account password, press "0' For example, to input password test#@1234 by phone keypad, you need to press the following translation conventions apply: • To input: A, B, C, a, b, c-press "2' • To input: D, E, F, d, e, f-press "3' • To ...convention only applies to the password input. Basic Administration of input. • To save value, press 1. • To review the value, press 2. • To re-enter the value, press 3. • To cancel the value entry and...
Cisco SPA9000 Voice System Administration Guide
Page 62
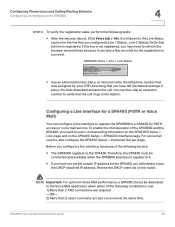
... times because it . • If you need to the Voice Mail application when either of the following conditions is registered. Line 4 Status). Review the DHCP client list on the SPA9000 4 STEP 6 To verify the registration state, perform the following tasks: • After the devices reboot,... on the SPA9000 Voice > Line page and on the SPA400 Setup > SPA9000 Interface page. Before you may need to the SPA400. Configuring Phone Lines and Calling Routing Behavior Configuring Line Interfaces on the router. Configuring a Line Interface for a SPA400 (PSTN or Voice Mail) You can...
... times because it . • If you need to the Voice Mail application when either of the following conditions is registered. Line 4 Status). Review the DHCP client list on the SPA9000 4 STEP 6 To verify the registration state, perform the following tasks: • After the devices reboot,... on the SPA9000 Voice > Line page and on the SPA400 Setup > SPA9000 Interface page. Before you may need to the SPA400. Configuring Phone Lines and Calling Routing Behavior Configuring Line Interfaces on the router. Configuring a Line Interface for a SPA400 (PSTN or Voice Mail) You can...

Cisco SPA9000 Voice System Administration Guide
Page 77
... a call using each digit sequence with a pipe character, and enclose the entire set of all phones). SPA9000 Voice System Administration Guide 75 Configuring Phone Lines and Calling Routing Behavior Configuring Dial Plans 4 STEP 3 Scroll down to review your entries and modify the dial plan appropriately. NOTE Separate each digit sequence that you entered...
... a call using each digit sequence with a pipe character, and enclose the entire set of all phones). SPA9000 Voice System Administration Guide 75 Configuring Phone Lines and Calling Routing Behavior Configuring Dial Plans 4 STEP 3 Scroll down to review your entries and modify the dial plan appropriately. NOTE Separate each digit sequence that you entered...

Cisco SPA9000 Voice System Administration Guide
Page 78
... using each client station that you entered in the IP Address column for the extension that needs a unique dial plan. Refer to the list of phones. STEP 9 Click the browser's Back button to return to the following example: (9,8[2-9]xxxxxx | 9,8,1[2-9]xxxxxxxxx | 9,8,011xx. | 9,8,xx.|[1-8]xx) STEP ...7 Click Submit All Changes. STEP 10 Repeat this procedure for each digit sequence that you want to review your entries and modify the dial plan appropriately. STEP 11 Verify that you need to configure. STEP 5 Scroll down to view the list of...
... using each client station that you entered in the IP Address column for the extension that needs a unique dial plan. Refer to the list of phones. STEP 9 Click the browser's Back button to return to the following example: (9,8[2-9]xxxxxx | 9,8,1[2-9]xxxxxxxxx | 9,8,011xx. | 9,8,xx.|[1-8]xx) STEP ...7 Click Submit All Changes. STEP 10 Repeat this procedure for each digit sequence that you want to review your entries and modify the dial plan appropriately. STEP 11 Verify that you need to configure. STEP 5 Scroll down to view the list of...
Cisco SPA9000 Voice System Administration Guide
Page 108
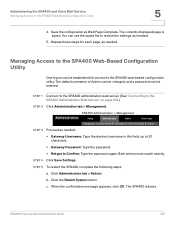
... restart the SPA400, complete the following steps: a. SPA9000 Voice System Administration Guide 106 Save the configuration as needed. 5. You can use the saved file to review the settings as Web Page Complete. The SPA400 reboots. Administering the SPA400 and Voice Mail Service Managing Access to the SPA400 Web-Based Configuration Utility...
... restart the SPA400, complete the following steps: a. SPA9000 Voice System Administration Guide 106 Save the configuration as needed. 5. You can use the saved file to review the settings as Web Page Complete. The SPA400 reboots. Administering the SPA400 and Voice Mail Service Managing Access to the SPA400 Web-Based Configuration Utility...
Cisco SPA9000 Voice System Administration Guide
Page 121
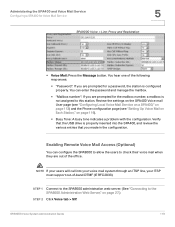
...RFC2833). STEP 1 Connect to the SPA9000 administration web server. (See "Connecting to this station. Review the settings on the SPA400 Voice mail User page (see "Configuring Local Voice Mail Service on a SPA400," on page113) and the Phone configuration page (see "Setting Up Voice Mail on Each Station," on page 27.) STEP 2... that the USB drive is properly inserted into your voice mail system through an ITSP line, your users will call into the SPA400, and review the various entries that you are out of the following responses: • "Password": If you made in the configuration.
...RFC2833). STEP 1 Connect to the SPA9000 administration web server. (See "Connecting to this station. Review the settings on the SPA400 Voice mail User page (see "Configuring Local Voice Mail Service on a SPA400," on page113) and the Phone configuration page (see "Setting Up Voice Mail on Each Station," on page 27.) STEP 2... that the USB drive is properly inserted into your voice mail system through an ITSP line, your users will call into the SPA400, and review the various entries that you are out of the following responses: • "Password": If you made in the configuration.
Cisco SPA9000 Voice System Administration Guide
Page 124
This PC needs to a syslog server. NOTE Partners can collect system logs and debug information for SPA Devices by reviewing the "syslog.514.log" file which acts as the SPA9000, to Cisco Partner Central, Voice & Conferencing page, Technical Resources section. Use the following URL: www....
This PC needs to a syslog server. NOTE Partners can collect system logs and debug information for SPA Devices by reviewing the "syslog.514.log" file which acts as the SPA9000, to Cisco Partner Central, Voice & Conferencing page, Technical Resources section. Use the following URL: www....
Cisco SPA9000 Voice System Administration Guide
Page 136
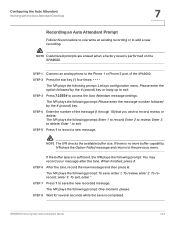
.... The IVR plays the following prompt: Enter 1 to the previous menu. STEP 1 Connect an analog phone to record a new message. Please enter the option followed by the # (pound) key. The IVR... 7 Recording an Auto Attendant Prompt Follow this procedure to overwrite an existing recording or to review. NOTE Customized prompts are erased when a factory reset is sufficient, the IVR plays the... prompt: You may record your message after the tone. The IVR plays the following prompt: Linksys configuration menu. STEP 6 After the tone, record the new message and then press #. SPA9000...
.... The IVR plays the following prompt: Enter 1 to the previous menu. STEP 1 Connect an analog phone to record a new message. Please enter the option followed by the # (pound) key. The IVR... 7 Recording an Auto Attendant Prompt Follow this procedure to overwrite an existing recording or to review. NOTE Customized prompts are erased when a factory reset is sufficient, the IVR plays the... prompt: You may record your message after the tone. The IVR plays the following prompt: Linksys configuration menu. STEP 6 After the tone, record the new message and then press #. SPA9000...
Cisco SPA9000 Voice System Administration Guide
Page 138
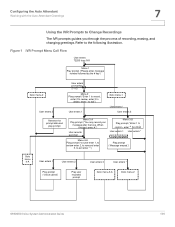
... by the # key") Goto menu-2 User enters 2 User enters prompt key (1-10) Menu-2 Play prompt ("Enter 1 to record, enter 2 to review, enter 3 to delete, enter * to Change Recordings The IVR prompts guides you through the process of recording, erasing, and changing greetings. When finished..., press #.") User records a prompt Menu-4-A Play prompt ("to save enter 1, to review enter 2, to rerecord enter 3, to exit enter *.") Menu-3-B Play prompt ("enter 1 to confirm, enter * to the following illustration. Refer to ...
... by the # key") Goto menu-2 User enters 2 User enters prompt key (1-10) Menu-2 Play prompt ("Enter 1 to record, enter 2 to review, enter 3 to delete, enter * to Change Recordings The IVR prompts guides you through the process of recording, erasing, and changing greetings. When finished..., press #.") User records a prompt Menu-4-A Play prompt ("to save enter 1, to review enter 2, to rerecord enter 3, to exit enter *.") Menu-3-B Play prompt ("enter 1 to confirm, enter * to the following illustration. Refer to ...

Cisco WBP54G Wireless-G Bridge for Phone Adapters User Guide
Page 19
... you proceed. Click the Yes button to save your new settings, or click Back to return to the wireless network using the new settings. Review them before you have two options offered by a pop-up screen. This indicates that the Bridge has connected to step 12. The new settings... will attempt to connect to the previous screen. 11. Screen Chapter 4: Setting Up and Connecting the Wireless-G Bridge for Phone Adapters 10. If the attempt succeeds, proceed to the wireless network. Click Next to proceed, or click Back to return to the Choose a ...
... you proceed. Click the Yes button to save your new settings, or click Back to return to the wireless network using the new settings. Review them before you have two options offered by a pop-up screen. This indicates that the Bridge has connected to step 12. The new settings... will attempt to connect to the previous screen. 11. Screen Chapter 4: Setting Up and Connecting the Wireless-G Bridge for Phone Adapters 10. If the attempt succeeds, proceed to the wireless network. Click Next to proceed, or click Back to return to the Choose a ...
User Guide
Page 11
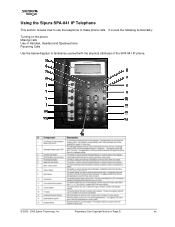
It covers the following functionality: Turning on Page 2) 11 Using the Sipura SPA-841 IP Telephone This section reviews how to use the telephone to familiarize yourself with the physical attributes of the SPA-841 IP phone. © 2003 - 2005 Sipura Technology, Inc Proprietary (See Copyright Notice on the phone Making Calls Use of Handset, Headset and Speakerphone Receiving Calls Use the below diagram to make phone calls.
It covers the following functionality: Turning on Page 2) 11 Using the Sipura SPA-841 IP Telephone This section reviews how to use the telephone to familiarize yourself with the physical attributes of the SPA-841 IP phone. © 2003 - 2005 Sipura Technology, Inc Proprietary (See Copyright Notice on the phone Making Calls Use of Handset, Headset and Speakerphone Receiving Calls Use the below diagram to make phone calls.
User Guide
Page 17
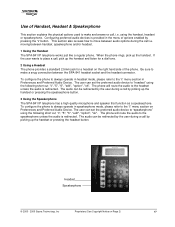
... SPA-841 IP telephone works just like a regular phone. The user can set the preferred audio device to "speakerphone" using the following short cut "i", "5", "6", "edit", "option", "ok". Headset Speakerphone © 2003 - 2005 Sipura ...SPA-841 IP telephone has a high quality microphone and speaker that function as a speakerphone. The audio can be redirected by the user during a call by pressing the "i" button. using the following short cut "i", "5", "6", "edit", "option", "ok". This section also reviews how to move between audio options during a call , i.e. The phone...
... SPA-841 IP telephone works just like a regular phone. The user can set the preferred audio device to "speakerphone" using the following short cut "i", "5", "6", "edit", "option", "ok". Headset Speakerphone © 2003 - 2005 Sipura ...SPA-841 IP telephone has a high quality microphone and speaker that function as a speakerphone. The audio can be redirected by the user during a call by pressing the "i" button. using the following short cut "i", "5", "6", "edit", "option", "ok". This section also reviews how to move between audio options during a call , i.e. The phone...

User Guide
Page 41
... Ans Number 4 CFWD No Ans Delay save CallForward edit © 2003 - 2005 Sipura Technology, Inc Proprietary (See Copyright Notice on Page 2) 41 This option forwards calls if there is the right soft key button. To review and change the call forwarding methods that can be returned to the "i" menu. This... option forwards all of the calls, Forward the calls when the line is busy, Forward when there is no answer after a time delay. This option forwards calls to another number when the phone is...
... Ans Number 4 CFWD No Ans Delay save CallForward edit © 2003 - 2005 Sipura Technology, Inc Proprietary (See Copyright Notice on Page 2) 41 This option forwards calls if there is the right soft key button. To review and change the call forwarding methods that can be returned to the "i" menu. This... option forwards all of the calls, Forward the calls when the line is busy, Forward when there is no answer after a time delay. This option forwards calls to another number when the phone is...