

3255 Manual
Page 2
...garage door opener 28 Having a problem 29 Diagnostic chart 30 Programming 31-32 To add or reprogram a hand-held remote control 31 To erase all codes 31 3-Button remotes 31 To add, reprogram or change a Keyless Entry PIN 32 Repair Parts 33-34 Rail assembly parts 33 Installation parts...Install the header bracket 9 Attach the rail to the header bracket 10 Position the opener 11 Hang the opener 12 Install the door control 13 Install the light 14 Attach the emergency release rope and handle 14 Electrical requirements 15 Install the Protector System 16-18 Fasten ...
...garage door opener 28 Having a problem 29 Diagnostic chart 30 Programming 31-32 To add or reprogram a hand-held remote control 31 To erase all codes 31 3-Button remotes 31 To add, reprogram or change a Keyless Entry PIN 32 Repair Parts 33-34 Rail assembly parts 33 Installation parts...Install the header bracket 9 Attach the rail to the header bracket 10 Position the opener 11 Hang the opener 12 Install the door control 13 Install the light 14 Attach the emergency release rope and handle 14 Electrical requirements 15 Install the Protector System 16-18 Fasten ...

3255 Manual
Page 5
... ONLY UP Header Bracket 2 Conductor Bell Wire White & White/Red? contain the motor unit and all parts illustrated below . 3245 (1), 3255 (1), 3255-2 (2) LOCK LIGHT Multi-Function Door Control Panel : SECURITY ® Single-Button Remote Control Remote Control Visor Clip Chain Sprocket Cover Styrofoam Motor Unit with 2-Conductor White & White/Black Bell Wire attached Safety Labels and Literature...
... ONLY UP Header Bracket 2 Conductor Bell Wire White & White/Red? contain the motor unit and all parts illustrated below . 3245 (1), 3255 (1), 3255-2 (2) LOCK LIGHT Multi-Function Door Control Panel : SECURITY ® Single-Button Remote Control Remote Control Visor Clip Chain Sprocket Cover Styrofoam Motor Unit with 2-Conductor White & White/Black Bell Wire attached Safety Labels and Literature...
3255 Manual
Page 13
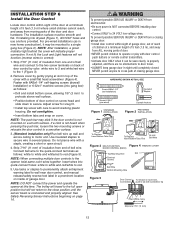
...wires into drywall (Figure 1), drill 5/32" holes and use anchors provided. Fasten with door control push buttons or remote control transmitters. • Activate door ONLY when it may stick if the door control is connected and properly aligned. Do not overtighten. • Insert bottom tabs and snap ...tacks or staples to permanently attach entrapment warning label to the close position until completely closed. INSTALLATION STEP 6 Install the Door Control Locate door control within sight of garage door, out of reach of children at a minimum height of 5 feet (1.5 m), and away from ...
...wires into drywall (Figure 1), drill 5/32" holes and use anchors provided. Fasten with door control push buttons or remote control transmitters. • Activate door ONLY when it may stick if the door control is connected and properly aligned. Do not overtighten. • Insert bottom tabs and snap ...tacks or staples to permanently attach entrapment warning label to the close position until completely closed. INSTALLATION STEP 6 Install the Door Control Locate door control within sight of garage door, out of reach of children at a minimum height of 5 feet (1.5 m), and away from ...
3255 Manual
Page 25
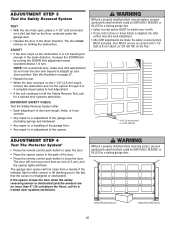
...(or 2x4 laid flat) on the floor. 1-1/2" (3.8 cm) board (or a 2x4 laid flat) ADJUSTMENT STEP 4 Test The Protector System® • Press the remote control push button to open , place a 1-1/2" (3.8 cm) board (or a 2x4 laid flat) on the floor, centered under the garage door. • Operate the door... • Place the opener carton in the path of the door. • Press the remote control push button to or adjustment of the garage floor. • Any repair to close from a remote if the indicator light in either sensor is misaligned or obstructed). Without a properly installed safety ...
...(or 2x4 laid flat) on the floor. 1-1/2" (3.8 cm) board (or a 2x4 laid flat) ADJUSTMENT STEP 4 Test The Protector System® • Press the remote control push button to open , place a 1-1/2" (3.8 cm) board (or a 2x4 laid flat) on the floor, centered under the garage door. • Operate the door... • Place the opener carton in the path of the door. • Press the remote control push button to or adjustment of the garage floor. • Any repair to close from a remote if the indicator light in either sensor is misaligned or obstructed). Without a properly installed safety ...
3255 Manual
Page 26
... falling rapidly and/or unexpectedly. 7. when the opener is A19. Security✚ ®light feature: Lights will reverse. ALWAYS keep remote controls out of reach of SEVERE INJURY or DEATH: 1. If one Security✚® Keyless Entry System. Activate your garage door opener, it...clearly, it is properly adjusted, and there are under the following : • The hand-held remote control have been factory-set to cables, spring assemblies and other control may be programmed before use emergency release handle unless garage doorway is clear of the following conditions: ...
... falling rapidly and/or unexpectedly. 7. when the opener is A19. Security✚ ®light feature: Lights will reverse. ALWAYS keep remote controls out of reach of SEVERE INJURY or DEATH: 1. If one Security✚® Keyless Entry System. Activate your garage door opener, it...clearly, it is properly adjusted, and there are under the following : • The hand-held remote control have been factory-set to cables, spring assemblies and other control may be programmed before use emergency release handle unless garage doorway is clear of the following conditions: ...
3255 Manual
Page 27
...on the next UP or DOWN operation, either manually or by using the door control or remote. Emergency Release Handle (Pull Down) Trolley Release Arm NOTICE The lockout feature prevents the trolley from hand-held remote controls. Repeat the procedure and the light will flash as long as necessary. The ...push bar light will blink twice, resetting the timer to the opener, press the door control push bar. Weak or broken springs or unbalanced door...
...on the next UP or DOWN operation, either manually or by using the door control or remote. Emergency Release Handle (Pull Down) Trolley Release Arm NOTICE The lockout feature prevents the trolley from hand-held remote controls. Repeat the procedure and the light will flash as long as necessary. The ...push bar light will blink twice, resetting the timer to the opener, press the door control push bar. Weak or broken springs or unbalanced door...
3255 Manual
Page 28
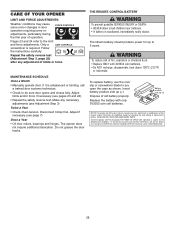
... require additional lubrication. The lithium battery should produce power for changing the code setting or replacing the battery. Only a LIMIT CONTROLS screwdriver is swallowed, immediately notify doctor. If it is subject to Comply with FCC and or Industry Canada rules (IC), ... cell batteries. Follow the instructions carefully. Do not grease the door tracks. FORCE CONTROLS 9 1 7 3 5 KG 9 1 7 3 5 KG Pages 23 and 24 refer to pry open the case as shown. THE REMOTE CONTROL BATTERY To prevent possible SERIOUS INJURY or DEATH: • NEVER allow small children near...
... require additional lubrication. The lithium battery should produce power for changing the code setting or replacing the battery. Only a LIMIT CONTROLS screwdriver is swallowed, immediately notify doctor. If it is subject to Comply with FCC and or Industry Canada rules (IC), ... cell batteries. Follow the instructions carefully. Do not grease the door tracks. FORCE CONTROLS 9 1 7 3 5 KG 9 1 7 3 5 KG Pages 23 and 24 refer to pry open the case as shown. THE REMOTE CONTROL BATTERY To prevent possible SERIOUS INJURY or DEATH: • NEVER allow small children near...
3255 Manual
Page 29
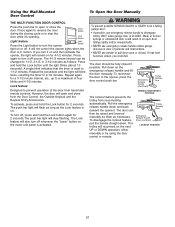
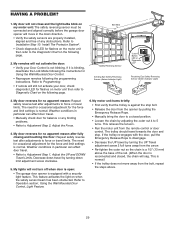
...refer to the Diagnostic Chart on the following the programming instructions. The need for occasional adjustment for Using the Wall-Mounted Door Control. • Reprogram remotes following page. Weather conditions in particular can affect door travel. • Refer to force or travel by adjusting the outer ...away from the arrow. • Re-tighten the outer nut so the chain is normal. My door will move away from the remote control or door control. HAVING A PROBLEM? 1. This relieves the tension. • Run the motor unit from the bolt, repeat the steps above the...
...refer to the Diagnostic Chart on the following the programming instructions. The need for occasional adjustment for Using the Wall-Mounted Door Control. • Reprogram remotes following page. Weather conditions in particular can affect door travel. • Refer to force or travel by adjusting the outer ...away from the arrow. • Re-tighten the outer nut so the chain is normal. My door will move away from the remote control or door control. HAVING A PROBLEM? 1. This relieves the tension. • Run the motor unit from the bolt, repeat the steps above the...
3255 Manual
Page 31
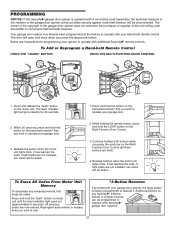
...;® garage door opener is factory programmed to operate with additional Security✚® remote controls. The door will be circumvented. While holding both buttons while you wish to use. *3-Button Remotes If provided with your garage door opener, the large button is operated with your garage... has already been programmed at the factory to operate your opener to operate it. To Add or Reprogram a Hand-held remote control. Press and hold the "learn indicator light goes out (approximately 6 seconds). Within 30 seconds, press and hold the button on the...
...;® garage door opener is factory programmed to operate with additional Security✚® remote controls. The door will be circumvented. While holding both buttons while you wish to use. *3-Button Remotes If provided with your garage door opener, the large button is operated with your garage... has already been programmed at the factory to operate your opener to operate it. To Add or Reprogram a Hand-held remote control. Press and hold the "learn indicator light goes out (approximately 6 seconds). Within 30 seconds, press and hold the button on the...
3255 Manual
Page 33
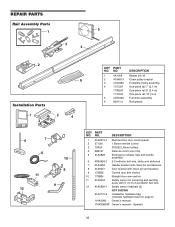
NO. DESCRIPTION 1 41A5273-1 Multi-function door control panel 2 371LM 1 Button remote control 3 10A20 3V2032 Lithium battery 4 29B137 Remote control visor clip 5 41A2828 Emergency release rope and handle assembly 6 41B4494-1 2-Conductor bell wire, white and white/red 7 41A4353 Header bracket with clevis pin and fastener 8 ...
NO. DESCRIPTION 1 41A5273-1 Multi-function door control panel 2 371LM 1 Button remote control 3 10A20 3V2032 Lithium battery 4 29B137 Remote control visor clip 5 41A2828 Emergency release rope and handle assembly 6 41B4494-1 2-Conductor bell wire, white and white/red 7 41A4353 Header bracket with clevis pin and fastener 8 ...

3255 Manual
Page 35
.... Tells you if your home! SECURITY✚® 3-Button Remote Control: Includes visor clip. Also can be limited to a programmable number of your garage door is designed to protect LiftMaster® garage door openers against damage from outside by adding additional... sensor modules. 975LM Remote Light Control: Enables homeowner to precisely park vehicles in the home with a remote. 990LM 373W Designer Burled Walnut 3-Button Remote Control with NO access door. Wireless Door Control:...
.... Tells you if your home! SECURITY✚® 3-Button Remote Control: Includes visor clip. Also can be limited to a programmable number of your garage door is designed to protect LiftMaster® garage door openers against damage from outside by adding additional... sensor modules. 975LM Remote Light Control: Enables homeowner to precisely park vehicles in the home with a remote. 990LM 373W Designer Burled Walnut 3-Button Remote Control with NO access door. Wireless Door Control:...


