LiftMaster 8587 Support and Manuals
Get Help and Manuals for this LiftMaster item

View All Support Options Below
Free LiftMaster 8587 manuals!
Problems with LiftMaster 8587?
Ask a Question
Free LiftMaster 8587 manuals!
Problems with LiftMaster 8587?
Ask a Question
LiftMaster 8587 Videos

Liftmaster 8587 Elite Series Carriage House Opener *new info *
Duration: 2:03
Total Views: 2,834
Duration: 2:03
Total Views: 2,834
Popular LiftMaster 8587 Manual Pages
8587 Manual - Page 1

Write down the following information for installation instructions. ELITE Series Chain Drive Garage Door Opener
Model 8587 - 3/4 hp
FOR RESIDENTIAL USE ONLY
■ Please read this manual and the enclosed safety materials carefully! ■ Fasten the manual near the garage door after installation. ■ The door WILL NOT CLOSE unless the Protector System® is connected and properly
...
8587 Manual - Page 2
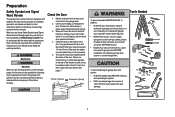
.... The hazard may be installed above the center of the door.
Torsion Spring OR Extension Spring
Tools Needed
To prevent possible SERIOUS INJURY or DEATH:
• ALWAYS call a trained door systems technician.
4. Read them . Preparation
Safety Symbol and Signal Word Review
This garage door opener has been designed and tested to offer safe service provided it is out of...
8587 Manual - Page 3

Door bracket
H. Door control
E. The instructions for reference and your product may be attached to the accessory and are for these accessories will vary depending on your garage door opener. Garage door opener
M. Safety reversing sensors
with your specific model, other accessories may look different. Rail
L. The images throughout this manual. Emergency release ...
8587 Manual - Page 4

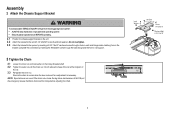
...bolts removed from the garage door opener. NOTE: The 6-tooth sprocket is for use with screws.
1.6 Guide the chain around the selected
groove in the chain spreader, to garage door opener, use ONLY those bolts/fasteners mounted in the top of the garage door opener.
1.2 Align the rail and the styrofoam over the
sprocket. Assembly
1 Attach the rail to the garage door opener
To avoid SERIOUS damage...
8587 Manual - Page 5
... to finger from moving garage door opener: • ALWAYS keep hand clear of sprocket while operating opener. • Securely attach sprocket cover BEFORE operating.
2.1 Position the chassis support bracket on the trolley threaded shaft. 3.2 Tighten the outer nut until the chain is a 1/2 inch above the base of the rail at the midpoint of
the rail.
3.3 Re-tighten the...
8587 Manual - Page 6

... garage door opener to power source until instructed to avoid entanglement. 5. They could result in garage door or opener mechanisms.
9. Door MUST reverse on contact with vehicles to -Close functionality if operating either one -piece door, visit www.liftmaster.com for installation instructions. 6 To be made by a trained
door systems technician BEFORE installing opener. 4. ALL repairs...
8587 Manual - Page 7

... high point.
DO NOT install header bracket over drywall.
• Concrete anchors MUST be used if mounting header bracket or 2x4 into masonry.
• NEVER try to loosen, move or adjust garage door, springs, cables, pulleys, brackets, or their hardware, ALL of which are installing the garage door opener on a one-piece door, visit www.liftmaster.com for ceiling...
8587 Manual - Page 9

... remain disconnected until instructed. Insert the clevis pin through the holes in the header bracket and rail. Slide the outer trolley toward the garage door opener. If the ladder is raised, pull the trolley release arm down to disconnect the inner and outer trolley.
NOTE: Use the packing material as a protective base for setting the distance...
8587 Manual - Page 10

... the 2x4. Two representative installations are not provided.
Operate the door
manually. Yours may be angled (Figure 1) to provide rigid support.
HARDWARE
Lock Washer 5/16"
Hex Bolt 5/16"- 18x7/8"
Nut 5/16"-18
Hanging your garage door opener will vary depending on your garage. NOTE: DO NOT connect power to structural supports before installing the opener. On finished ceilings (Figure...
8587 Manual - Page 19

...-WIRED INSTALLATIONS: If your garage 2.1A Run the wire from both sensors to the floor
using concrete anchors.
The lens on the garage door opener. Attach the wire to
sensors, see page 20.
Insert the white/black wires into the white terminal on
each sensor. Hex Bolt 1/4"-20x5/8"
Lock Nut 1/4"-20
Lag Screws 1-4"x1-1/2"
Extension Bracket...
8587 Manual - Page 27
... use, randomly accessing over 100 billion new codes. power is restored after interruption, or when the garage door opener is fully closed. The lights will open , and the safety reversing sensors are not installed, or are not compatible. If the door senses an obstruction or is interrupted while opening cycle. When the door is in any other Security+ 2.0™...
8587 Manual - Page 32

.... To reduce risk of white lithium grease to wipe away the existing grease from the garage door opener rail. THERE ARE NO USER SERVICEABLE PARTS. Any changes or modifications not expresslyapproved by using the door control or remote control. To replace the batteries, remove the two screws and open or closed if possible. 2 Pull down and back (toward the...
8587 Manual - Page 34

... such as needed. My vehicle's Homelink® is set to a custom time, press the ON button on the door control detects movement in the down direction.
• Verify the safety sensors are properly installed, aligned and free of your garage door opener and reprogram the remote control(s). Troubleshooting
DIAGNOSTIC CODE
Up Arrow Flash(es)
Down Arrow Flash(es...
8587 Manual - Page 35

... Gateway: Internet enabled accessory which connects to the computer and allows you to open /closed status for up to install.
893MAX
3-Button MAX Remote Control: Compatible with LiftMaster® garage door openers manufactured since 1993. includes a push bar to monitor and control garage door openers and lighting accessories enabled by MyQ® technology.
829LM
823LM
Remote Light...
8587 Manual - Page 38

... Troubleshooting issue, it is recommended that you are ordering a repair part please have the model number of the garage door opener. If you have access to : The Chamberlain Group, Inc. 6050 S. Repair Parts
Garage Door Opener Parts
1
6
3
4
9
16 11
8
15
5
10
14
114A4622
2
12 7 89
13
Description 1 Chassis Support Bracket Assembly Kit 2 Chain spreader 3 Gear and Sprocket 4 Drive...
LiftMaster 8587 Reviews
We have not received any reviews for LiftMaster yet.