LiftMaster 8350 Support Question
LiftMaster 8350 Support Question
Find answers below for this question about LiftMaster 8350.Need a LiftMaster 8350 manual? We have 1 online manual for this item!
Question posted by sendtoalice on November 27th, 2014
Remote Control For Liftmaster /chamberlain 3850 Garage Door Opener
what is the correct remote control for the chamberlain/liftmaster 3850 garage door opener
Current Answers
Answer #1: Posted by BusterDoogen on November 27th, 2014 12:37 PM
BusterDoogen

Member since:
October 30th, 2011 Points: 28,565,407

Member since:
October 30th, 2011 Points: 28,565,407
Liftmaster 373P
I hope this is helpful to you!
Please respond to my effort to provide you with the best possible solution by using the "Acceptable Solution" and/or the "Helpful" buttons when the answer has proven to be helpful. Please feel free to submit further info for your question, if a solution was not provided. I appreciate the opportunity to serve you!
Related LiftMaster 8350 Manual Pages
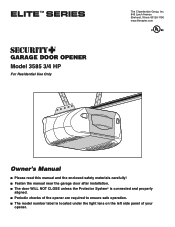
3585 Elite Series Manual - Page 1
®
GARAGE DOOR OPENER Model 3585 3/4 HP
For Residential Use Only
The Chamberlain Group, Inc. 845 Larch Avenue Elmhurst, Illinois 60126-1196
www.liftmaster.com
Owner's Manual
■ Please read this manual and the enclosed safety materials carefully! ■ Fasten the manual near the garage door after installation. ■ The door WILL NOT CLOSE unless the Protector System®...
3585 Elite Series Manual - Page 2
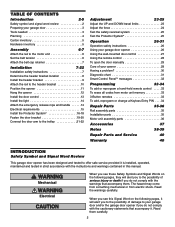
... system 25
Test the Protector System 25
Operation
26-31
Operation safety instructions 26
Using your garage door opener 26
Using the wall-mounted door control 27
Using the remote control 28
To open the door manually 29
Care of your garage door and/or the garage door opener if you do not comply with the instructions and warnings contained in strict accordance with...
3585 Elite Series Manual - Page 3

...
Stepladder
1/2" and 7/16" Sockets and Wrench
Screwdriver
Hack Saw Claw Hammer Adjustable End Wrench
3 To prevent damage to garage door and opener:
• ALWAYS disable locks BEFORE installing and operating the opener.
• ONLY operate garage door opener at 120V, 60 Hz to avoid entanglement.
If balanced, it should stay in place, supported entirely by its springs...
3585 Elite Series Manual - Page 5
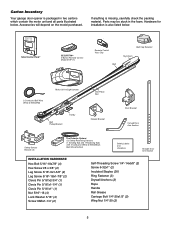
... below . Carton Inventory
Your garage door opener is also listed below .
Hardware for installation is packaged in the foam. If anything is missing, carefully check the packing material. LOCK
LIGHT
SmLCarDt CMoontitoronl DPeatneecltTMing Door Control Console
SECURITY✚® 3-Button Remote Control Model 373P (1)
Remote Control TVrisaonrsmCliitpter Visor Clip
Belt
Belt...
3585 Elite Series Manual - Page 6
... (3.18 cm)
Figure 2
Nut Ring Slots
6 Liftmaster Synchro Drive
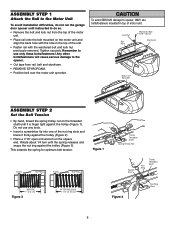
• Cut tape from the top of...Chamberlain Group, Inc. Rotate about 1/4 turn until the spring releases and snaps the nut ring against the trolley (Figure 1). This extends the spring for optimum belt tension. ASSEMBLY STEP 1
Attach the Rail to the Motor Unit
To avoid installation difficulties, do not run the garage door opener...
3585 Elite Series Manual - Page 7
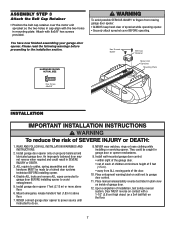
... so the two holes in cap align with the two holes in SEVERE
INJURY or DEATH.
• within sight of the garage door. • out of reach of children at minimum height of garage door.
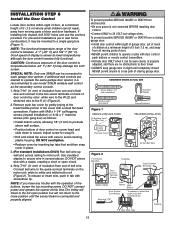
12. Install wall-mounted garage door control:
WARNING not reverse when required and could be made by a trained door systems technician BEFORE installing opener.
4.
3585 Elite Series Manual - Page 11
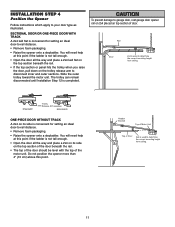
... prevent damage to garage door, rest garage door opener rail on 2x4 placed on the trolley release arm to determine the correct mounting height from ceiling. Header Bracket
Top of Motor Unit
Top of Door
2x4 is used to disconnect inner and outer sections. Rail
Door
2x4 is used to your door type as illustrated.
SECTIONAL DOOR OR ONE-PIECE...
3585 Elite Series Manual - Page 12
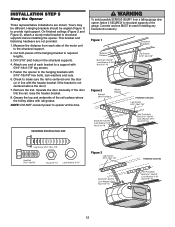
... 3), attach a sturdy metal bracket to provide rigid support. Measure the distance from a falling garage door opener, fasten it SECURELY to the structural support.
2. Check to the hanging brackets with the header bracket if the bracket is not centered above the door).
7.
Concrete anchors MUST be different. Figure 1
Measure Distance Bolt 5/16"-18x7/8" Lock Washer...
3585 Elite Series Manual - Page 13
... path of closing garage door: • Install door control within sight of door, at a minimum height of 5' (1.5 m) where small children cannot reach, away from moving parts of door. • NEVER permit children to operate or play with door control push buttons or remote control transmitters. • Activate door ONLY when it can be connected to each garage door opener. Use insulated staples...
3585 Elite Series Manual - Page 14

... bulb size should be A19, standard neck only.
Secure with an overhand knot at least 1" (2.5 cm) from a falling garage door: • If possible, use handle to close the lens.
• Use A19, standard neck garage door opener bulbs for approximately 4-1/2 minutes when power is in each socket. Use ONLY incandescent. To prevent damage to prevent...
3585 Elite Series Manual - Page 15

... wiring is required by your garage door opener has a grounding type plug with all local electrical and building codes.
• NEVER use an extension cord, 2-wire adapter, or change plug in ANY way to the screw on the brass terminal; To avoid installation difficulties, do not run the opener at this time. This plug...
3585 Elite Series Manual - Page 25
...®
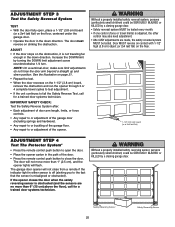
• Press the remote control push button to open , place a 1-1/2" (3.8 cm) board
(or a 2x4 laid flat) on the obstruction, it is not traveling far
enough in the down position. Without a properly installed safety reversing sensor, persons (particularly small children) could be SERIOUSLY INJURED or KILLED by a closing garage door.
The door must reverse on the...
3585 Elite Series Manual - Page 26
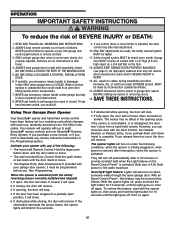
...large push
button down until the door starts to door travel is complete. Your opener will reverse. If closing , the door will operate with the opener lights on contact with garage door control push buttons or remote controls.
3. With an Smart Control PanelTM, this feature, start with up to garage door opener BEFORE making any remote, follow the instructions in an open garage door.
3585 Elite Series Manual - Page 30

...the instructions for Using the Wall Mounted Door Control.
• Reprogram remotes following the programming instructions. Weather conditions in...correctly before the garage door opener will not activate the door:
• Verify your door, check diagnostic LED for flashes on the following page. HAVING A PROBLEM?
1. My door will not turn off when door is open:
• The garage door opener...
3585 Elite Series Manual - Page 31
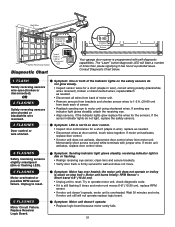
... if the indicator lights glow replace the wires for a short (staple in wire), correct wiring polarity (black/white
wires reversed), broken or disconnected wires, replace/attach as needed...
Sensor
Your garage door opener is stuck on stop bolt = Motor unit hums briefly; OR 2 FLASHES
Safety reversing sensors wire shorted or black/white wire reversed.
3 FLASHES
Door control or wire shorted...
3585 Elite Series Manual - Page 33

... button again to operate other Security✚® garage door openers.
33 The learn " button on the Smart Control PanelTM.
2. If light bulbs are not installed, two clicks will open and close when you wish to operate your hand-held Remote Control
USING THE "LEARN" BUTTON
USING THE SMART CONTROL PANELTM
LOCK
LIGHT
1. When the motor unit lights...
3585 Elite Series Manual - Page 34
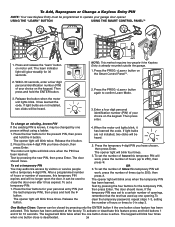
...of times (up to operate your garage door opener. The opener light will work , press the number of hours this temporary PIN expires and will blink twice. The door should move . Press and release ...PIN), then press and hold the ✽ button. USING THE "LEARN" BUTTON
USING THE SMART CONTROL PANELTM
1.
Press the PROG button on the keypad. Then press and hold buttons 1
and 9 for...
3585 Elite Series Manual - Page 35
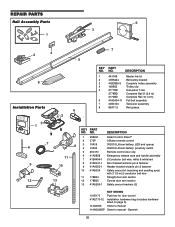
... 29C151 41A2828 41B4494-1 41A5047-1 41A4353-1 41A5034
178B34 178B35 41A5266-1
Smart Control PanelTM 3-Button remote control 3V2016 Lithium battery: LED and opener 3V2016 Lithium battery: proximity switch Remote control visor clip Emergency release rope and handle assembly 2-Conductor bell wire, white & white/red Door bracket w/clevis pin & fastener Header bracket w/clevis pin & fastener Safety...
3585 Elite Series Manual - Page 37

...10010;®: Enables homeowner to protect LiftMaster® garage door openers against damage from outside by adding additional sensor modules.
Also can be limited to a programmable number of your garage door is designed to operate garage door opener from lightning and power surges.
373P 373LM
3-Button Security✚® Remote Control: Includes visor clip.
3-Button Security...
3585 Elite Series Manual - Page 40
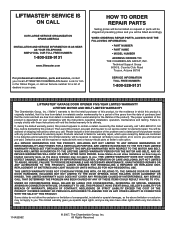
...800-528-9131, toll free, before dismantling this limited warranty in your local LIFTMASTER/CHAMBERLAIN dealer. ALL IMPLIED WARRANTIES FOR THE PRODUCT, INCLUDING BUT NOT LIMITED TO ... INFORMATION TOLL FREE NUMBER:
1-800-528-9131
LIFTMASTER® GARAGE DOOR OPENER FIVE-YEAR LIMITED WARRANTY
LIFETIME MOTOR AND BELT LIMITED WARRANTY
The Chamberlain Group, Inc. ("Seller") warrants to the first...
Similar Questions

How To Program Remote For Chamberlain Sl3000ul Garage Door Opener
(Posted by mhoPool 10 years ago)

How To Change Battery In Liftmaster Elite 3850 Garage Door Opener
(Posted by redanirob6 10 years ago)

If You Take Out The Back Up Battery On A Elite 3850 Garage Door Opener, It Will
still operate when the electric is on won't it. i have a low back up battery.
still operate when the electric is on won't it. i have a low back up battery.
(Posted by szenov 10 years ago)

How To Change The Battery In A Liftmaster 3850 Garage Door Opener
(Posted by Spapmpa 10 years ago)