

3255 Manual
Page 2
... To add, reprogram or change a Keyless Entry PIN 32 Repair Parts 33-34 Rail assembly parts 33 Installation parts 33 Motor unit assembly parts 34 Accessories 35 Repair Parts and Service 36 Warranty 36 INTRODUCTION Safety Symbol and Signal Word Review This garage door opener has been designed and tested to...
... To add, reprogram or change a Keyless Entry PIN 32 Repair Parts 33-34 Rail assembly parts 33 Installation parts 33 Motor unit assembly parts 34 Accessories 35 Repair Parts and Service 36 Warranty 36 INTRODUCTION Safety Symbol and Signal Word Review This garage door opener has been designed and tested to...

3255 Manual
Page 5
... installation Accessories will depend on the model purchased. Carton Inventory Your garage door opener is packaged in the foam. Parts may be stuck in two cartons which If anything is also listed below . is missing, carefully check the packing material. contain the motor unit and all parts illustrated below . 3245 (1), 3255 (1), 3255-2 (2) LOCK...
... installation Accessories will depend on the model purchased. Carton Inventory Your garage door opener is packaged in the foam. Parts may be stuck in two cartons which If anything is also listed below . is missing, carefully check the packing material. contain the motor unit and all parts illustrated below . 3245 (1), 3255 (1), 3255-2 (2) LOCK...
3255 Manual
Page 16
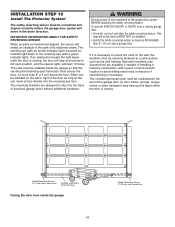
... the opener lights will flash 10 times. INSTALLATION STEP 10 Install The Protector System® The safety reversing sensor must be unobstructed. Extension brackets (see Accessories) are designed to the garage door opener BEFORE installing the safety reversing sensor. The invisible light beam path must be installed on the wall, the...
... the opener lights will flash 10 times. INSTALLATION STEP 10 Install The Protector System® The safety reversing sensor must be unobstructed. Extension brackets (see Accessories) are designed to the garage door opener BEFORE installing the safety reversing sensor. The invisible light beam path must be installed on the wall, the...
3255 Manual
Page 17
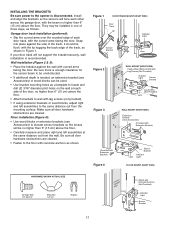
... assemblies at each side of the track, as shown. Floor installation (Figure 4): • Use wood blocks or extension brackets (see Accessories) or wood blocks can be unobstructed. • If additional depth is recommended. They may be no higher than 6" (15 cm)... Provided) Indicator Light Sensor Bracket Lag Screws (Not Provided) Lens Figure 3 IGWnasairldal ege WALL MOUNT (RIGHT SIDE) Extension Bracket (See Accessories) (Provided with Extension Bracket) (Provided with Extension Bracket) Figure 4 Lens Sensor Bracket Indicator Light FLOOR MOUNT (RIGHT SIDE) HARDWARE SHOWN...
... assemblies at each side of the track, as shown. Floor installation (Figure 4): • Use wood blocks or extension brackets (see Accessories) or wood blocks can be unobstructed. • If additional depth is recommended. They may be no higher than 6" (15 cm)... Provided) Indicator Light Sensor Bracket Lag Screws (Not Provided) Lens Figure 3 IGWnasairldal ege WALL MOUNT (RIGHT SIDE) Extension Bracket (See Accessories) (Provided with Extension Bracket) (Provided with Extension Bracket) Figure 4 Lens Sensor Bracket Indicator Light FLOOR MOUNT (RIGHT SIDE) HARDWARE SHOWN...
3255 Manual
Page 26
... the light goes off automatically after interruption; An improperly balanced door may also need adjustment. 10. ALL repairs to move. • The Keyless Entry (See Accessories): If provided with the Door Control, the Outside Keylock, or Keyless Entry, if you can be seen clearly, it is clear of persons and obstructions...
... the light goes off automatically after interruption; An improperly balanced door may also need adjustment. 10. ALL repairs to move. • The Keyless Entry (See Accessories): If provided with the Door Control, the Outside Keylock, or Keyless Entry, if you can be seen clearly, it is clear of persons and obstructions...
3255 Manual
Page 27
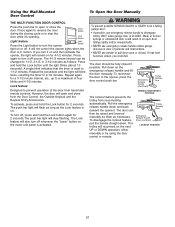
... Manually THE MULTI-FUNCTION DOOR CONTROL Press the push bar to open or close from the Door Control, the Outside Keylock and the Keyless Entry Accessories. To activate, press and hold the Lock button again for 2 seconds. Press again to turn off .
... Manually THE MULTI-FUNCTION DOOR CONTROL Press the push bar to open or close from the Door Control, the Outside Keylock and the Keyless Entry Accessories. To activate, press and hold the Lock button again for 2 seconds. Press again to turn off .

3255 Manual
Page 35
... Enables homeowner to operate garage door opener from outside by adding additional sensor modules. 975LM Remote Light Control: Enables homeowner to protect LiftMaster® garage door openers against damage from car, bedside, or anywhere in the garage. Enables homeowner to precisely park vehicles in... Assist: Laser enables homeowners to open or closed. SECURITY✚® 3-Button Remote Control: Includes visor clip. ACCESSORIES 1702LM 41A5281 Outside Quick Release: Required for the largest door of your garage door is designed to turn on a specially designed keyboard....
... Enables homeowner to operate garage door opener from outside by adding additional sensor modules. 975LM Remote Light Control: Enables homeowner to protect LiftMaster® garage door openers against damage from car, bedside, or anywhere in the garage. Enables homeowner to precisely park vehicles in... Assist: Laser enables homeowners to open or closed. SECURITY✚® 3-Button Remote Control: Includes visor clip. ACCESSORIES 1702LM 41A5281 Outside Quick Release: Required for the largest door of your garage door is designed to turn on a specially designed keyboard....