
Getting Started
Page 2
... documentation, to a professional service person. Important safety information Use only the power supply and power supply cord provided with this product or make any electrical or cabling connections, such as the power supply cord or telephone, during a lightning storm. This product is designed, tested, ...some parts may not always be obvious. SAVE THESE INSTRUCTIONS. Connect the power supply cord to meet strict global safety standards with the printer software. The safety features of specific Lexmark components. CAUTION: Do not set up this product or the manufacturer's ...
... documentation, to a professional service person. Important safety information Use only the power supply and power supply cord provided with this product or make any electrical or cabling connections, such as the power supply cord or telephone, during a lightning storm. This product is designed, tested, ...some parts may not always be obvious. SAVE THESE INSTRUCTIONS. Connect the power supply cord to meet strict global safety standards with the printer software. The safety features of specific Lexmark components. CAUTION: Do not set up this product or the manufacturer's ...

Getting Started
Page 12
6 Insert the power supply. 7 Connect the power cord. 8 Make sure the power is on. 2 1 9 Open the access cover. 12
6 Insert the power supply. 7 Connect the power cord. 8 Make sure the power is on. 2 1 9 Open the access cover. 12

Getting Started
Page 23
Connect the printer to a power source using the power cord. 1 Plug the power cord all the way into the power supply on , press . 3 Internal wireless adapter Connect to a computer using . 2 1 3 If the light is not on the printer. 2 Plug the power cord into an electrical outlet that other electrical devices have been using a USB cable. Use the 8 Paper support To Load paper. 1 Use the 1 USB port 2 Power supply 2 3 To Connect the printer to a wireless network. 23
Connect the printer to a power source using the power cord. 1 Plug the power cord all the way into the power supply on , press . 3 Internal wireless adapter Connect to a computer using . 2 1 3 If the light is not on the printer. 2 Plug the power cord into an electrical outlet that other electrical devices have been using a USB cable. Use the 8 Paper support To Load paper. 1 Use the 1 USB port 2 Power supply 2 3 To Connect the printer to a wireless network. 23
Getting Started
Page 34
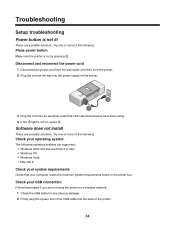
...power cord 1 Disconnect the power cord from the wall outlet, and then from the printer. 2 Plug the cord all the way into the power supply on the printer. 2 1 3 Plug the cord into the back of the printer. 34 Try one or more of the following: Check your operating system The following : Press power... If the light is not on the printer box. Check your computer meets the minimum system requirements listed on , press . Troubleshooting Setup troubleshooting Power button is on a wireless network: 1 Check the USB cable for any obvious damage. 2 Firmly plug the square end of the USB cable...
...power cord 1 Disconnect the power cord from the wall outlet, and then from the printer. 2 Plug the cord all the way into the power supply on the printer. 2 1 3 Plug the cord into the back of the printer. 34 Try one or more of the following: Check your operating system The following : Press power... If the light is not on the printer box. Check your computer meets the minimum system requirements listed on , press . Troubleshooting Setup troubleshooting Power button is on a wireless network: 1 Check the USB cable for any obvious damage. 2 Firmly plug the square end of the USB cable...
Getting Started
Page 35
.... The USB port is not lit" on page 34. Reconnect the power supply 1 Press to turn the printer off. 2 Disconnect the power cord from the wall outlet. 3 Gently remove the power supply from the printer. 4 Reconnect the power supply to turn the printer on. For more of the following: Check... messages If an error message is displayed, see "Power button is marked with the USB symbol....
.... The USB port is not lit" on page 34. Reconnect the power supply 1 Press to turn the printer off. 2 Disconnect the power cord from the wall outlet. 3 Gently remove the power supply from the printer. 4 Reconnect the power supply to turn the printer on. For more of the following: Check... messages If an error message is displayed, see "Power button is marked with the USB symbol....
Getting Started
Page 36
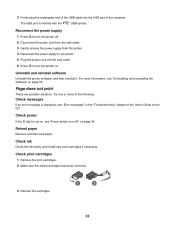
... Press to turn the printer on page 50. WiFi Indicator is off . 2 Disconnect the power cord from the wall outlet. 3 Gently remove the power supply from the printer. 4 Reconnect the power supply to the printer. 5 Plug the power cord into the wall outlet. 6 Press to turn the printer off . 2 Press and hold... for each file you must select the print queue device for five seconds, and then release the button. Try one or more information, see "Power button is...
... Press to turn the printer on page 50. WiFi Indicator is off . 2 Disconnect the power cord from the wall outlet. 3 Gently remove the power supply from the printer. 4 Reconnect the power supply to the printer. 5 Plug the power cord into the wall outlet. 6 Press to turn the printer off . 2 Press and hold... for each file you must select the print queue device for five seconds, and then release the button. Try one or more information, see "Power button is...

User's Guide
Page 2
...or the manufacturer's authorized replacement power supply and power supply cord. CAUTIONS Do not place or use this product or make any electrical or cabling connections, such as the power supply cord or telephone, during a lightning storm. Lexmark is near water or wet ...locations. Important safety information Use only the power supply and power supply cord provided with the use of specific Lexmark components. Connect the power supply cord to a professional service...
...or the manufacturer's authorized replacement power supply and power supply cord. CAUTIONS Do not place or use this product or make any electrical or cabling connections, such as the power supply cord or telephone, during a lightning storm. Lexmark is near water or wet ...locations. Important safety information Use only the power supply and power supply cord provided with the use of specific Lexmark components. Connect the power supply cord to a professional service...
User's Guide
Page 11
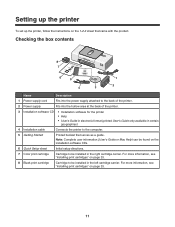
... up the printer, follow the instructions on the 1-2-3 sheet that serves as a guide. Checking the box contents 8 1 7 2 3 6 5 1 2 4 3 Name Description 1 Power supply cord Fits into the power supply attached to the back of the printer. 2 Power supply Fits into the hollow area at the back of the printer. 3 Installation software CD • Installation software for...
... up the printer, follow the instructions on the 1-2-3 sheet that serves as a guide. Checking the box contents 8 1 7 2 3 6 5 1 2 4 3 Name Description 1 Power supply cord Fits into the power supply attached to the back of the printer. 2 Power supply Fits into the hollow area at the back of the printer. 3 Installation software CD • Installation software for...
User's Guide
Page 14
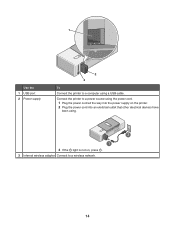
1 Use the 1 USB port 2 Power supply 2 3 To Connect the printer to a computer using . 2 1 3 If the light is not on, press . 3 Internal wireless adapter Connect to a power source using the power cord. 1 Plug the power cord all the way into the power supply on the printer. 2 Plug the power cord into an electrical outlet that other electrical devices have been using a USB cable. Connect the printer to a wireless network. 14
1 Use the 1 USB port 2 Power supply 2 3 To Connect the printer to a computer using . 2 1 3 If the light is not on, press . 3 Internal wireless adapter Connect to a power source using the power cord. 1 Plug the power cord all the way into the power supply on the printer. 2 Plug the power cord into an electrical outlet that other electrical devices have been using a USB cable. Connect the printer to a wireless network. 14

User's Guide
Page 38
... devices have been using. 2 1 3 If the light is not lit Make sure you have disconnected the power supply cord from the wall outlet and then from the printer. 1 Plug the cord all New Hardware Found screens. 3 Insert the CD, and then follow the instructions on the computer screen to... reinstall the software. 38 Solution 3 1 Turn off and then restart your computer. 2 Click Cancel on all the way into the power supply on the printer. 2 Plug the cord into an electrical outlet that your computer meets the minimum system requirements listed on the box. Troubleshooting Setup troubleshooting...
... devices have been using. 2 1 3 If the light is not lit Make sure you have disconnected the power supply cord from the wall outlet and then from the printer. 1 Plug the cord all New Hardware Found screens. 3 Insert the CD, and then follow the instructions on the computer screen to... reinstall the software. 38 Solution 3 1 Turn off and then restart your computer. 2 Click Cancel on all the way into the power supply on the printer. 2 Plug the cord into an electrical outlet that your computer meets the minimum system requirements listed on the box. Troubleshooting Setup troubleshooting...
User's Guide
Page 39
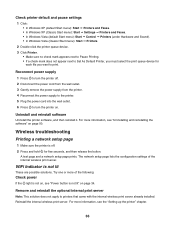
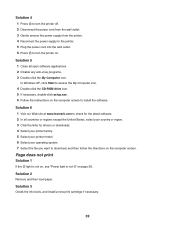
...lexmark.com to check for drivers or downloads. 4 Select your printer family. 5 Select your printer model. 6 Select your operating system. 7 Select the file you want to download, and then follow the directions on page 38. Page does not print Solution 1 If the light is not on, see "Power... computer screen. Solution 4 1 Press to turn the printer off. 2 Disconnect the power cord from the wall outlet. 3 Gently remove the power supply from the printer. 4 Reconnect the power supply to the printer. 5 Plug the power cord into the wall outlet. 6 Press to turn the printer on the computer screen to...
...lexmark.com to check for drivers or downloads. 4 Select your printer family. 5 Select your printer model. 6 Select your operating system. 7 Select the file you want to download, and then follow the directions on page 38. Page does not print Solution 1 If the light is not on, see "Power... computer screen. Solution 4 1 Press to turn the printer off. 2 Disconnect the power cord from the wall outlet. 3 Gently remove the power supply from the printer. 4 Reconnect the power supply to the printer. 5 Plug the power cord into the wall outlet. 6 Press to turn the printer on the computer screen to...

User's Guide
Page 50
... amount of ink. A variable amount of ink will remain in order to stop product power consumption, disconnect the power supply cord from hard-copy original documents. Since power consumption claims are designed to calculate energy usage. After this product has an off . ...A replacement cartridge sold without these terms is sometimes helpful to Lexmark for remanufacturing, refilling or recycling. Total energy usage It is available at www.lexmark.com. 50 Power consumption Product power consumption The following license/agreement: The patented print cartridges contained ...
... amount of ink. A variable amount of ink will remain in order to stop product power consumption, disconnect the power supply cord from hard-copy original documents. Since power consumption claims are designed to calculate energy usage. After this product has an off . ...A replacement cartridge sold without these terms is sometimes helpful to Lexmark for remanufacturing, refilling or recycling. Total energy usage It is available at www.lexmark.com. 50 Power consumption Product power consumption The following license/agreement: The patented print cartridges contained ...


