Online User's Guide (3.47 MB)
Page 10
...Select this tab: Status Options To: • Monitor the status of a scanned image. • Enable and set the sharpen level. Windows 98/Me Click this tab: Application OCR Descreen/Sharpen To: Choose and configure any application on your computer for the Send to use. &#...OCR) to Application button. Enable or disable various software functions, such as Sound Effects and Buffer Mode. www.lexmark.com Lexmark X84-X85 To open the Control Program, click Start Programs Lexmark X84-X85 Print Control Program. Select the language you monitor the printer and install or replace cartridges.
...Select this tab: Status Options To: • Monitor the status of a scanned image. • Enable and set the sharpen level. Windows 98/Me Click this tab: Application OCR Descreen/Sharpen To: Choose and configure any application on your computer for the Send to use. &#...OCR) to Application button. Enable or disable various software functions, such as Sound Effects and Buffer Mode. www.lexmark.com Lexmark X84-X85 To open the Control Program, click Start Programs Lexmark X84-X85 Print Control Program. Select the language you monitor the printer and install or replace cartridges.
Online User's Guide (3.47 MB)
Page 11
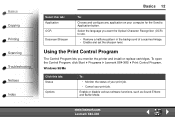
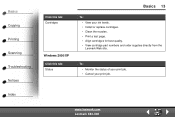
www.lexmark.com Lexmark X84-X85 Basics Copying Printing Scanning Troubleshooting Notices Index Click this tab: Cartridges Windows 2000/XP Click this tab: Status Basics 13 To: • View your print job. To: • Monitor the status of your print job. • Cancel your ink levels. • Install or replace cartridges. • Clean the nozzles. • Print a test page. • Align cartridges for best quality. • View cartridge part numbers and order supplies directly from the Lexmark Web site.
www.lexmark.com Lexmark X84-X85 Basics Copying Printing Scanning Troubleshooting Notices Index Click this tab: Cartridges Windows 2000/XP Click this tab: Status Basics 13 To: • View your print job. To: • Monitor the status of your print job. • Cancel your ink levels. • Install or replace cartridges. • Clean the nozzles. • Print a test page. • Align cartridges for best quality. • View cartridge part numbers and order supplies directly from the Lexmark Web site.

Online User's Guide (3.47 MB)
Page 37
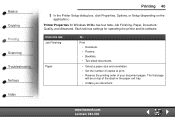
... Copying Printing Scanning Troubleshooting Notices Index Printing 39 Printing instructions 1 From the application File menu, select Print. 2 From the Print dialog box, click OK. www.lexmark.com Lexmark X84-X85 Printer Properties or Printing Preferences lets you are using Windows 98/Me, click Printer Properties to customize your print job. If you are using...
... Copying Printing Scanning Troubleshooting Notices Index Printing 39 Printing instructions 1 From the application File menu, select Print. 2 From the Print dialog box, click OK. www.lexmark.com Lexmark X84-X85 Printer Properties or Printing Preferences lets you are using Windows 98/Me, click Printer Properties to customize your print job. If you are using...
Online User's Guide (3.47 MB)
Page 38
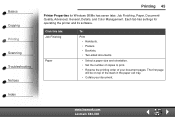
... (depending on top of your document. The first page will be on the application.) Printer Properties for operating the printer and its software. www.lexmark.com Lexmark X84-X85 Click this tab: Job Finishing Paper To: Print • Handouts. • Posters. • Booklets. • Two-sided documents. • Select a paper size and orientation... to print. • Reverse the printing order of the stack in the paper exit tray. • Collate your document pages. Each tab has settings for Windows 98/Me has four tabs: Job Finishing, Paper, Document/ Quality, and Advanced.
... (depending on top of your document. The first page will be on the application.) Printer Properties for operating the printer and its software. www.lexmark.com Lexmark X84-X85 Click this tab: Job Finishing Paper To: Print • Handouts. • Posters. • Booklets. • Two-sided documents. • Select a paper size and orientation... to print. • Reverse the printing order of the stack in the paper exit tray. • Collate your document pages. Each tab has settings for Windows 98/Me has four tabs: Job Finishing, Paper, Document/ Quality, and Advanced.

Online User's Guide (3.47 MB)
Page 40
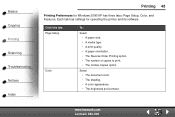
Each tab has settings for Windows 2000/XP has five tabs: General, Options, Page Setup, Color, and Features. Print • Frames. • All linked documents. • A table of copies. Click this tab: General Options To: Select • A printer. • Which pages to print. • The number of links. Basics Copying Printing Scanning Troubleshooting Notices Index Printing 42 Printing Preferences for operating the printer and its software. www.lexmark.com Lexmark X84-X85
Each tab has settings for Windows 2000/XP has five tabs: General, Options, Page Setup, Color, and Features. Print • Frames. • All linked documents. • A table of copies. Click this tab: General Options To: Select • A printer. • Which pages to print. • The number of links. Basics Copying Printing Scanning Troubleshooting Notices Index Printing 42 Printing Preferences for operating the printer and its software. www.lexmark.com Lexmark X84-X85

Online User's Guide (3.47 MB)
Page 42
Opening Printer Properties or Printing Preferences from Windows Opening Printer Properties or Printing Preferences from Windows lets you apply the settings to access the printer driver Help. Note: Click the Help button on any tab in the Printer ...Printers. 2 From the Printers folder, right-click the printer icon for the printer. 3 Select Properties or Printing Preferences from the sidebar menu. www.lexmark.com Lexmark X84-X85 Basics Copying Printing Scanning Troubleshooting Notices Index Printing 44 Click this tab: Features To: Select • The Dry Time Delay option. • The...
Opening Printer Properties or Printing Preferences from Windows Opening Printer Properties or Printing Preferences from Windows lets you apply the settings to access the printer driver Help. Note: Click the Help button on any tab in the Printer ...Printers. 2 From the Printers folder, right-click the printer icon for the printer. 3 Select Properties or Printing Preferences from the sidebar menu. www.lexmark.com Lexmark X84-X85 Basics Copying Printing Scanning Troubleshooting Notices Index Printing 44 Click this tab: Features To: Select • The Dry Time Delay option. • The...
Online User's Guide (3.47 MB)
Page 43
www.lexmark.com Lexmark X84-X85 Click this tab: Job Finishing Paper To: Print • Handouts. • Posters. • Booklets. • Two-sided documents. • Select a paper size and orientation. • ... to print. • Reverse the printing order of the stack in the paper exit tray. • Collate your document pages. Each tab has settings for Windows 98/Me has seven tabs: Job Finishing, Paper, Document/ Quality, Advanced, General, Details, and Color Management. Basics Copying Printing Scanning Troubleshooting Notices Index Printing 45...
www.lexmark.com Lexmark X84-X85 Click this tab: Job Finishing Paper To: Print • Handouts. • Posters. • Booklets. • Two-sided documents. • Select a paper size and orientation. • ... to print. • Reverse the printing order of the stack in the paper exit tray. • Collate your document pages. Each tab has settings for Windows 98/Me has seven tabs: Job Finishing, Paper, Document/ Quality, Advanced, General, Details, and Color Management. Basics Copying Printing Scanning Troubleshooting Notices Index Printing 45...
Online User's Guide (3.47 MB)
Page 46
... • The document color. • The shading. • A color appearance. • The brightness and contrast. Each tab has settings for Windows 2000/XP has three tabs: Page Setup, Color, and Features. Click this tab: Page Setup Color To: Select • A paper size. &#... A paper orientation. • The Reverse Order Printing option. • The number of copies to print. • The Collate Copies option. www.lexmark.com Lexmark X84-X85 Basics Copying Printing Scanning Troubleshooting Notices Index Printing 48 Printing Preferences for operating the printer and its software.
... • The document color. • The shading. • A color appearance. • The brightness and contrast. Each tab has settings for Windows 2000/XP has three tabs: Page Setup, Color, and Features. Click this tab: Page Setup Color To: Select • A paper size. &#... A paper orientation. • The Reverse Order Printing option. • The number of copies to print. • The Collate Copies option. www.lexmark.com Lexmark X84-X85 Basics Copying Printing Scanning Troubleshooting Notices Index Printing 48 Printing Preferences for operating the printer and its software.

Online User's Guide (3.47 MB)
Page 50
... tab to print booklets. 1 Customize Printer Properties for a two-sided document. Basics Copying Printing Scanning Troubleshooting Notices Index Printing 52 Creating projects Windows 98/Me Two-sided printing Besides saving paper, this feature is helpful when you to select the page size and orientation. f Click OK. 2 ...the Paper tab to reload the paper. e To print paper reloading instructions, select the option on the screen that prints reloading instructions. www.lexmark.com Lexmark X84-X85 a Open Printer Properties. d Select a binding edge. For help, see page 39.
... tab to print booklets. 1 Customize Printer Properties for a two-sided document. Basics Copying Printing Scanning Troubleshooting Notices Index Printing 52 Creating projects Windows 98/Me Two-sided printing Besides saving paper, this feature is helpful when you to select the page size and orientation. f Click OK. 2 ...the Paper tab to reload the paper. e To print paper reloading instructions, select the option on the screen that prints reloading instructions. www.lexmark.com Lexmark X84-X85 a Open Printer Properties. d Select a binding edge. For help, see page 39.
Online User's Guide (3.47 MB)
Page 62
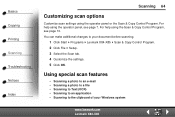
...or the Scan & Copy Control Program. You can make additional changes to the clipboard of your document before scanning. 1 Click Start Programs Lexmark X84-X85 Scan & Copy Control Program. 2 Click File Setup. 3 Select the Scan tab. 4 Customize the settings. 5 Click OK. For... a photo to a file • Scanning to Text/(OCR) • Scanning to an application • Scanning to your Windows system www.lexmark.com Lexmark X84-X85 Basics Copying Printing Scanning Troubleshooting Notices Index Scanning 64 Customizing scan options Customize scan settings using the operator panel, see page 10...
...or the Scan & Copy Control Program. You can make additional changes to the clipboard of your document before scanning. 1 Click Start Programs Lexmark X84-X85 Scan & Copy Control Program. 2 Click File Setup. 3 Select the Scan tab. 4 Customize the settings. 5 Click OK. For... a photo to a file • Scanning to Text/(OCR) • Scanning to an application • Scanning to your Windows system www.lexmark.com Lexmark X84-X85 Basics Copying Printing Scanning Troubleshooting Notices Index Scanning 64 Customizing scan options Customize scan settings using the operator panel, see page 10...
Online User's Guide (3.47 MB)
Page 65
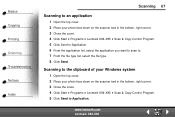
...Windows system 1 Open the top cover. 2 Place your photo face down on the scanner bed in the bottom, right corner. 3 Close the cover. 4 Click Start Programs Lexmark X84-X85 Scan & Copy Control Program. 5 Click Send to . 7 From the file type list, select the file type. 8 Click Send. www.lexmark.com Lexmark X84-X85... your photo face down on the scanner bed in the bottom, right corner. 3 Close the cover. 4 Click Start Programs Lexmark X84-X85 Scan & Copy Control Program. 5 Click Send to Application. 6 From the application list, select the application you want to scan to Application.
...Windows system 1 Open the top cover. 2 Place your photo face down on the scanner bed in the bottom, right corner. 3 Close the cover. 4 Click Start Programs Lexmark X84-X85 Scan & Copy Control Program. 5 Click Send to . 7 From the file type list, select the file type. 8 Click Send. www.lexmark.com Lexmark X84-X85... your photo face down on the scanner bed in the bottom, right corner. 3 Close the cover. 4 Click Start Programs Lexmark X84-X85 Scan & Copy Control Program. 5 Click Send to Application. 6 From the application list, select the application you want to scan to Application.
Online User's Guide (3.47 MB)
Page 85
Installing the software Windows users: 1 Disconnect the USB cable. 2 Insert the Lexmark X84-X85 CD to reinstall the software. 3 Follow the instructions on your computer screen. www.lexmark.com Lexmark X84-X85 Basics Copying Printing Scanning Troubleshooting Notices Index Troubleshooting 87 4 Restart the computer. Note: Do not connect the USB cable until you are prompted by the CD software.
Installing the software Windows users: 1 Disconnect the USB cable. 2 Insert the Lexmark X84-X85 CD to reinstall the software. 3 Follow the instructions on your computer screen. www.lexmark.com Lexmark X84-X85 Basics Copying Printing Scanning Troubleshooting Notices Index Troubleshooting 87 4 Restart the computer. Note: Do not connect the USB cable until you are prompted by the CD software.

Getting Started (1.24 MB)
Page 3
Contents Setting up your printer 1 Using the operator panel 7 Using the operator panel buttons 8 Using the Scan & Copy Control Program 8 Introducing the printer menus 9 Copying 11 Scanning 12 Printing 13 Windows 13 Macintosh 13 Setting defaults 14 Creating projects 15 Create a wedding program 15 More fun projects 16 Troubleshooting 17 Printer has a paper jam 17 Paper misfeeds or multiple sheets feed 18 Printer is not communicating, or scanner is not communicating . 18 Other error messages 18 iii
Contents Setting up your printer 1 Using the operator panel 7 Using the operator panel buttons 8 Using the Scan & Copy Control Program 8 Introducing the printer menus 9 Copying 11 Scanning 12 Printing 13 Windows 13 Macintosh 13 Setting defaults 14 Creating projects 15 Create a wedding program 15 More fun projects 16 Troubleshooting 17 Printer has a paper jam 17 Paper misfeeds or multiple sheets feed 18 Printer is not communicating, or scanner is not communicating . 18 Other error messages 18 iii

Getting Started (1.24 MB)
Page 4
Click View Documentation. 1 Insert CD 2. 2 Click View User's Guide. Document does not print 19 Document prints slowly 19 Uninstalling and reinstalling the printer software 19 Statement of Limited Warranty 21 Accessing the online User's Guide Windows users: or 1 Insert CD 1. 2 Click Tools. 3 Click View Documentation. Macintosh users: 1 Insert CD 1. iv
Click View Documentation. 1 Insert CD 2. 2 Click View User's Guide. Document does not print 19 Document prints slowly 19 Uninstalling and reinstalling the printer software 19 Statement of Limited Warranty 21 Accessing the online User's Guide Windows users: or 1 Insert CD 1. 2 Click Tools. 3 Click View Documentation. Macintosh users: 1 Insert CD 1. iv

Getting Started (1.24 MB)
Page 9
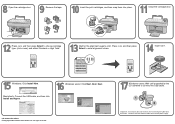
Click Next. 5 Macintosh users: Connect the USB cable and click Install and Agree. To scan, print, and copy using a computer, continue with the following installation steps: 1 Insert CD 1. 2 Windows users: Click Install Now.
Click Next. 5 Macintosh users: Connect the USB cable and click Install and Agree. To scan, print, and copy using a computer, continue with the following installation steps: 1 Insert CD 1. 2 Windows users: Click Install Now.

Getting Started (1.24 MB)
Page 16
Scanning 1 Make sure you want to the online User's Guide. 12 You may want appears on the scanner bed in the bottom, right corner. 5 Close the top cover. 6 Press Scan To until the scan destination you have installed the printer software for Windows or Macintosh. For help , see page 5. 2 Make sure your computer and your printer are turned on. 3 Open the top cover. 4 Place your document face down on the display. 7 Press Select. 8 Press Scan. For help , refer to change additional settings.
Scanning 1 Make sure you want to the online User's Guide. 12 You may want appears on the scanner bed in the bottom, right corner. 5 Close the top cover. 6 Press Scan To until the scan destination you have installed the printer software for Windows or Macintosh. For help , see page 5. 2 Make sure your computer and your printer are turned on. 3 Open the top cover. 4 Place your document face down on the display. 7 Press Select. 8 Press Scan. For help , refer to change additional settings.

Getting Started (1.24 MB)
Page 17
Printing Windows 1 Make sure you have installed the printer software for Macintosh. For help, see page 5. 2 From your program, open the File menu. 3 Choose Print.... 4 Change settings ... Printer Preferences. 4 From the Print dialog box, click OK or Print (depending on the program). Macintosh 1 Make sure you have installed the printer software for Windows.
Printing Windows 1 Make sure you have installed the printer software for Macintosh. For help, see page 5. 2 From your program, open the File menu. 3 Choose Print.... 4 Change settings ... Printer Preferences. 4 From the Print dialog box, click OK or Print (depending on the program). Macintosh 1 Make sure you have installed the printer software for Windows.
Getting Started (1.24 MB)
Page 24
Installing the software Windows users: 1 Disconnect the USB cable. 2 Insert the Lexmark X85 CD to reinstall the software. 3 Follow the instructions on your computer... Scan & Copy Control Program. Uninstalling software 1 Disconnect the USB cable. 2 Click Start Programs Lexmark X85 Uninstall. 3 Follow the instructions on your default. 3 Click Select. 20 To check or select your default fax driver...: 1 Click Start Programs Lexmark X85 Scan & Copy Control Program. 2 Click File Setup, and then select the Copy/Fax tab. Note:...
Installing the software Windows users: 1 Disconnect the USB cable. 2 Insert the Lexmark X85 CD to reinstall the software. 3 Follow the instructions on your computer... Scan & Copy Control Program. Uninstalling software 1 Disconnect the USB cable. 2 Click Start Programs Lexmark X85 Uninstall. 3 Follow the instructions on your default. 3 Click Select. 20 To check or select your default fax driver...: 1 Click Start Programs Lexmark X85 Scan & Copy Control Program. 2 Click File Setup, and then select the Copy/Fax tab. Note:...
Setup Sheet (953 KB)
Page 2
...Select to print. Open the cartridge door. Insert CD 1. Windows users: Click Next, Next, Next. Macintosh: Connect the USB cable, and then click Install and Agree. P/N 10K0620 EC 10K034 © Copyright 2002 Lexmark International, Inc. Close the cartridge door. All rights reserved.... Snap Snap Wait for the alignment page to enter alignment values. Windows: Click Install Now. Insert the print cartridges, and then snap them...
...Select to print. Open the cartridge door. Insert CD 1. Windows users: Click Next, Next, Next. Macintosh: Connect the USB cable, and then click Install and Agree. P/N 10K0620 EC 10K034 © Copyright 2002 Lexmark International, Inc. Close the cartridge door. All rights reserved.... Snap Snap Wait for the alignment page to enter alignment values. Windows: Click Install Now. Insert the print cartridges, and then snap them...

