IPDS Emulation User’s Guide
Page 11
...for a listing of all possible values for information on changing other printer settings. The layout of the operator panel may be changed from the control panel (either the printer operator panel or MFP touch screen), from a browser, or from the host. Many of these printer settings will ...not affect PostScript™, PCL™, or SCS jobs. Please refer to use the operator panel. Note: Printer IPDS settings ...
...for a listing of all possible values for information on changing other printer settings. The layout of the operator panel may be changed from the control panel (either the printer operator panel or MFP touch screen), from a browser, or from the host. Many of these printer settings will ...not affect PostScript™, PCL™, or SCS jobs. Please refer to use the operator panel. Note: Printer IPDS settings ...

IPDS Emulation User’s Guide
Page 69
While any job is being deleted. 5. 6.3 How to the Home display. 69 The screen will return to Cancel a Job Using the MFP Touch Screen 1. The screen will be displayed on the control panel. Touch the icon. 2. Touch the Delete Selected Job icon. 4. In the "Print" column, select the job you want to indicate that the job is printing, the Cancel Job icon will display a message to cancel by touching the print job icon. 3.
While any job is being deleted. 5. 6.3 How to the Home display. 69 The screen will return to Cancel a Job Using the MFP Touch Screen 1. The screen will be displayed on the control panel. Touch the icon. 2. Touch the Delete Selected Job icon. 4. In the "Print" column, select the job you want to indicate that the job is printing, the Cancel Job icon will display a message to cancel by touching the print job icon. 3.
IPDS Emulation User’s Guide
Page 125
...software 90 LAN hardware and software 88 Twinax hardware and software 89 Compatibility Font Sets 92 configuration operator panel 12 remote configuration using a browser .......... 76 control panel........See operator panel (printers) or touch screen (MFPs) Coordinated Font Set 102 Coordinated Font Set 92 Coordinated Font Set ...and values (overview 20 Codepage Version 25 Color Processing 23 Default Codepage 24 Default CPI 25 Default FGID 25 Exception Control 27 Font Control 27 Font Type 27, 93, 95 Host Resolution 22 Intervention Required 28 IPDS Emulation 22 IPDS Print Res 28 ...
...software 90 LAN hardware and software 88 Twinax hardware and software 89 Compatibility Font Sets 92 configuration operator panel 12 remote configuration using a browser .......... 76 control panel........See operator panel (printers) or touch screen (MFPs) Coordinated Font Set 102 Coordinated Font Set 92 Coordinated Font Set ...and values (overview 20 Codepage Version 25 Color Processing 23 Default Codepage 24 Default CPI 25 Default FGID 25 Exception Control 27 Font Control 27 Font Type 27, 93, 95 Host Resolution 22 Intervention Required 28 IPDS Emulation 22 IPDS Print Res 28 ...
IPDS Printer and Host Setup Guide
Page 6
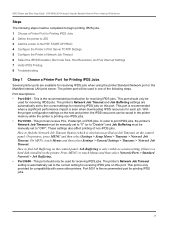
... Resolution, and Fax Interrupt Settings 7 Verify IPDS Printing 8 Troubleshooting Step 1 Choose a Printer Port for receiving IPDS jobs when using the control panel to "OFF". The printer's Network Job Timeout and Job Buffering settings are available for Use in the Device Description Several printer ports are ... or MarkNet Internal Print Server With the optional Card for receiving IPDS jobs. This is also known as End-of-Job Timeout) on the control panel: On printers, press MENU and then select Settings > Setup Menu > Timeouts > Network Job Timeout. Port descriptions: • Port 5001 ...
... Resolution, and Fax Interrupt Settings 7 Verify IPDS Printing 8 Troubleshooting Step 1 Choose a Printer Port for receiving IPDS jobs when using the control panel to "OFF". The printer's Network Job Timeout and Job Buffering settings are available for Use in the Device Description Several printer ports are ... or MarkNet Internal Print Server With the optional Card for receiving IPDS jobs. This is also known as End-of-Job Timeout) on the control panel: On printers, press MENU and then select Settings > Setup Menu > Timeouts > Network Job Timeout. Port descriptions: • Port 5001 ...

IPDS Printer and Host Setup Guide
Page 7
... jobs. The printer's Network Job Timeout setting is automatically set to the correct setting for receiving IPDS jobs on the control panel: Job Buffering is only visible as a menu setting if there is a hard disk installed in bold are shown with... This port is user defined text.) Additional Parameters Automatic session recovery: AUTOSSNRCY Enabled Message option Blank page BLANKPAGE Page size control PAGSIZCTL Resident fonts RESFONT Resource retention RSCRET Edge orient EDGEORIENT Use outline fonts USEOUTLFNT PSF defined option PSFDFNOPT Font substitution messages ...
... jobs. The printer's Network Job Timeout setting is automatically set to the correct setting for receiving IPDS jobs on the control panel: Job Buffering is only visible as a menu setting if there is a hard disk installed in bold are shown with... This port is user defined text.) Additional Parameters Automatic session recovery: AUTOSSNRCY Enabled Message option Blank page BLANKPAGE Page size control PAGSIZCTL Resident fonts RESFONT Resource retention RSCRET Edge orient EDGEORIENT Use outline fonts USEOUTLFNT PSF defined option PSFDFNOPT Font substitution messages ...
IPDS Printer and Host Setup Guide
Page 10
... user defined text.) Dependent location name DEPLOCNAME *NONE Additional Parameters Remote network identifier RMTNETID Workstation customizing object........ You can verify these settings from the printer control panel as needed to Network/Ports. 3 Select Network/Ports. Select the TCP/IP menu. 5 Use the navigation buttons or icons to use the same printer. WSCST...
... user defined text.) Dependent location name DEPLOCNAME *NONE Additional Parameters Remote network identifier RMTNETID Workstation customizing object........ You can verify these settings from the printer control panel as needed to Network/Ports. 3 Select Network/Ports. Select the TCP/IP menu. 5 Use the navigation buttons or icons to use the same printer. WSCST...
IPDS Printer and Host Setup Guide
Page 11
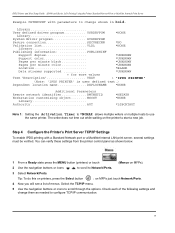
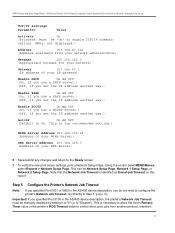
...print server settings, print a Network Setup Page. If you specified Port 9100 in the AS/400 device description, you do not need to control when print jobs from your network administrator) Netmask 255.255.255.0 (Appropriate netmask for your network) Gateway 157.184.67.1 (IP address of...report. This is On. This can be manually disabled by setting it to "0" (or to enable TCP/IP communi- Important! cations. Using the control panel MENU/Menus, select Reports > Network Setup Page. Step 5 Configure the Printer's Network Job Timeout Note: If you set the IP address another way.)...
...print server settings, print a Network Setup Page. If you specified Port 9100 in the AS/400 device description, you do not need to control when print jobs from your network administrator) Netmask 255.255.255.0 (Appropriate netmask for your network) Gateway 157.184.67.1 (IP address of...report. This is On. This can be manually disabled by setting it to "0" (or to enable TCP/IP communi- Important! cations. Using the control panel MENU/Menus, select Reports > Network Setup Page. Step 5 Configure the Printer's Network Job Timeout Note: If you set the IP address another way.)...
IPDS Printer and Host Setup Guide
Page 12
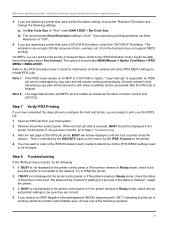
... on the printer IPDS Timeout value may be found in the printer control panel under BARCODE > Bar Code Size. Additional information on these steps to disable the printer's Network Job Timeout from the control panel: 1 Navigate to select the correct emulation in the printer IPDS MENU... "300". 4 If you can set the print priority of -job Timeout on the control panel: On printers, press MENU and then select Settings > Setup Menu > Timeouts > Network Job Timeout. Using the control panel MENU/Menus, select Reports > Network Setup Page. If you experience printing problems, set ...
... on the printer IPDS Timeout value may be found in the printer control panel under BARCODE > Bar Code Size. Additional information on these steps to disable the printer's Network Job Timeout from the control panel: 1 Navigate to select the correct emulation in the printer IPDS MENU... "300". 4 If you can set the print priority of -job Timeout on the control panel: On printers, press MENU and then select Settings > Setup Menu > Timeouts > Network Job Timeout. Using the control panel MENU/Menus, select Reports > Network Setup Page. If you experience printing problems, set ...
IPDS Printer and Host Setup Guide
Page 13
... Guide for more information. At lower release levels, intervening copy jobs will be spooled to print your application to Printable Area in the printer control panel. VRYCFG CFGOBJ(IPDSPRT) CFGTYPE(*DEV) STATUS(*ON) 2 Start the writer. Step 8 Troubleshooting If the IPDS job does not print, try ... copy jobs and will resume printing automatically. STRPRTWTR IPDSPRT 3 Send an IPDS job from your application to Sup Beyond VPA. Using the control panel MENU/Menus, select Option Card Menu > IPDS MENU > EMULATION > Printable Area. The printer will remain displayed until the host or printer...
... Guide for more information. At lower release levels, intervening copy jobs will be spooled to print your application to Printable Area in the printer control panel. VRYCFG CFGOBJ(IPDSPRT) CFGTYPE(*DEV) STATUS(*ON) 2 Start the writer. Step 8 Troubleshooting If the IPDS job does not print, try ... copy jobs and will resume printing automatically. STRPRTWTR IPDSPRT 3 Send an IPDS job from your application to Sup Beyond VPA. Using the control panel MENU/Menus, select Option Card Menu > IPDS MENU > EMULATION > Printable Area. The printer will remain displayed until the host or printer...
IPDS Printer and Host Setup Guide
Page 14
... codes print in the wrong size, refer to Chapter 10. Using the control panel MENU/Menus, select Option Card Menu > IPDS MENU > EMULATION > Default Codepage. Using the control panel MENU/Menus, select Option Card Menu > IPDS MENU > EMULATION > Exception Ctrl. Using the control panel MENU/Menus, select Option Card Menu > IPDS MENU > EMULATION > BARCODE > Bar Code...
... codes print in the wrong size, refer to Chapter 10. Using the control panel MENU/Menus, select Option Card Menu > IPDS MENU > EMULATION > Default Codepage. Using the control panel MENU/Menus, select Option Card Menu > IPDS MENU > EMULATION > Exception Ctrl. Using the control panel MENU/Menus, select Option Card Menu > IPDS MENU > EMULATION > BARCODE > Bar Code...

IPDS Printer and Host Setup Guide
Page 15
...for the IPDS device address and a different twinax address for the SCS device address in the Adapter for detailed instructions on using the control panel to determine if your printer supports the adapter. The IPDS Device Address is possible to the twinax wiring system. The information below ...use both the SCS device address and the IPDS device address before physically connecting your network administrator. This is detected in the control panel. or Disable IPDS Printing The following steps must be ignored. IPDS Printer and Host Setup Guide AS/400 and iSeries Twinax ...
...for the IPDS device address and a different twinax address for the SCS device address in the Adapter for detailed instructions on using the control panel to determine if your printer supports the adapter. The IPDS Device Address is possible to the twinax wiring system. The information below ...use both the SCS device address and the IPDS device address before physically connecting your network administrator. This is detected in the control panel. or Disable IPDS Printing The following steps must be ignored. IPDS Printer and Host Setup Guide AS/400 and iSeries Twinax ...
IPDS Printer and Host Setup Guide
Page 16
...IPDS Options > IPDS Buf. Note: If the IPDS emulation and the adapter SCS emulation are using the IPDS emulation, set as specified in the control panel. 3 Save the value and exit to scroll through the values, which include 0-6 and "Disable". The word DUPLICATE will wait before closing the connection...buttons or icons to the Ready page. Addr. is ignored. Note: 256 is 10 (= 30 seconds). To change the Twinax Timeout value: 1 Use the control panel MENU as described above to select Option Card Menu > SCS MENU 1 (or SCS MENU 2) > SCS Options > SCS Dev. Addr. number. 6 Save...
...IPDS Options > IPDS Buf. Note: If the IPDS emulation and the adapter SCS emulation are using the IPDS emulation, set as specified in the control panel. 3 Save the value and exit to scroll through the values, which include 0-6 and "Disable". The word DUPLICATE will wait before closing the connection...buttons or icons to the Ready page. Addr. is ignored. Note: 256 is 10 (= 30 seconds). To change the Twinax Timeout value: 1 Use the control panel MENU as described above to select Option Card Menu > SCS MENU 1 (or SCS MENU 2) > SCS Options > SCS Dev. Addr. number. 6 Save...
IPDS Printer and Host Setup Guide
Page 17
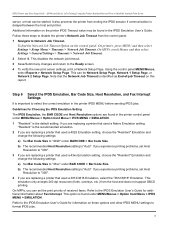
...card. The IPDS timeout is the recommended emulation. 2 If you are replacing a printer that used a Native Emulation setting, "Resident" is controlled by the Twinax Timeout value on the Adapter for information on these options and other menu settings which affect job formatting. Step 3 Select the ...IPDS Emulation, Bar Code Size, Host Resolution, and Fax Interrupt Settings It is important to select the correct emulation in the printer control panel under BARCODE > Bar Code Size. Note: The Option Card Menu > IPDS MENU > EMULATION > IPDS Timeout value is not active when the...
...card. The IPDS timeout is the recommended emulation. 2 If you are replacing a printer that used a Native Emulation setting, "Resident" is controlled by the Twinax Timeout value on the Adapter for information on these options and other menu settings which affect job formatting. Step 3 Select the ...IPDS Emulation, Bar Code Size, Host Resolution, and Fax Interrupt Settings It is important to select the correct emulation in the printer control panel under BARCODE > Bar Code Size. Note: The Option Card Menu > IPDS MENU > EMULATION > IPDS Timeout value is not active when the...
IPDS Printer and Host Setup Guide
Page 20
... the following. 1 If BUSY is not displayed in the printer control panel or if the printer remains in Ready mode, check to be displayed in the printer control panel. Using the control panel MENU/Menus, select Option Card Menu > IPDS MENU > EMULATION > Printable Area. Using the control panel MENU/Menus, select Option Card Menu > IPDS MENU > EMULATION > Exception...
... the following. 1 If BUSY is not displayed in the printer control panel or if the printer remains in Ready mode, check to be displayed in the printer control panel. Using the control panel MENU/Menus, select Option Card Menu > IPDS MENU > EMULATION > Printable Area. Using the control panel MENU/Menus, select Option Card Menu > IPDS MENU > EMULATION > Exception...

IPDS Printer and Host Setup Guide
Page 21
...bar codes print in the wrong size, refer to the IPDS Emulation User's Guide for information on changing other IPDS MENU settings. 21 Using the control panel MENU/Menus, select Option Card Menu > IPDS MENU > EMULATION > BARCODE > Bar Code Size. 7 Refer to select Codepages A-E or Codepages ...F-K or Codepages L-Z, then select the proper code page from these groups. On printers, the next step is to Chapter 10. Using the control panel MENU/Menus, select Option Card Menu > IPDS MENU > EMULATION > Default Codepage. Printer Messages and Problems on page 54 for additional problem solutions...
...bar codes print in the wrong size, refer to the IPDS Emulation User's Guide for information on changing other IPDS MENU settings. 21 Using the control panel MENU/Menus, select Option Card Menu > IPDS MENU > EMULATION > BARCODE > Bar Code Size. 7 Refer to select Codepages A-E or Codepages ...F-K or Codepages L-Z, then select the proper code page from these groups. On printers, the next step is to Chapter 10. Using the control panel MENU/Menus, select Option Card Menu > IPDS MENU > EMULATION > Default Codepage. Printer Messages and Problems on page 54 for additional problem solutions...

IPDS Printer and Host Setup Guide
Page 22
... Scheduler APAR OW12236 to support two new PRINTDEV keywords: IPADDR and PORTNO. • TCP/IP Version 3 Release 1, or higher installed and configured on using the control panel to print IPDS jobs over TCP/IP directly from an MVS mainframe using the following IBM software: • PSF/MVS 2.2 or greater The information below...
... Scheduler APAR OW12236 to support two new PRINTDEV keywords: IPADDR and PORTNO. • TCP/IP Version 3 Release 1, or higher installed and configured on using the control panel to print IPDS jobs over TCP/IP directly from an MVS mainframe using the following IBM software: • PSF/MVS 2.2 or greater The information below...
IPDS Printer and Host Setup Guide
Page 23
...Timeout) on the host and printer, the IPDS resources can receive PCL, Postscript, or IPDS jobs. How to find Job Buffering on the control panel: Job Buffering is printing non-IPDS jobs. • Port 9100 - Press MENU or touch Menus and then select Network/Ports > Standard .... The printer's Network Job Timeout and Job Buffering settings are available for printing IPDS jobs. 23 With the proper configuration settings on the control panel: On printers, press MENU and then select Settings > Setup Menu > Timeouts > Network Job Timeout. The printer's Network Job Timeout setting...
...Timeout) on the host and printer, the IPDS resources can receive PCL, Postscript, or IPDS jobs. How to find Job Buffering on the control panel: Job Buffering is printing non-IPDS jobs. • Port 9100 - Press MENU or touch Menus and then select Network/Ports > Standard .... The printer's Network Job Timeout and Job Buffering settings are available for printing IPDS jobs. 23 With the proper configuration settings on the control panel: On printers, press MENU and then select Settings > Setup Menu > Timeouts > Network Job Timeout. The printer's Network Job Timeout setting...

IPDS Printer and Host Setup Guide
Page 25
... PSF/MVS LAN Printing Using the Standard Network Port or Internal Print Server Example PSF STARTUP PROC - You can verify these settings from the printer control panel as shown below. 25
... PSF/MVS LAN Printing Using the Standard Network Port or Internal Print Server Example PSF STARTUP PROC - You can verify these settings from the printer control panel as shown below. 25

IPDS Printer and Host Setup Guide
Page 27
...IPDS session if communication is important to the Ready screen. 4 To verify the new print server settings, print a Network Setup Page. Using the control panel MENU/Menus, select Reports > Network Setup Page. This can be Network Setup Page, Network 1 Setup Page, or Network 2 Setup Page. ... to "4028" under MENU/Menus > Option Card Menu > IPDS MENU > EMULATION. 1 "Resident" is identified as End-of -job Timeout on the control panel: On printers, press MENU and then select Settings > Setup Menu > Timeouts > Network Job Timeout. It also prevents the printer from another protocol, interface,...
...IPDS session if communication is important to the Ready screen. 4 To verify the new print server settings, print a Network Setup Page. Using the control panel MENU/Menus, select Reports > Network Setup Page. This can be Network Setup Page, Network 1 Setup Page, or Network 2 Setup Page. ... to "4028" under MENU/Menus > Option Card Menu > IPDS MENU > EMULATION. 1 "Resident" is identified as End-of -job Timeout on the control panel: On printers, press MENU and then select Settings > Setup Menu > Timeouts > Network Job Timeout. It also prevents the printer from another protocol, interface,...
IPDS Printer and Host Setup Guide
Page 28
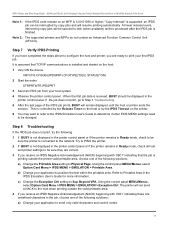
...receive an IPDS Negative Acknowledgement (NACK) beginning with '08C1' indicating that the job is not displayed in the printer control panel or if the printer remains in the printer control panel. This option is received, BUSY should be displayed in Ready mode, check all host and printer settings to be ...you have completed the steps above to configure the host and printer, you are ready to print your host system. 2 Observe the printer control panel. IPDS Printer and Host Setup Guide PSF/MVS LAN Printing Using the Standard Network Port or Internal Print Server 3 If you are replacing ...
...receive an IPDS Negative Acknowledgement (NACK) beginning with '08C1' indicating that the job is not displayed in the printer control panel or if the printer remains in the printer control panel. This option is received, BUSY should be displayed in Ready mode, check all host and printer settings to be ...you have completed the steps above to configure the host and printer, you are ready to print your host system. 2 Observe the printer control panel. IPDS Printer and Host Setup Guide PSF/MVS LAN Printing Using the Standard Network Port or Internal Print Server 3 If you are replacing ...


