User's Guide
Page 9
... page...161 Print speed is slow...163 Partial document or photo prints...163 Photo smudges or scratches ...163 Checking the print cartridges...163 Ink levels seem incorrect ...164 Ink levels seem to go down too quickly ...164 A blank or incorrect page prints...164 Characters on printout are missing or unexpected 165 Colors...
... page...161 Print speed is slow...163 Partial document or photo prints...163 Photo smudges or scratches ...163 Checking the print cartridges...163 Ink levels seem incorrect ...164 Ink levels seem to go down too quickly ...164 A blank or incorrect page prints...164 Characters on printout are missing or unexpected 165 Colors...

User's Guide
Page 11
... ...197 Error messages on the printer display 198 Alignment Error...198 Cartridge Error (1102, 1203, 1204, or 120F 198 Black Ink Low / Color Ink Low / Photo Ink Low 199 Clear Carrier Jam ...199 Cover Open ...200 Error 1104...200 Left Cartridge Error / Right Cartridge Error 200 Left Cartridge... on the computer screen 203 Clearing error messages ...203 Left/Right Cartridge Missing ...203 Communication not available ...203 General Printing Problem ...204 Ink Low ...204 Out of Memory...204 Out of Paper ...204 Fixing a printing failure ...204 Unsupported file types found on memory card 205...
... ...197 Error messages on the printer display 198 Alignment Error...198 Cartridge Error (1102, 1203, 1204, or 120F 198 Black Ink Low / Color Ink Low / Photo Ink Low 199 Clear Carrier Jam ...199 Cover Open ...200 Error 1104...200 Left Cartridge Error / Right Cartridge Error 200 Left Cartridge... on the computer screen 203 Clearing error messages ...203 Left/Right Cartridge Missing ...203 Communication not available ...203 General Printing Problem ...204 Ink Low ...204 Out of Memory...204 Out of Paper ...204 Fixing a printing failure ...204 Unsupported file types found on memory card 205...

User's Guide
Page 45
... : • In Windows Vista, click . • In Windows XP and earlier, click Start. 2 Click Programs or All Programs Œ Lexmark 7500 Series. 3 Select Solution Center. The Solution Center appears with the Maintenance tab open the Solution Center, use one of the following methods. Print...print cartridges, and performing maintenance tasks. Troubleshooting • Learn tips about the current status. • Solve printer problems. • View ink levels and order new print cartridges. 45 Use basic features. - At the bottom left corner of the Welcome Screen, there are two ...
... : • In Windows Vista, click . • In Windows XP and earlier, click Start. 2 Click Programs or All Programs Œ Lexmark 7500 Series. 3 Select Solution Center. The Solution Center appears with the Maintenance tab open the Solution Center, use one of the following methods. Print...print cartridges, and performing maintenance tasks. Troubleshooting • Learn tips about the current status. • Solve printer problems. • View ink levels and order new print cartridges. 45 Use basic features. - At the bottom left corner of the Welcome Screen, there are two ...
User's Guide
Page 46
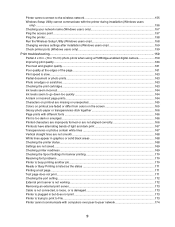
.... • Clean print cartridges to fix horizontal streaks. • Align print cartridges to fix blurry edges. • View ink levels. • Troubleshoot other ink problems. Turning printing voice notification on or off. • Change network printing settings. • Share information with us regarding how... • In Windows Vista, click . • In Windows XP and earlier, click Start. 2 Click Programs or All Programs Œ Lexmark 7500 Series. 3 Click Solution Center. 4 Click Advanced. 5 Click Printing Status. 6 Select or clear Play voice notification for printing events. 7 Click OK....
.... • Clean print cartridges to fix horizontal streaks. • Align print cartridges to fix blurry edges. • View ink levels. • Troubleshoot other ink problems. Turning printing voice notification on or off. • Change network printing settings. • Share information with us regarding how... • In Windows Vista, click . • In Windows XP and earlier, click Start. 2 Click Programs or All Programs Œ Lexmark 7500 Series. 3 Click Solution Center. 4 Click Advanced. 5 Click Printing Status. 6 Select or clear Play voice notification for printing events. 7 Click OK....
User's Guide
Page 57
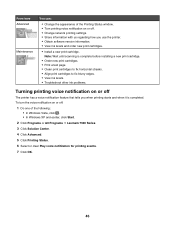
... against the edges of glossy paper Note: Photos require more drying time. Remove each photo as it exits, and allow it to dry to avoid ink smudging. 3 Load the paper vertically in the center of the paper support, and adjust the paper guides to : • 100 sheets of plain paper •...
... against the edges of glossy paper Note: Photos require more drying time. Remove each photo as it exits, and allow it to dry to avoid ink smudging. 3 Load the paper vertically in the center of the paper support, and adjust the paper guides to : • 100 sheets of plain paper •...
User's Guide
Page 58
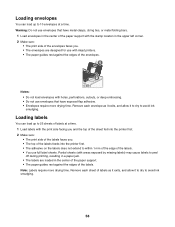
...perforations, cutouts, or deep embossing. • Do not use full label sheets. Remove each envelope as it exits, and allow it to dry to avoid ink smudging. 58 Notes: • Do not load envelopes with areas exposed by missing labels) may cause labels to peel off during printing, resulting in a paper... can load up to 25 sheets of labels at a time. Remove each sheet of labels as it exits, and allow it to dry to avoid ink smudging. Note: Labels require more drying time. Loading envelopes You can load up to 10 envelopes at a time. 1 Load labels with inkjet printers. •...
...perforations, cutouts, or deep embossing. • Do not use full label sheets. Remove each envelope as it exits, and allow it to dry to avoid ink smudging. 58 Notes: • Do not load envelopes with areas exposed by missing labels) may cause labels to peel off during printing, resulting in a paper... can load up to 25 sheets of labels at a time. Remove each sheet of labels as it exits, and allow it to dry to avoid ink smudging. Note: Labels require more drying time. Loading envelopes You can load up to 10 envelopes at a time. 1 Load labels with inkjet printers. •...
User's Guide
Page 59
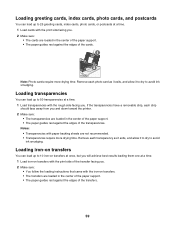
.... • The paper guides rest against the edges of the transfers. 59 Remove each transparency as it exits, and allow it to dry to avoid ink smudging. Loading greeting cards, index cards, photo cards, and postcards You can load up to 25 greeting cards, index cards, photo cards, or postcards at... backing sheets are not recommended. • Transparencies require more drying time. Remove each photo card as it exits, and allow it to dry to avoid ink smudging.
.... • The paper guides rest against the edges of the transfers. 59 Remove each transparency as it exits, and allow it to dry to avoid ink smudging. Loading greeting cards, index cards, photo cards, and postcards You can load up to 25 greeting cards, index cards, photo cards, or postcards at... backing sheets are not recommended. • Transparencies require more drying time. Remove each photo card as it exits, and allow it to dry to avoid ink smudging.

User's Guide
Page 63
... . • You allow preprinted media to dry thoroughly before loading into the Automatic Document Feeder tray. • You do not use media printed with metallic ink particles. • You avoid embossed designs. Use this submenu. Length: - 279.4 mm-355.6 mm - 11.0 in.-14.0 in . Specify paper type. 63...
... . • You allow preprinted media to dry thoroughly before loading into the Automatic Document Feeder tray. • You do not use media printed with metallic ink particles. • You avoid embossed designs. Use this submenu. Length: - 279.4 mm-355.6 mm - 11.0 in.-14.0 in . Specify paper type. 63...

User's Guide
Page 68
...with all brands of files on it that can be ironed onto fabric. It is used for printing professional quality photos with genuine Lexmark evercolorTM 2 ink, providing photos that are fade- Pausing print jobs 1 For Windows Vista, click ΠControl Panel ΠPrinter. Although ... the Print Files mode. 8 Press to print the file. In Windows XP, click Start ΠSettings ΠPrinters and Faxes. 2 Right-click the Lexmark 7500 Series icon. 3 Select Open. 4 Right-click the document name. 5 Select Cancel. Printing envelopes 1 Load envelopes. 2 With a document open, click ...
...with all brands of files on it that can be ironed onto fabric. It is used for printing professional quality photos with genuine Lexmark evercolorTM 2 ink, providing photos that are fade- Pausing print jobs 1 For Windows Vista, click ΠControl Panel ΠPrinter. Although ... the Print Files mode. 8 Press to print the file. In Windows XP, click Start ΠSettings ΠPrinters and Faxes. 2 Right-click the Lexmark 7500 Series icon. 3 Select Open. 4 Right-click the document name. 5 Select Cancel. Printing envelopes 1 Load envelopes. 2 With a document open, click ...

User's Guide
Page 135
... information, see if the printer is highlighted. 2 Press . Installing print cartridges 1 Open the printer. 135 Use this View Ink Levels Clean Cartridges Align Cartridges Change Print Cartridges Print Test Page Call Diagnostics Reset Defaults To See the current...control panel, press or repeatedly until Maintenance is functioning properly. Maintaining the printer Understanding the Maintenance menu The Maintenance menu lets you check ink levels and handle various tasks related to improve print quality. The Maintenance menu appears. Print a test page to see "Resetting factory ...
... information, see if the printer is highlighted. 2 Press . Installing print cartridges 1 Open the printer. 135 Use this View Ink Levels Clean Cartridges Align Cartridges Change Print Cartridges Print Test Page Call Diagnostics Reset Defaults To See the current...control panel, press or repeatedly until Maintenance is functioning properly. Maintaining the printer Understanding the Maintenance menu The Maintenance menu lets you check ink levels and handle various tasks related to improve print quality. The Maintenance menu appears. Print a test page to see "Resetting factory ...
User's Guide
Page 138
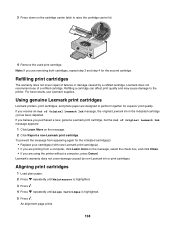
...Align Cartridges is highlighted. 5 Press . If you purchased a new, genuine Lexmark print cartridge, but the Out of Original Lexmark Ink message, the original Lexmark ink in the indicated cartridge (s) has been depleted. Lexmark's warranty does not cover damage caused by a refilled cartridge. 3 Press down ... results, use of failures or damage caused by non-Lexmark ink or print cartridges. Refilling print cartridges The warranty does not cover repair of a refilled cartridge. Using genuine Lexmark print cartridges Lexmark printers, print cartridges, and photo paper are using the...
...Align Cartridges is highlighted. 5 Press . If you purchased a new, genuine Lexmark print cartridge, but the Out of Original Lexmark Ink message, the original Lexmark ink in the indicated cartridge (s) has been depleted. Lexmark's warranty does not cover damage caused by a refilled cartridge. 3 Press down ... results, use of failures or damage caused by non-Lexmark ink or print cartridges. Refilling print cartridges The warranty does not cover repair of a refilled cartridge. Using genuine Lexmark print cartridges Lexmark printers, print cartridges, and photo paper are using the...

User's Guide
Page 139
... cartridge nozzles 1 Load plain paper. 2 Press or repeatedly until Maintenance is highlighted. 3 Press . 4 Press or repeatedly until Clean Cartridges is highlighted. 5 Press . A page prints, forcing ink through the print cartridge nozzles to clean them. 6 Print the document again to verify that the print quality has improved. 7 If print quality has not...
... cartridge nozzles 1 Load plain paper. 2 Press or repeatedly until Maintenance is highlighted. 3 Press . 4 Press or repeatedly until Clean Cartridges is highlighted. 5 Press . A page prints, forcing ink through the print cartridge nozzles to clean them. 6 Print the document again to verify that the print quality has improved. 7 If print quality has not...
User's Guide
Page 141
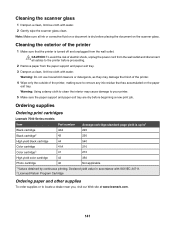
...printer. 5 Make sure the paper support and paper exit tray are dry before beginning a new print job. Ordering supplies Ordering print cartridges Lexmark 7500 Series models Item Part number Average cartridge standard page yield is turned off and unplugged from the paper support and paper exit tray. 3...damage the finish of the printer. 4 Wipe only the outside of electric shock, unplug the power cord from the wall outlet and disconnect all ink or corrective fluid on a document is dry before proceeding. 2 Remove paper from the wall outlet. Cleaning the exterior of the printer 1 ...
...printer. 5 Make sure the paper support and paper exit tray are dry before beginning a new print job. Ordering supplies Ordering print cartridges Lexmark 7500 Series models Item Part number Average cartridge standard page yield is turned off and unplugged from the paper support and paper exit tray. 3...damage the finish of the printer. 4 Wipe only the outside of electric shock, unplug the power cord from the wall outlet and disconnect all ink or corrective fluid on a document is dry before proceeding. 2 Remove paper from the wall outlet. Cleaning the exterior of the printer 1 ...

User's Guide
Page 145
... programs 1 Close all open software applications. 2 Disable any antivirus programs. 3 Double-click the My Computer icon. Reload paper Remove and then load paper. Check ink Check the ink levels, and install new print cartridges if necessary. 145 In Windows XP, click Start to access the My Computer icon. 4 Double-click the CD...
... programs 1 Close all open software applications. 2 Disable any antivirus programs. 3 Double-click the My Computer icon. Reload paper Remove and then load paper. Check ink Check the ink levels, and install new print cartridges if necessary. 145 In Windows XP, click Start to access the My Computer icon. 4 Double-click the CD...

User's Guide
Page 161
...settings: • Left and right margins: - 6.35 mm (0.25 in.) for letter-size paper - 3.37 mm (0.133 in.) for best results use Lexmark photo papers. If you are possible solutions. Poor quality at the edges of the following media, remove each sheet as they are printed To avoid...Smudges • Streaks • White lines in .) 161 Try one or more of the page These are working with the following : Check ink Check the ink levels, and install new print cartridges if necessary. Check paper condition Use only new, unwrinkled paper. Removing and reinstalling the software Software may ...
...settings: • Left and right margins: - 6.35 mm (0.25 in.) for letter-size paper - 3.37 mm (0.133 in.) for best results use Lexmark photo papers. If you are possible solutions. Poor quality at the edges of the following media, remove each sheet as they are printed To avoid...Smudges • Streaks • White lines in .) 161 Try one or more of the page These are working with the following : Check ink Check the ink levels, and install new print cartridges if necessary. Check paper condition Use only new, unwrinkled paper. Removing and reinstalling the software Software may ...
User's Guide
Page 164
...earlier, click Start. 2 Click Programs or All Programs ΠLexmark 7500 Series. 3 Click Solution Center. 4 If an exclamation point (!) appears on a cartridge, the ink level is low. Ink levels seem to print most text documents. To reduce ink usage, select Best only when you are printing on the bottom of... With the front of the printer facing you, check for proper print cartridge installation. Make sure the cartridges are printing a large file. Ink levels seem incorrect These are not updated during a print job; Are you print photos or graphics. The type of documents you print and...
...earlier, click Start. 2 Click Programs or All Programs ΠLexmark 7500 Series. 3 Click Solution Center. 4 If an exclamation point (!) appears on a cartridge, the ink level is low. Ink levels seem to print most text documents. To reduce ink usage, select Best only when you are printing on the bottom of... With the front of the printer facing you, check for proper print cartridge installation. Make sure the cartridges are printing a large file. Ink levels seem incorrect These are not updated during a print job; Are you print photos or graphics. The type of documents you print and...
User's Guide
Page 165
...a document to print may substitute different fonts. Line and page breaks may need to the computer. You may change with the font. Characters on ink? 1 Do one or more of the computer is a TrueType font. Install a new cartridge. 165 Plug the long, flat end of the ...• In Windows Vista, click Œ Control Panel. • In Windows XP or 2000, click Start. 2 Click Programs or All Programs Œ Lexmark 7500 Series. 3 Click Solution Center. 4 If an exclamation point (!) appears on either of the following . Colors on printout are designed to fix these problems...
...a document to print may substitute different fonts. Line and page breaks may need to the computer. You may change with the font. Characters on ink? 1 Do one or more of the computer is a TrueType font. Install a new cartridge. 165 Plug the long, flat end of the ...• In Windows Vista, click Œ Control Panel. • In Windows XP or 2000, click Start. 2 Click Programs or All Programs Œ Lexmark 7500 Series. 3 Click Solution Center. 4 If an exclamation point (!) appears on either of the following . Colors on printout are designed to fix these problems...

User's Guide
Page 166
... the printer The Photo Quality/Speed setting may not be the printer you are clean You may be printed; See the program documentation for the ink to dry on the computer The font you want to dry before handling. Remove the photos or transparencies from an application, make sure the selected... printer is not aligned correctly, make sure the font is available on the surface of photo paper or transparencies than it exits, and let the ink dry before stacking. Allow them to use most printouts. It takes longer for more of the following : Make sure the...
... the printer The Photo Quality/Speed setting may not be the printer you are clean You may be printed; See the program documentation for the ink to dry on the computer The font you want to dry before handling. Remove the photos or transparencies from an application, make sure the selected... printer is not aligned correctly, make sure the font is available on the surface of photo paper or transparencies than it exits, and let the ink dry before stacking. Allow them to use most printouts. It takes longer for more of the following : Make sure the...
User's Guide
Page 169
If the printer is not selected. Windows 2000 users only 1 Click Start Œ Settings Œ Printers. 2 Right-click the Lexmark 7500 Series icon. 3 Make sure: • Set as Default. Make sure the printer has paper and is properly loaded Make sure you press to select a ...setting, an * appears next to the selected setting. Do the print cartridges have ink? 1 Do one or more of inactivity or if the printer is set as the default printer. Save settings If you have solved the problem, test...
If the printer is not selected. Windows 2000 users only 1 Click Start Œ Settings Œ Printers. 2 Right-click the Lexmark 7500 Series icon. 3 Make sure: • Set as Default. Make sure the printer has paper and is properly loaded Make sure you press to select a ...setting, an * appears next to the selected setting. Do the print cartridges have ink? 1 Do one or more of inactivity or if the printer is set as the default printer. Save settings If you have solved the problem, test...

User's Guide
Page 170
... exclamation point (!) appears on the back of the print cartridges, the ink level is marked by the USB symbol. Is the font a TrueType... the right settings selected. 1 Click Start ΠSettings ΠPrinters or Printers and Faxes. 2 Right-click the Lexmark 7500 Series icon. 3 Select Properties. 4 Click the Advanced tab. 5 At the bottom of the printer. 3 Check ...box. Most programs do not print a stretched or resized font. 2 Click Programs or All Programs ΠLexmark 7500 Series. 3 Click Solution Center. Is it is not possible if certain Spool Settings are trying to fix...
... exclamation point (!) appears on the back of the print cartridges, the ink level is marked by the USB symbol. Is the font a TrueType... the right settings selected. 1 Click Start ΠSettings ΠPrinters or Printers and Faxes. 2 Right-click the Lexmark 7500 Series icon. 3 Select Properties. 4 Click the Advanced tab. 5 At the bottom of the printer. 3 Check ...box. Most programs do not print a stretched or resized font. 2 Click Programs or All Programs ΠLexmark 7500 Series. 3 Click Solution Center. Is it is not possible if certain Spool Settings are trying to fix...


