
Wireless Setup Guide
Page 7
Setting up the printer 7 Push in the green touch points on each side of the cartridges to open the top cover. Remove the toner cartridges by lifting the handles and then gently pulling away from the imaging kit. Slide the release latch to the left and lift to release the side panel, and then remove it.
Setting up the printer 7 Push in the green touch points on each side of the cartridges to open the top cover. Remove the toner cartridges by lifting the handles and then gently pulling away from the imaging kit. Slide the release latch to the left and lift to release the side panel, and then remove it.
User's Guide
Page 7
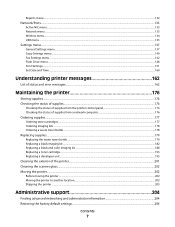
...control panel 176 Checking the status of supplies from a network computer 176 Ordering supplies...177 Ordering toner cartridges...177 Ordering imaging kits ...178 Ordering a waste toner bottle...178 Replacing supplies...179 Replacing the waste toner bottle ...179 Replacing a black imaging kit ...182 Replacing a black and color imaging kit ...188... Replacing a toner cartridge...193 Replacing a developer unit ...195 Cleaning the exterior of the printer...201 Cleaning the scanner glass...202 Moving the ...
...control panel 176 Checking the status of supplies from a network computer 176 Ordering supplies...177 Ordering toner cartridges...177 Ordering imaging kits ...178 Ordering a waste toner bottle...178 Replacing supplies...179 Replacing the waste toner bottle ...179 Replacing a black imaging kit ...182 Replacing a black and color imaging kit ...188... Replacing a toner cartridge...193 Replacing a developer unit ...195 Cleaning the exterior of the printer...201 Cleaning the scanner glass...202 Moving the ...

User's Guide
Page 47
... our Web site at www.lexmark.com/recycle. 2 From the Toner Cartridges section, select your area. Facilities may not exist in your country from landfills annually by making it both easy and free for Lexmark customers to return used cartridges to Lexmark for recycling. When you return a cartridge to Lexmark, you want to Lexmark are 100% recyclable where corrugated...
... our Web site at www.lexmark.com/recycle. 2 From the Toner Cartridges section, select your area. Facilities may not exist in your country from landfills annually by making it both easy and free for Lexmark customers to return used cartridges to Lexmark for recycling. When you return a cartridge to Lexmark, you want to Lexmark are 100% recyclable where corrugated...
User's Guide
Page 123
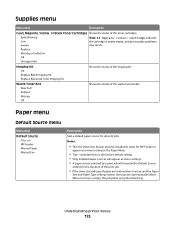
... OK Shows the status of paper are automatically linked. Supplies menu Menu item Description Cyan, Magenta, Yellow, or Black Toner Cartridges Shows the status of the toner cartridges Early Warning Low Note: 88 Replace Cartridge indicates the cartridge is the factory default setting. • Only installed paper sources will appear as menu settings. • A paper source...
... OK Shows the status of paper are automatically linked. Supplies menu Menu item Description Cyan, Magenta, Yellow, or Black Toner Cartridges Shows the status of the toner cartridges Early Warning Low Note: 88 Replace Cartridge indicates the cartridge is the factory default setting. • Only installed paper sources will appear as menu settings. • A paper source...
User's Guide
Page 163
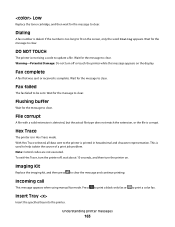
Low Replace the toner cartridge, and then wait for the message to clear. DO NOT TOUCH The printer is dialed. Fax failed The fax failed to print a color fax. Press ...
Low Replace the toner cartridge, and then wait for the message to clear. DO NOT TOUCH The printer is dialed. Fax failed The fax failed to print a color fax. Press ...
User's Guide
Page 166
... sent from the device. Reading data A PictBridge enabled device is connected, and the printer is reading data from a USB drive was reading information from the toner cartridges. Warning-Potential Damage: Do not remove the device or turn the printer off while Reading data appears on the display. pXX represents the number of...
... sent from the device. Reading data A PictBridge enabled device is connected, and the printer is reading data from a USB drive was reading information from the toner cartridges. Warning-Potential Damage: Do not remove the device or turn the printer off while Reading data appears on the display. pXX represents the number of...
User's Guide
Page 167
... printer control panel or set to clear the message and continue printing. pXX represents the number of pages. If the setting is closed. Replace cartridge Replace the toner cartridge, and then press to On from the Supply Notifications Web page (located on the USB drive failed. Sending pXX The printer is open. Wait...
... printer control panel or set to clear the message and continue printing. pXX represents the number of pages. If the setting is closed. Replace cartridge Replace the toner cartridge, and then press to On from the Supply Notifications Web page (located on the USB drive failed. Sending pXX The printer is open. Wait...
User's Guide
Page 168
...the imaging kit. Warning-Potential Damage: Do not turn the printer off while this message appears on the display. 30.yy cartridge missing Insert the missing toner cartridge to the printer. Waiting The printer has received data to print the contents of -Job command, a Form Feed command, ...camera controls to print A recognized PictBridge-compatible camera is attached to clear the message and continue printing. 31.yy Defective Cartridge Replace the defective toner cartridge with a new one or more of the following: • Press to print, but is waiting for the message to PictBridge....
...the imaging kit. Warning-Potential Damage: Do not turn the printer off while this message appears on the display. 30.yy cartridge missing Insert the missing toner cartridge to the printer. Waiting The printer has received data to print the contents of -Job command, a Form Feed command, ...camera controls to print A recognized PictBridge-compatible camera is attached to clear the message and continue printing. 31.yy Defective Cartridge Replace the defective toner cartridge with a new one or more of the following: • Press to print, but is waiting for the message to PictBridge....
User's Guide
Page 169
32.yy Replace Unsupported Cartridge Replace the unsupported toner cartridge with a new one. 50 PPDS Font Error The printer has encountered a font error because a specific font may not have enough memory available to save settings. ... the collation message and collates the remainder of this. Understanding printer messages 169 Press , and then press to cancel printing. 40 Invalid refill, change cartridge Replace the toner cartridge with a supported one or more of the following : • Press to clear the message and continue printing. • Press , and then press to cancel...
32.yy Replace Unsupported Cartridge Replace the unsupported toner cartridge with a new one. 50 PPDS Font Error The printer has encountered a font error because a specific font may not have enough memory available to save settings. ... the collation message and collates the remainder of this. Understanding printer messages 169 Press , and then press to cancel printing. 40 Invalid refill, change cartridge Replace the toner cartridge with a supported one or more of the following : • Press to clear the message and continue printing. • Press , and then press to cancel...
User's Guide
Page 172
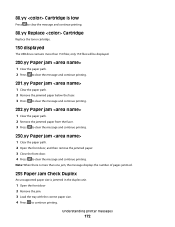
...pages jammed. 235 Paper Jam Check Duplex An unsupported paper size is low Press to clear the message and continue printing. 88.yy Replace Cartridge Replace the toner cartridge. 150 displayed The USB drive contains more than 150 files; only 150 files will be displayed. 200.yy Paper jam 1 Clear the ...door, and then remove the jammed paper. 3 Close the front door. 4 Press to clear the message and continue printing. Understanding printer messages 172 88.yy Cartridge is jammed in the duplex unit. 1 Open the front door 2 Remove the jam. 3 Load the tray with the correct paper size. 4 Press to ...
...pages jammed. 235 Paper Jam Check Duplex An unsupported paper size is low Press to clear the message and continue printing. 88.yy Replace Cartridge Replace the toner cartridge. 150 displayed The USB drive contains more than 150 files; only 150 files will be displayed. 200.yy Paper jam 1 Clear the ...door, and then remove the jammed paper. 3 Close the front door. 4 Press to clear the message and continue printing. Understanding printer messages 172 88.yy Cartridge is jammed in the duplex unit. 1 Open the front door 2 Remove the jam. 3 Load the tray with the correct paper size. 4 Press to ...

User's Guide
Page 174
... make sure it is installed properly. Note: If turning the printer off , wait about 10 seconds, and then turn the printer on the cyan toner cartridge to make sure it is installed properly. Turn the printer off and then on again does not clear the message, contact your system support person.... 940.01 Press down on the magenta toner cartridge to start a color job. Turn the printer off . 3 Wait 15 seconds and then turn the printer back on 941.01 Press down on ...
... make sure it is installed properly. Note: If turning the printer off , wait about 10 seconds, and then turn the printer on the cyan toner cartridge to make sure it is installed properly. Turn the printer off and then on again does not clear the message, contact your system support person.... 940.01 Press down on the magenta toner cartridge to start a color job. Turn the printer off . 3 Wait 15 seconds and then turn the printer back on 941.01 Press down on ...

User's Guide
Page 175
... the printer back on. Call for service. 943.02 The black toner cartridge needs maintenance. If the service message appears again, contact Customer Support, and report the message. 940.02 The cyan toner cartridge needs maintenance. Call for service. 941.02 The magenta toner cartridge needs maintenance. Understanding printer messages 175 Call for service. 942.02...
... the printer back on. Call for service. 943.02 The black toner cartridge needs maintenance. If the service message appears again, contact Customer Support, and report the message. 940.02 The cyan toner cartridge needs maintenance. Call for service. 941.02 The magenta toner cartridge needs maintenance. Understanding printer messages 175 Call for service. 942.02...
User's Guide
Page 177
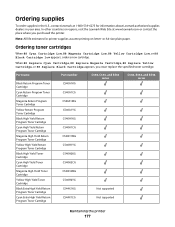
... Return Program Toner Cartridge Cyan Extra High Yield Return Program Toner Cartridge Part number C540A1KG C540A1CG C540A1MG C540A1YG C540H1KG C540H1CG C540H1MG C540H1YG C540H2KG C540H2CG C540H2MG C540H2YG C544X1KG C544X1CG C540, C543, and X543 series C544, X544, and X546 series Not supported Not supported Maintaining the printer 177 In other countries or regions, visit the Lexmark Web Site...
... Return Program Toner Cartridge Cyan Extra High Yield Return Program Toner Cartridge Part number C540A1KG C540A1CG C540A1MG C540A1YG C540H1KG C540H1CG C540H1MG C540H1YG C540H2KG C540H2CG C540H2MG C540H2YG C544X1KG C544X1CG C540, C543, and X543 series C544, X544, and X546 series Not supported Not supported Maintaining the printer 177 In other countries or regions, visit the Lexmark Web Site...
User's Guide
Page 178
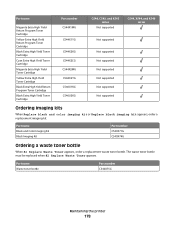
... Toner Cartridge Yellow Extra High Yield Return Program Toner Cartridge Black Extra High Yield Toner Cartridge Cyan Extra High Yield Toner Cartridge Magenta Extra High Yield Toner Cartridge Yellow Extra High Yield Toner Cartridge Black Extra High Yield Return Program Toner Cartridge Black Extra High Yield Toner Cartridge Part number C544X1MG C544X1YG C544X2KG C544X2CG C544X2MG C544X2YG C546U1KG C546U2KG C540, C543, and X543 series Not supported C544, X544...
... Toner Cartridge Yellow Extra High Yield Return Program Toner Cartridge Black Extra High Yield Toner Cartridge Cyan Extra High Yield Toner Cartridge Magenta Extra High Yield Toner Cartridge Yellow Extra High Yield Toner Cartridge Black Extra High Yield Return Program Toner Cartridge Black Extra High Yield Toner Cartridge Part number C544X1MG C544X1YG C544X2KG C544X2CG C544X2MG C544X2YG C546U1KG C546U2KG C540, C543, and X543 series Not supported C544, X544...
User's Guide
Page 183
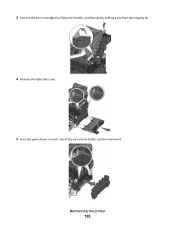
Maintaining the printer 183 3 Remove the toner cartridges by lifting the handles, and then gently pulling away from the imaging kit. 4 Remove the right side cover. 5 Press the green levers on each side of the waste toner bottle, and then remove it.
Maintaining the printer 183 3 Remove the toner cartridges by lifting the handles, and then gently pulling away from the imaging kit. 4 Remove the right side cover. 5 Press the green levers on each side of the waste toner bottle, and then remove it.
User's Guide
Page 187
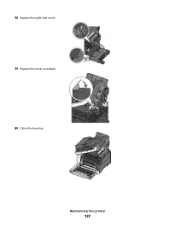
Maintaining the printer 187 18 Replace the right side cover. 19 Replace the toner cartridges. 20 Close the top door.
Maintaining the printer 187 18 Replace the right side cover. 19 Replace the toner cartridges. 20 Close the top door.

User's Guide
Page 189
3 Remove the toner cartridges by lifting the handles, and then gently pulling away from the imaging kit. 4 Remove the right side cover. 5 Press the green levers on each side of the waste toner bottle, and remove it. Maintaining the printer 189
3 Remove the toner cartridges by lifting the handles, and then gently pulling away from the imaging kit. 4 Remove the right side cover. 5 Press the green levers on each side of the waste toner bottle, and remove it. Maintaining the printer 189
User's Guide
Page 192
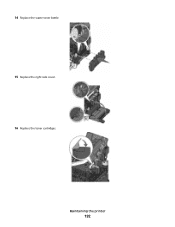
14 Replace the waste toner bottle. 15 Replace the right side cover. 16 Replace the toner cartridges. Maintaining the printer 192
14 Replace the waste toner bottle. 15 Replace the right side cover. 16 Replace the toner cartridges. Maintaining the printer 192

User's Guide
Page 193
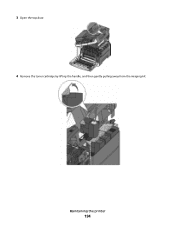
... warranty. Replacing a toner cartridge Replace the specified toner cartridge (yellow, cyan, magenta, or black) when 88 Replace Cartridge appears. Maintaining the printer 193 17 Close the top door. 18 Close the front door. Warning-Potential Damage: Damage caused by use of a non-Lexmark toner cartridge is replaced. Note: Degraded print quality may result from using non-Lexmark toner cartridges. 1 Make sure...
... warranty. Replacing a toner cartridge Replace the specified toner cartridge (yellow, cyan, magenta, or black) when 88 Replace Cartridge appears. Maintaining the printer 193 17 Close the top door. 18 Close the front door. Warning-Potential Damage: Damage caused by use of a non-Lexmark toner cartridge is replaced. Note: Degraded print quality may result from using non-Lexmark toner cartridges. 1 Make sure...
User's Guide
Page 194
3 Open the top door. 4 Remove the toner cartridge by lifting the handle, and then gently pulling away from the imaging kit. Maintaining the printer 194
3 Open the top door. 4 Remove the toner cartridge by lifting the handle, and then gently pulling away from the imaging kit. Maintaining the printer 194


