User's Guide
Page 18
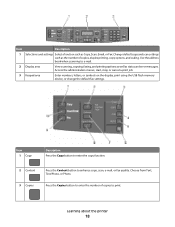
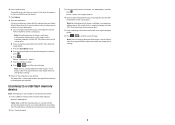
Item 1 2 3 Description Selections and settings Select a function such as status and error messages. Display area View scanning, copying, faxing, and printing options as well as Copy, Scan, Email, or Fax. Keypad area Enter numbers, letters, or symbols on the display, print using the USB flash memory device, or ...change the default fax settings. Press the Copies button to print. Change default copy and scan settings such as the number ...
Item 1 2 3 Description Selections and settings Select a function such as status and error messages. Display area View scanning, copying, faxing, and printing options as well as Copy, Scan, Email, or Fax. Keypad area Enter numbers, letters, or symbols on the display, print using the USB flash memory device, or ...change the default fax settings. Press the Copies button to print. Change default copy and scan settings such as the number ...
User's Guide
Page 19
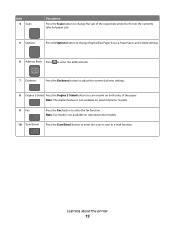
Note: The duplex feature is not available on selected printer models. 10 Scan/Email Press the Scan/Email button to enter the scan or scan to enter the fax function. Learning about the printer 19 Item 4 Scale Description Press the Scale button to change the size of the paper. Note: ... Press to enter the address book. 7 Darkness Press the Darkness button to adjust the current darkness settings. 8 Duplex 2-Sided Press the Duplex 2-Sided button to scan or print on selected printer models. 9 Fax Press the Fax button to e-mail function.
Note: The duplex feature is not available on selected printer models. 10 Scan/Email Press the Scan/Email button to enter the scan or scan to enter the fax function. Learning about the printer 19 Item 4 Scale Description Press the Scale button to change the size of the paper. Note: ... Press to enter the address book. 7 Darkness Press the Darkness button to adjust the current darkness settings. 8 Duplex 2-Sided Press the Duplex 2-Sided button to scan or print on selected printer models. 9 Fax Press the Fax button to e-mail function.

User's Guide
Page 85
...Press . Note: If there are no entries in the address book, Manual Entry appears. 3 From the printer control panel, press the Scan/Email button. Scan to send a color copy. Scan to send a color copy. After you are no entries in the address book, then Manual Entry appears. 5 Press to that button ...Entry appears. Note: If there are loading a document into the ADF, then adjust the paper guides. 3 From the printer control panel, press the Scan/Email button. b Press 1 to end the search. a Press the button on the second line. The first time you want appears, and then press ...
...Press . Note: If there are no entries in the address book, Manual Entry appears. 3 From the printer control panel, press the Scan/Email button. Scan to send a color copy. Scan to send a color copy. After you are no entries in the address book, then Manual Entry appears. 5 Press to that button ...Entry appears. Note: If there are loading a document into the ADF, then adjust the paper guides. 3 From the printer control panel, press the Scan/Email button. b Press 1 to end the search. a Press the button on the second line. The first time you want appears, and then press ...

User's Guide
Page 86
... the scanner glass. 2 If you press 2, Press Start To Begin appears. 8 Press to send a black only copy or to send a color copy. Scan to continue scanning the e-mail. Search appears. to E-mail appears. 4 Press . After you are no entries in the address book, Manual Entry appears. 5 Press to ... the ADF. Note: If there are loading a document into the ADF, then adjust the paper guides. 3 From the printer control panel, press the Scan/Email button. Canceling an e-mail An e-mail can be canceled when the document is canceled, the copy screen appears. Note: If you want appears, and...
... the scanner glass. 2 If you press 2, Press Start To Begin appears. 8 Press to send a black only copy or to send a color copy. Scan to continue scanning the e-mail. Search appears. to E-mail appears. 4 Press . After you are no entries in the address book, Manual Entry appears. 5 Press to ... the ADF. Note: If there are loading a document into the ADF, then adjust the paper guides. 3 From the printer control panel, press the Scan/Email button. Canceling an e-mail An e-mail can be canceled when the document is canceled, the copy screen appears. Note: If you want appears, and...

User's Guide
Page 108
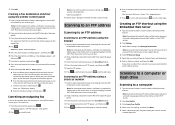
... to an FTP server is that you are loading a document into the ADF or facedown on the scanner glass. 2 If you scan documents directly to the server at a time. Scanning to send a color copy. Scanning to an FTP address ADF Scanner glass Use the ADF for example, a color document can be...the keypad 1 Load an original document faceup, short edge first into the ADF, then adjust the paper guides. 3 From the printer control panel, press the Scan/Email button. 4 Press the arrow buttons until FTP appears, and then press . 5 Type the FTP address. 6 Press to send a black-only copy or ...
... to an FTP server is that you are loading a document into the ADF or facedown on the scanner glass. 2 If you scan documents directly to the server at a time. Scanning to send a color copy. Scanning to an FTP address ADF Scanner glass Use the ADF for example, a color document can be...the keypad 1 Load an original document faceup, short edge first into the ADF, then adjust the paper guides. 3 From the printer control panel, press the Scan/Email button. 4 Press the arrow buttons until FTP appears, and then press . 5 Type the FTP address. 6 Press to send a black-only copy or ...

User's Guide
Page 109
... number 1 Load an original document faceup, short edge first into the ADF, then adjust the paper guides. 3 From the printer control panel, press the Scan/Email button. 4 Press the arrow buttons until FTP appears, and then press . 5 Press , and then enter the recipient's shortcut number. 6 Press 1 to... the IP address of your system support person. 4 Click FTP Shortcut Setup. 5 Select the scan settings (Format, Content, Color, and Resolution). 6 Enter a shortcut number, and then click Add. Scanning to an FTP address using the Embedded Web Server 1 Type the printer IP address into the ADF...
... number 1 Load an original document faceup, short edge first into the ADF, then adjust the paper guides. 3 From the printer control panel, press the Scan/Email button. 4 Press the arrow buttons until FTP appears, and then press . 5 Press , and then enter the recipient's shortcut number. 6 Press 1 to... the IP address of your system support person. 4 Click FTP Shortcut Setup. 5 Select the scan settings (Format, Content, Color, and Resolution). 6 Enter a shortcut number, and then click Add. Scanning to an FTP address using the Embedded Web Server 1 Type the printer IP address into the ADF...
User's Guide
Page 111
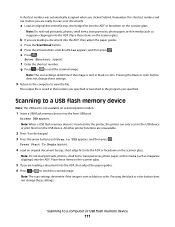
...the ADF or facedown on selected printer models. 1 Insert a USB flash memory device into the printer, the printer can only scan to USB appears, and then press . Scanning to scan your documents. b If you are loading a document into the ADF, then adjust the paper guides. Access USB appears. ...use it when you are loading a document into the ADF, then adjust the paper guides. 6 Press or to view the file. c Press the Scan/Email button. Pressing the black or color button does not change these items on the scanner glass. 5 If you are unavailable. 2 Press 1 on the...
...the ADF or facedown on selected printer models. 1 Insert a USB flash memory device into the printer, the printer can only scan to USB appears, and then press . Scanning to scan your documents. b If you are loading a document into the ADF, then adjust the paper guides. Access USB appears. ...use it when you are loading a document into the ADF, then adjust the paper guides. 6 Press or to view the file. c Press the Scan/Email button. Pressing the black or color button does not change these items on the scanner glass. 5 If you are unavailable. 2 Press 1 on the...
User's Guide
Page 113
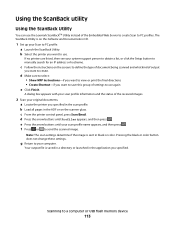
...on the screens to define the type of document being scanned and what kind of output you want to manually search for an IP address or hostname. a Locate the printer you specified. c From the printer control panel, press Scan/Email. The ScanBack Utility is saved in a directory or... launched in the application you specified in black or color. Note: The scan settings determine if the image is sent in the scan profile. f Press or to PC profiles. Using the ScanBack utility Using the ScanBack Utility You can use the Lexmark...
...on the screens to define the type of document being scanned and what kind of output you want to manually search for an IP address or hostname. a Locate the printer you specified. c From the printer control panel, press Scan/Email. The ScanBack Utility is saved in a directory or... launched in the application you specified in black or color. Note: The scan settings determine if the image is sent in the scan profile. f Press or to PC profiles. Using the ScanBack utility Using the ScanBack Utility You can use the Lexmark...
Quick Reference
Page 3
... or on your computer where you are loading a document into the ADF, then adjust the paper guides. 3 From the printer control panel, press the Scan/Email button. 4 Press the arrow buttons until FTP appears, and then press . 5 Type the FTP address. 6 Press to send a black-only copy or...NO, Enter Name appears. Note: If you are loading a document into the ADF, then adjust the paper guides. 3 From the printer control panel, press the Scan/Email button. 4 Press the arrow buttons until Enter Fax Number appears, and then press . 7 Enter the fax number, and then press . 8 Press 1 to that...
... or on your computer where you are loading a document into the ADF, then adjust the paper guides. 3 From the printer control panel, press the Scan/Email button. 4 Press the arrow buttons until FTP appears, and then press . 5 Type the FTP address. 6 Press to send a black-only copy or...NO, Enter Name appears. Note: If you are loading a document into the ADF, then adjust the paper guides. 3 From the printer control panel, press the Scan/Email button. 4 Press the arrow buttons until Enter Fax Number appears, and then press . 7 Enter the fax number, and then press . 8 Press 1 to that...
Quick Reference
Page 4
...If you are loading a document into the ADF or facedown on the scanner glass. b If you clicked Submit. c Press the Scan/Email button. Note: The scan settings determine if the image is inserted into the ADF, then adjust the paper guides. 6 Press or to view the file. ...1 on selected printer models. 1 Insert a USB flash memory device into the ADF or facedown on the display. 7 Click Submit. 8 Scan your documents. Scanning to send the scanned image. Enter Shortcut: appears. Note: Do not load postcards, photos, small items, transparencies, photo paper, or thin media (such as magazine...
...If you are loading a document into the ADF or facedown on the scanner glass. b If you clicked Submit. c Press the Scan/Email button. Note: The scan settings determine if the image is inserted into the ADF, then adjust the paper guides. 6 Press or to view the file. ...1 on selected printer models. 1 Insert a USB flash memory device into the ADF or facedown on the display. 7 Click Submit. 8 Scan your documents. Scanning to send the scanned image. Enter Shortcut: appears. Note: Do not load postcards, photos, small items, transparencies, photo paper, or thin media (such as magazine...
Enhanced Number Pad Mode User's Guide
Page 5
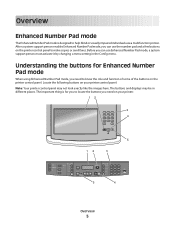
... to know the role and function of some of the buttons on your printer. 12 1 2 3 ABC DEF 4 5 6 GHI JKL MNO 7 8 9 PQRS TUV WXYZ * 0 # 3 4 5 12 3 Copy Scan/Email Content Darkness Text Text/Photo Photo Fax Duplex/2-Sided Copy Copies Scale Options Menu Back Select Stop/Cancel Start Black Color Fax Redial/Pause Resolution...
... to know the role and function of some of the buttons on your printer. 12 1 2 3 ABC DEF 4 5 6 GHI JKL MNO 7 8 9 PQRS TUV WXYZ * 0 # 3 4 5 12 3 Copy Scan/Email Content Darkness Text Text/Photo Photo Fax Duplex/2-Sided Copy Copies Scale Options Menu Back Select Stop/Cancel Start Black Color Fax Redial/Pause Resolution...


