
Fax Guide
Page 9
...Do not use the telephone line adapter included in your location. 3 Connect the telephone line of your printer to the telephone line that came with the printer. 1 Connect one end of the telephone cord into the Line port of the adapter. Your adapter may look different, but it will fit the ...telephone outlet used in the box with the printer. Do not set up this product or make any electrical or cabling connections, such as the power supply cord...
...Do not use the telephone line adapter included in your location. 3 Connect the telephone line of your printer to the telephone line that came with the printer. 1 Connect one end of the telephone cord into the Line port of the adapter. Your adapter may look different, but it will fit the ...telephone outlet used in the box with the printer. Do not set up this product or make any electrical or cabling connections, such as the power supply cord...

Fax Guide
Page 19
...print photos, text documents, magazine articles, newspapers, and other publications. Use the scanner glass for faxing. 1 Make sure the computer and the printer are on. 2 Open the top cover. Loading original documents on page 29. Using Fax 19 Do not set up this product or make any... can scan a document for single pages, small items (such as postcards or photos), transparencies, photo paper, or thin media (such as the power supply cord or telephone, during a lightning storm. CAUTION-SHOCK HAZARD: Do not use the fax feature during a lightning storm. Using Fax ADF Scanner glass ...
...print photos, text documents, magazine articles, newspapers, and other publications. Use the scanner glass for faxing. 1 Make sure the computer and the printer are on. 2 Open the top cover. Loading original documents on page 29. Using Fax 19 Do not set up this product or make any... can scan a document for single pages, small items (such as postcards or photos), transparencies, photo paper, or thin media (such as the power supply cord or telephone, during a lightning storm. CAUTION-SHOCK HAZARD: Do not use the fax feature during a lightning storm. Using Fax ADF Scanner glass ...

Fax Guide
Page 41
...power cord from the wall outlet. 3 Gently remove the power supply from the printer. 2 Plug the cord all New Hardware Found screens. 3 Insert the CD, and then follow the instructions on the computer screen to turn the printer off and then restart your computer meets the minimum system requirements listed on , press . Try one... or more of the USB cable into an electrical outlet that your computer. 2 Click Cancel on all the way into the power supply on the printer. 3 Plug the cord into the USB port of the computer. CHECK YOUR ...
...power cord from the wall outlet. 3 Gently remove the power supply from the printer. 2 Plug the cord all New Hardware Found screens. 3 Insert the CD, and then follow the instructions on the computer screen to turn the printer off and then restart your computer meets the minimum system requirements listed on , press . Try one... or more of the USB cable into an electrical outlet that your computer. 2 Click Cancel on all the way into the power supply on the printer. 3 Plug the cord into the USB port of the computer. CHECK YOUR ...
Fax Guide
Page 42
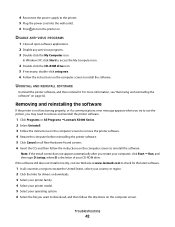
...power supply to the printer. 5 Plug the power cord into the wall outlet. 6 Press to install the software. UNINSTALL AND REINSTALL SOFTWARE Uninstall the printer software, and then reinstall it. Note: If the install screen does not appear automatically after you may need to remove and reinstall the printer software. 1 Click Programs or All Programs ŒLexmark... X5400 Series. 2 Select Uninstall. 3 Follow the instructions on the computer screen to remove the printer software. 4 Restart the computer before reinstalling the printer...
...power supply to the printer. 5 Plug the power cord into the wall outlet. 6 Press to install the software. UNINSTALL AND REINSTALL SOFTWARE Uninstall the printer software, and then reinstall it. Note: If the install screen does not appear automatically after you may need to remove and reinstall the printer software. 1 Click Programs or All Programs ŒLexmark... X5400 Series. 2 Select Uninstall. 3 Follow the instructions on the computer screen to remove the printer software. 4 Restart the computer before reinstalling the printer...

User's Guide
Page 15
...: Do not twist, bind, crush, or place heavy objects on the power cord. Safety information 15 Safety information Use only the power supply and power supply cord provided with the use of specific Lexmark components. Do not pinch the power cord between objects such as the power supply cord or telephone, during a lightning storm. The safety features of fire or...
...: Do not twist, bind, crush, or place heavy objects on the power cord. Safety information 15 Safety information Use only the power supply and power supply cord provided with the use of specific Lexmark components. Do not pinch the power cord between objects such as the power supply cord or telephone, during a lightning storm. The safety features of fire or...
User's Guide
Page 16
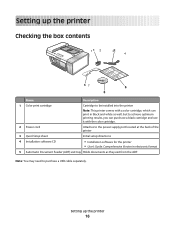
... results, you can purchase a black cartridge and use it with the color cartridge. 2 Power cord Attaches to the power supply port located at the back of the printer 3 Quick Setup sheet Initial setup directions 4 Installation software CD • Installation software for the printer • User's Guide: Comprehensive Version in electronic format 5 Automatic Document Feeder (ADF...
... results, you can purchase a black cartridge and use it with the color cartridge. 2 Power cord Attaches to the power supply port located at the back of the printer 3 Quick Setup sheet Initial setup directions 4 Installation software CD • Installation software for the printer • User's Guide: Comprehensive Version in electronic format 5 Automatic Document Feeder (ADF...

User's Guide
Page 20
10 Connect the power cord. CAUTION-POTENTIAL INJURY: Read the safety information included with this product before connecting power or any cabling connections. 11 If the printer does not automatically turn on, press . 12 If prompted, set the language. 1 2 1 a Using the control panel of the printer, press or repeatedly until the language that you want appears on the display. b Press to save. Note: Do not attach the USB cable yet. Setting up the printer 20
10 Connect the power cord. CAUTION-POTENTIAL INJURY: Read the safety information included with this product before connecting power or any cabling connections. 11 If the printer does not automatically turn on, press . 12 If prompted, set the language. 1 2 1 a Using the control panel of the printer, press or repeatedly until the language that you want appears on the display. b Press to save. Note: Do not attach the USB cable yet. Setting up the printer 20

User's Guide
Page 83
...-Potential Damage: Do not use , you are dry before beginning a new print job. Maintaining the printer 83 CAUTION-SHOCK HAZARD: To avoid the risk of electric shock, unplug the power cord from the printer except to install it. • Do not remove a cartridge from the wall outlet and disconnect all... Cleaning the scanner glass 1 Dampen a clean, lint-free cloth with water. Note: Make sure all cables to remove any ink residue that the printer is turned off and unplugged from the paper support and paper exit tray. 3 Dampen a clean, lint-free cloth with water. 2 Gently wipe the...
...-Potential Damage: Do not use , you are dry before beginning a new print job. Maintaining the printer 83 CAUTION-SHOCK HAZARD: To avoid the risk of electric shock, unplug the power cord from the printer except to install it. • Do not remove a cartridge from the wall outlet and disconnect all... Cleaning the scanner glass 1 Dampen a clean, lint-free cloth with water. Note: Make sure all cables to remove any ink residue that the printer is turned off and unplugged from the paper support and paper exit tray. 3 Dampen a clean, lint-free cloth with water. 2 Gently wipe the...

User's Guide
Page 87
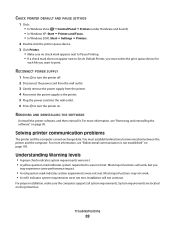
... one or more of the computer. RECONNECT POWER SUPPLY 1 Press to turn the printer on. Troubleshooting 87 CHECK YOUR SYSTEM REQUIREMENTS Check that other electrical devices have been using. 4 If the light is not on the printer box. CHECK USB CONNECTION If the printer is marked with Service Pack 3 or later. DISCONNECT AND RECONNECT THE POWER CORD...
... one or more of the computer. RECONNECT POWER SUPPLY 1 Press to turn the printer on. Troubleshooting 87 CHECK YOUR SYSTEM REQUIREMENTS Check that other electrical devices have been using. 4 If the light is not on the printer box. CHECK USB CONNECTION If the printer is marked with Service Pack 3 or later. DISCONNECT AND RECONNECT THE POWER CORD...
User's Guide
Page 89
... is not established" on . Troubleshooting 89 RECONNECT POWER SUPPLY 1 Press to turn the printer off. 2 Disconnect the power cord from the wall outlet. 3 Gently remove the power supply from the printer. 4 Reconnect the power supply to the printer. 5 Plug the power cord into the wall outlet. 6 Press to print. Solving printer communication problems The printer and the computer cannot exchange data. CHECK...
... is not established" on . Troubleshooting 89 RECONNECT POWER SUPPLY 1 Press to turn the printer off. 2 Disconnect the power cord from the wall outlet. 3 Gently remove the power supply from the printer. 4 Reconnect the power supply to the printer. 5 Plug the power cord into the wall outlet. 6 Press to print. Solving printer communication problems The printer and the computer cannot exchange data. CHECK...

User's Guide
Page 114
..., see "Loading paper" on page 37. CHECK POWER If the light is not on page 48. Make sure the power cord is plugged into a properly grounded outlet. Paper continues to be fed correctly into the printer. ARE YOU LOADING THE PAPER CORRECTLY? Troubleshooting 114 ...For more of the following settings to enable the printer to the printer. Check the type of paper you are possible solutions. Try one...
..., see "Loading paper" on page 37. CHECK POWER If the light is not on page 48. Make sure the power cord is plugged into a properly grounded outlet. Paper continues to be fed correctly into the printer. ARE YOU LOADING THE PAPER CORRECTLY? Troubleshooting 114 ...For more of the following settings to enable the printer to the printer. Check the type of paper you are possible solutions. Try one...

User's Guide
Page 119
... carrier lids. 2 Disconnect the power cord from the electrical outlet. 4 Reconnect the power cord to the electrical outlet. 5 If the button is not working properly. If the error does not reappear, the problem has been corrected. If the problem reappears, one or more information, see "Aligning print cartridges" on the printer display Alignment Error These are...
... carrier lids. 2 Disconnect the power cord from the electrical outlet. 4 Reconnect the power cord to the electrical outlet. 5 If the button is not working properly. If the error does not reappear, the problem has been corrected. If the problem reappears, one or more information, see "Aligning print cartridges" on the printer display Alignment Error These are...

User's Guide
Page 121
...corrected. • Reappears, replace the print cartridge with a new one or more information, see "Installing print cartridges" on page 78. For more photos larger than the paper size you selected on the printer menu. 1 Press to clear the error message. 2 Press or ...Cartridge Incorrect / Right Cartridge Incorrect 1 Remove the indicated print cartridge. 2 Disconnect the power cord from the electrical outlet. 3 Reconnect the power cord to begin printing. Troubleshooting 121 Photo must fit on page. There are one . Note: To remove the error message, press . Left Cartridge Error / Right ...
...corrected. • Reappears, replace the print cartridge with a new one or more information, see "Installing print cartridges" on page 78. For more photos larger than the paper size you selected on the printer menu. 1 Press to clear the error message. 2 Press or ...Cartridge Incorrect / Right Cartridge Incorrect 1 Remove the indicated print cartridge. 2 Disconnect the power cord from the electrical outlet. 3 Reconnect the power cord to begin printing. Troubleshooting 121 Photo must fit on page. There are one . Note: To remove the error message, press . Left Cartridge Error / Right ...

User's Guide
Page 128
Mode Description Power consumption (Watts) Printing The product is generating hard-copy output from electronic 14.6 inputs. Copying The product is generating hard-copy output from hard-copy 15.1 original documents. Low Off ( Scanning The product is scanning hard-copy documents. 9.1 Ready The product is waiting for a print job. 6.6 Power Saver The product is in energy-saving mode. 6.1 High Off The product is plugged into a wall outlet, but the power switch 4.0 is turned off.
Mode Description Power consumption (Watts) Printing The product is generating hard-copy output from electronic 14.6 inputs. Copying The product is generating hard-copy output from hard-copy 15.1 original documents. Low Off ( Scanning The product is scanning hard-copy documents. 9.1 Ready The product is waiting for a print job. 6.6 Power Saver The product is in energy-saving mode. 6.1 High Off The product is plugged into a wall outlet, but the power switch 4.0 is turned off.


