
User's Guide
Page 6
... the exterior of the printer ...99 Cleaning the scanner glass ...100 Cleaning the dust-proof glass...101 Ordering supplies...106 Ordering toner cartridges...106 Ordering a fuser...107 Ordering a photodeveloper cartridge...107 Ordering a waste toner bottle ...107 Moving the printer...107 Before moving the printer ...107 Locking the scanner ...108 Removing the printer...
... the exterior of the printer ...99 Cleaning the scanner glass ...100 Cleaning the dust-proof glass...101 Ordering supplies...106 Ordering toner cartridges...106 Ordering a fuser...107 Ordering a photodeveloper cartridge...107 Ordering a waste toner bottle ...107 Moving the printer...107 Before moving the printer ...107 Locking the scanner ...108 Removing the printer...

User's Guide
Page 43
...range of 18 to 24°C (65 to the sheet edge. Partial sheets may contaminate the printer. Partial sheets also contaminate the printer and the cartridge with adhesive, and could void the warranty. • If zone coating of the label. • Be sure adhesive backing does not reach to ... 21°C (70°F) and the relative humidity is heavy, single-ply print media. Adhesive material contaminates the printer and could void the printer and cartridge warranties. • Do not print within 1 mm (0.04 in.) of the edge of the label, of the perforations, or between 40 and 60%. &#...
...range of 18 to 24°C (65 to the sheet edge. Partial sheets may contaminate the printer. Partial sheets also contaminate the printer and the cartridge with adhesive, and could void the warranty. • If zone coating of the label. • Be sure adhesive backing does not reach to ... 21°C (70°F) and the relative humidity is heavy, single-ply print media. Adhesive material contaminates the printer and could void the printer and cartridge warranties. • Do not print within 1 mm (0.04 in.) of the edge of the label, of the perforations, or between 40 and 60%. &#...
User's Guide
Page 89
... moved to the home position. Note: Not Execute is low or empty. Menu item Supplies Info Toner Black Life Magenta Life Yellow Life Cyan Life Cartridge Type Black Init. 1000 Pages Std. 2500 Pages High 5000 Pages Magenta Init. 1000 Pages Std. 1500 Pages High 5000 Pages Yellow Init. 1000 Pages...
... moved to the home position. Note: Not Execute is low or empty. Menu item Supplies Info Toner Black Life Magenta Life Yellow Life Cyan Life Cartridge Type Black Init. 1000 Pages Std. 2500 Pages High 5000 Pages Magenta Init. 1000 Pages Std. 1500 Pages High 5000 Pages Yellow Init. 1000 Pages...

User's Guide
Page 94
... Wait for the message to clear the message. 94 Understanding printer messages List of status and error messages Toner Empty: Replace Toner The specified toner cartridge is empty. Remove the specified cartridge, and then install a new one. If the service message appears again, contact Customer Support, and report the message.
... Wait for the message to clear the message. 94 Understanding printer messages List of status and error messages Toner Empty: Replace Toner The specified toner cartridge is empty. Remove the specified cartridge, and then install a new one. If the service message appears again, contact Customer Support, and report the message.
User's Guide
Page 96
... menu or Print Properties to match what is loaded in Tray 1. Load Tray 1 with the specified paper type. Install or reseat the photodeveloper cartridge. Cancel the job, and then try sending it again. No Response A signal from what is missing or not installed correctly. Missing: Install... Fuser Unit The fuser unit is missing or not installed correctly. Install the fuser unit. Missing: Install Toner The specified toner cartridge is loaded. No Memory: Out of Memory There is loaded in Tray 1. PC Printing Wait for the specified tray. 96 Paper Empty: ...
... menu or Print Properties to match what is loaded in Tray 1. Load Tray 1 with the specified paper type. Install or reseat the photodeveloper cartridge. Cancel the job, and then try sending it again. No Response A signal from what is missing or not installed correctly. Missing: Install... Fuser Unit The fuser unit is missing or not installed correctly. Install the fuser unit. Missing: Install Toner The specified toner cartridge is loaded. No Memory: Out of Memory There is loaded in Tray 1. PC Printing Wait for the specified tray. 96 Paper Empty: ...

User's Guide
Page 98
...(cyan)-will soon be exhausted. Warming up Wait for the message to clear. If it . 98 Toner Error: Install Supported Toner Cartridge An invalid toner cartridge is missing, install it is installed. Waste Pack Full The waste toner bottle is loaded in the tray. An unsupported paper size is... on the coverage of the toner color, after this procedure multiple times until the print remains faded, and then replace the toner cartridge(s). Transmitting The printer has connected with the replacement waste toner bottle. When Toner Low appears or when the print becomes faded, follow...
...(cyan)-will soon be exhausted. Warming up Wait for the message to clear. If it . 98 Toner Error: Install Supported Toner Cartridge An invalid toner cartridge is missing, install it is installed. Waste Pack Full The waste toner bottle is loaded in the tray. An unsupported paper size is... on the coverage of the toner color, after this procedure multiple times until the print remains faded, and then replace the toner cartridge(s). Transmitting The printer has connected with the replacement waste toner bottle. When Toner Low appears or when the print becomes faded, follow...

User's Guide
Page 101
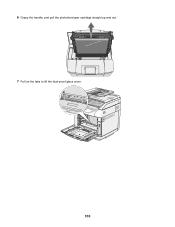
Cleaning the dust-proof glass Clean the dust-proof glass if you encounter print quality problems. 1 Turn the printer off. 2 Pull the front door release latch forward, and gently lower the front door. 3 Remove the toner cartridges one at a time. 101
Cleaning the dust-proof glass Clean the dust-proof glass if you encounter print quality problems. 1 Turn the printer off. 2 Pull the front door release latch forward, and gently lower the front door. 3 Remove the toner cartridges one at a time. 101
User's Guide
Page 102
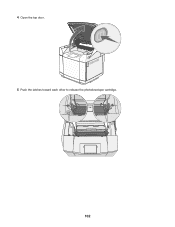
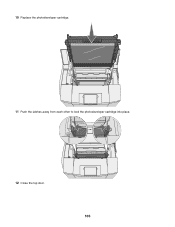
4 Open the top door. 5 Push the latches toward each other to release the photodeveloper cartridge. 102
4 Open the top door. 5 Push the latches toward each other to release the photodeveloper cartridge. 102
User's Guide
Page 103
6 Grasp the handle, and pull the photodeveloper cartridge straight up and out. 7 Pull on the tabs to lift the dust-proof glass cover. 103
6 Grasp the handle, and pull the photodeveloper cartridge straight up and out. 7 Pull on the tabs to lift the dust-proof glass cover. 103
User's Guide
Page 105
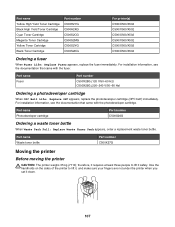
10 Replace the photodeveloper cartridge. 11 Push the latches away from each other to lock the photodeveloper cartridge into place. 12 Close the top door. 105
10 Replace the photodeveloper cartridge. 11 Push the latches away from each other to lock the photodeveloper cartridge into place. 12 Close the top door. 105

User's Guide
Page 106
...door. 15 Turn the printer on letter- In other countries or regions, visit the Lexmark Web Site at 1-800-539-6275 for printer supplies assume printing on . The toner cartridge(s) of the toner color, after the message first appears. Note: Repeat this procedure ...printer are: Part name Cyan High Yield Toner Cartridge Part number C500H2CG For printer(s) C500/X500/X502 Magenta High Yield Toner Cartridge C500S2MG C500/X500/X502 106 The recommended toner cartridges specifically designed for your area. Ordering toner cartridges When Toner Low appears, order the specified new ...
...door. 15 Turn the printer on letter- In other countries or regions, visit the Lexmark Web Site at 1-800-539-6275 for printer supplies assume printing on . The toner cartridge(s) of the toner color, after the message first appears. Note: Repeat this procedure ...printer are: Part name Cyan High Yield Toner Cartridge Part number C500H2CG For printer(s) C500/X500/X502 Magenta High Yield Toner Cartridge C500S2MG C500/X500/X502 106 The recommended toner cartridges specifically designed for your area. Ordering toner cartridges When Toner Low appears, order the specified new ...
User's Guide
Page 107
... Yield Toner Cartridge Black High Yield Toner Cartridge Cyan Toner Cartridge Magenta Toner Cartridge Yellow Toner Cartridge Black Toner Cartridge Part number C500H2YG C500H2KG C500S2CG C500S2MG C500S2YG C500S2KG For printer(s) C500/X500/X502 C500/X500/X502 C500/X500/X502 C500/X500/X502 C500/X500/X502 C500/X500/X502 Ordering ... (120 V/50-60 Hz) C500X29G (220-240 V/50-60 Hz) Ordering a photodeveloper cartridge When OPC Belt Life: Replace OPC appears, replace the photodeveloper cartridge (OPC belt) immediately. For installation information, see the documentation that came with the fuser....
... Yield Toner Cartridge Black High Yield Toner Cartridge Cyan Toner Cartridge Magenta Toner Cartridge Yellow Toner Cartridge Black Toner Cartridge Part number C500H2YG C500H2KG C500S2CG C500S2MG C500S2YG C500S2KG For printer(s) C500/X500/X502 C500/X500/X502 C500/X500/X502 C500/X500/X502 C500/X500/X502 C500/X500/X502 Ordering ... (120 V/50-60 Hz) C500X29G (220-240 V/50-60 Hz) Ordering a photodeveloper cartridge When OPC Belt Life: Replace OPC appears, replace the photodeveloper cartridge (OPC belt) immediately. For installation information, see the documentation that came with the fuser....

User's Guide
Page 119
... solutions. Note: Repeat this procedure multiple times until the print remains faded, and then replace the toner cartridge(s). 119 Is the toner low? Try one or more of the toner cartridge(s): 1 Remove the toner cartridge(s). 2 Firmly shake the cartridge(s) side-to-side and front-to-back several times to redistribute toner. 3 Reinsert the toner...
... solutions. Note: Repeat this procedure multiple times until the print remains faded, and then replace the toner cartridge(s). 119 Is the toner low? Try one or more of the toner cartridge(s): 1 Remove the toner cartridge(s). 2 Firmly shake the cartridge(s) side-to-side and front-to-back several times to redistribute toner. 3 Reinsert the toner...
User's Guide
Page 125
...Check to make sure Quick Dial or Speed Dial has been programmed for the number that the quality of the toner cartridge(s): 1 Remove the toner cartridge(s). 2 Firmly shake the cartridge(s) side-to-side and front-to-back several times to extend the life of the following : Is the printer... (such as magazine clippings) into the ADF or facedown on the scanner glass. There may be able to redistribute toner. 3 Reinsert the cartridge(s) and continue printing. Make sure Quick Dial or Speed Dial is satisfactory. • Resend the fax. Repeat this procedure multiple times until ...
...Check to make sure Quick Dial or Speed Dial has been programmed for the number that the quality of the toner cartridge(s): 1 Remove the toner cartridge(s). 2 Firmly shake the cartridge(s) side-to-side and front-to-back several times to extend the life of the following : Is the printer... (such as magazine clippings) into the ADF or facedown on the scanner glass. There may be able to redistribute toner. 3 Reinsert the cartridge(s) and continue printing. Make sure Quick Dial or Speed Dial is satisfactory. • Resend the fax. Repeat this procedure multiple times until ...
User's Guide
Page 127
...indicated in .). Solving print quality problems The information in .) • Once per page 127 Try one color and multiple times on a page Replace the toner cartridge if the defects occur every 35 mm (1.38 in the tray or on . Reset the printer Turn the printer off. Check the paper guides Move... see if marks occur repeatedly only in one or more information, see if marks occur across the page repeatedly in all colors Replace the photodeveloper cartridge if the defects occur: • 35 mm (1.38 in.) • 95 mm (3.74 in the following : Check the paper Use recommended paper and other ...
...indicated in .). Solving print quality problems The information in .) • Once per page 127 Try one color and multiple times on a page Replace the toner cartridge if the defects occur every 35 mm (1.38 in the tray or on . Reset the printer Turn the printer off. Check the paper guides Move... see if marks occur repeatedly only in one or more information, see if marks occur across the page repeatedly in all colors Replace the photodeveloper cartridge if the defects occur: • 35 mm (1.38 in.) • 95 mm (3.74 in the following : Check the paper Use recommended paper and other ...
User's Guide
Page 128
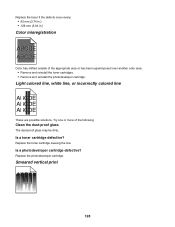
...Try one or more of the appropriate area or has been superimposed over another color area. • Remove and reinstall the toner cartridges. • Remove and reinstall the photodeveloper cartridge. Smeared vertical print 128 Replace the fuser if the defects occur every: • 95 mm (3.74 in.) • 128... outside of the following: Clean the dust-proof glass The dust-proof glass may be dirty. Replace the toner cartridge causing the line. Replace the photodeveloper cartridge. Light colored line, white line, or incorrectly colored line These are possible solutions. Is a toner...
...Try one or more of the appropriate area or has been superimposed over another color area. • Remove and reinstall the toner cartridges. • Remove and reinstall the photodeveloper cartridge. Smeared vertical print 128 Replace the fuser if the defects occur every: • 95 mm (3.74 in.) • 128... outside of the following: Clean the dust-proof glass The dust-proof glass may be dirty. Replace the toner cartridge causing the line. Replace the photodeveloper cartridge. Light colored line, white line, or incorrectly colored line These are possible solutions. Is a toner...
User's Guide
Page 129
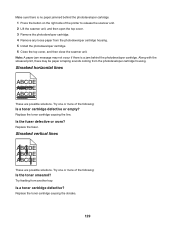
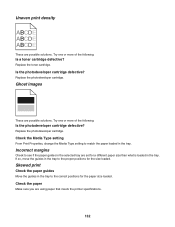
...to release the scanner unit. 2 Lift the scanner unit, and then open the top cover. 3 Remove the photodeveloper cartridge. 4 Remove any loose paper from the photodeveloper cartridge housing. 5 Install the photodeveloper cartridge. 6 Close the top cover, and then close the scanner unit. Note: A paper jam message may be paper scraping... the line. Along with the smeared print, there may not occur if there is no paper jammed behind the photodeveloper cartridge. Try one or more of the following : Is the toner smeared? Is the fuser defective or worn? Streaked horizontal lines ABCDE ABCDE...
...to release the scanner unit. 2 Lift the scanner unit, and then open the top cover. 3 Remove the photodeveloper cartridge. 4 Remove any loose paper from the photodeveloper cartridge housing. 5 Install the photodeveloper cartridge. 6 Close the top cover, and then close the scanner unit. Note: A paper jam message may be paper scraping... the line. Along with the smeared print, there may not occur if there is no paper jammed behind the photodeveloper cartridge. Try one or more of the following : Is the toner smeared? Is the fuser defective or worn? Streaked horizontal lines ABCDE ABCDE...
User's Guide
Page 130
...not too light From Print Properties, select a different Color Adjustment setting before sending the job to redistribute toner. 3 Reinsert the toner cartridge(s) and continue printing. Print irregularities These are possible solutions. Note: Repeat this procedure multiple times until you use it. Try one ...solution applies to match the paper loaded in its original wrapper until the print remains faded, and then replace the toner cartridge(s). Is a toner cartridge defective? Make sure the Media Type setting matches the paper loaded in the tray From Print Properties, change the Media ...
...not too light From Print Properties, select a different Color Adjustment setting before sending the job to redistribute toner. 3 Reinsert the toner cartridge(s) and continue printing. Print irregularities These are possible solutions. Note: Repeat this procedure multiple times until you use it. Try one ...solution applies to match the paper loaded in its original wrapper until the print remains faded, and then replace the toner cartridge(s). Is a toner cartridge defective? Make sure the Media Type setting matches the paper loaded in the tray From Print Properties, change the Media ...
User's Guide
Page 131
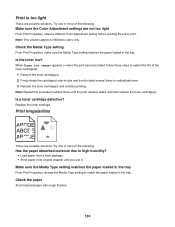
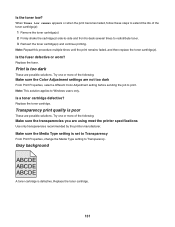
... Color Adjustment setting before sending the job to Windows users only. Try one or more of the toner cartridge(s): 1 Remove the toner cartridge(s). 2 Firmly shake the cartridge(s) side-to-side and front-to-back several times to Transparency. Make sure the Media Type setting is... From Print Properties, change the Media Type setting to redistribute toner. 3 Reinsert the toner cartridge(s) and continue printing. Replace the toner cartridge. Gray background ABCDE ABCDE ABCDE A toner cartridge is poor These are possible solutions. Note: Repeat this procedure multiple times until the print ...
... Color Adjustment setting before sending the job to Windows users only. Try one or more of the toner cartridge(s): 1 Remove the toner cartridge(s). 2 Firmly shake the cartridge(s) side-to-side and front-to-back several times to Transparency. Make sure the Media Type setting is... From Print Properties, change the Media Type setting to redistribute toner. 3 Reinsert the toner cartridge(s) and continue printing. Replace the toner cartridge. Gray background ABCDE ABCDE ABCDE A toner cartridge is poor These are possible solutions. Note: Repeat this procedure multiple times until the print ...
User's Guide
Page 132
...the tray to the proper positions for the paper size loaded. If so, move the guides in the tray. Is the photodeveloper cartridge defective? Check the paper Make sure you are possible solutions. Skewed print Check the paper guides Move the guides in the tray.... Replace the toner cartridge. Replace the photodeveloper cartridge. Replace the photodeveloper cartridge. Try one or more of the following : Is the photodeveloper cartridge defective? Incorrect margins Check to the correct positions for the size loaded. Uneven ...
...the tray to the proper positions for the paper size loaded. If so, move the guides in the tray. Is the photodeveloper cartridge defective? Check the paper Make sure you are possible solutions. Skewed print Check the paper guides Move the guides in the tray.... Replace the toner cartridge. Replace the photodeveloper cartridge. Replace the photodeveloper cartridge. Try one or more of the following : Is the photodeveloper cartridge defective? Incorrect margins Check to the correct positions for the size loaded. Uneven ...

