
Getting Started
Page 3
... Using the PictBridge menu ...32 Using the Settings menu ...33 Saving settings ...35 Learning about the software 37 Using the printer software...37 Using the Lexmark Imaging Studio...37 Using the Solution Center...38 Using Printing Preferences...40 Opening Printing Preferences ...40 Using the Save Settings menu ...40 Using the I Want... menu ...40 Using the Printing Preferences tabs ...41 Using the Toolbar...41 Resetting printer software settings to defaults 42 Maintaining the printer 43 Changing print cartridges...43 3
... Using the PictBridge menu ...32 Using the Settings menu ...33 Saving settings ...35 Learning about the software 37 Using the printer software...37 Using the Lexmark Imaging Studio...37 Using the Solution Center...38 Using Printing Preferences...40 Opening Printing Preferences ...40 Using the Save Settings menu ...40 Using the I Want... menu ...40 Using the Printing Preferences tabs ...41 Using the Toolbar...41 Resetting printer software settings to defaults 42 Maintaining the printer 43 Changing print cartridges...43 3
Getting Started
Page 4
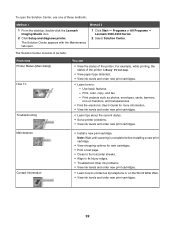
Removing a used print cartridge...43 Installing print cartridges...43 Ordering print cartridges...45 Ordering paper and other supplies...45 Troubleshooting...47 Setup troubleshooting...47 Incorrect language appears on the display 47 Power button is not lit ...47 ...
Removing a used print cartridge...43 Installing print cartridges...43 Ordering print cartridges...45 Ordering paper and other supplies...45 Troubleshooting...47 Setup troubleshooting...47 Incorrect language appears on the display 47 Power button is not lit ...47 ...
Getting Started
Page 14
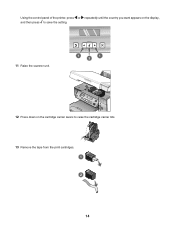
Using the control panel of the printer, press or repeatedly until the country you want appears on the display, and then press to save the setting. 11 Raise the scanner unit. 1 1 2 12 Press down on the cartridge carrier levers to raise the cartridge carrier lids. 13 Remove the tape from the print cartridges. 1 2 14
Using the control panel of the printer, press or repeatedly until the country you want appears on the display, and then press to save the setting. 11 Raise the scanner unit. 1 1 2 12 Press down on the cartridge carrier levers to raise the cartridge carrier lids. 13 Remove the tape from the print cartridges. 1 2 14
Getting Started
Page 15
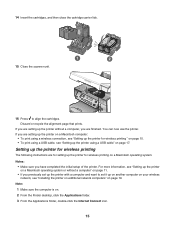
... the Applications folder. 3 From the Applications folder, double-click the Internet Connect icon. 15 Discard or recycle the alignment page that prints. 14 Insert the cartridges, and then close the cartridge carrier lids. 15 Close the scanner unit. 16 Press to set up the printer with a computer and want to align the...
... the Applications folder. 3 From the Applications folder, double-click the Internet Connect icon. 15 Discard or recycle the alignment page that prints. 14 Insert the cartridges, and then close the cartridge carrier lids. 15 Close the scanner unit. 16 Press to set up the printer with a computer and want to align the...
Getting Started
Page 26
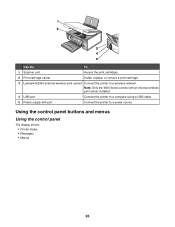
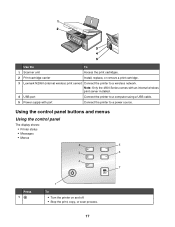
Use the To 1 Scanner unit Access the print cartridges. 2 Print cartridge carrier Install, replace, or remove a print cartridge. 3 Lexmark N2050 (internal wireless print server) Connect the printer to a power source. Note: Only the 4500 Series comes with an internal wireless print server installed. 4 USB port Connect the printer to a computer using a USB cable. 5 Power supply with port Connect the printer to a wireless network. Using the control panel buttons and menus Using the control panel The display shows: • Printer status • Messages • Menus 26
Use the To 1 Scanner unit Access the print cartridges. 2 Print cartridge carrier Install, replace, or remove a print cartridge. 3 Lexmark N2050 (internal wireless print server) Connect the printer to a power source. Note: Only the 4500 Series comes with an internal wireless print server installed. 4 USB port Connect the printer to a computer using a USB cable. 5 Power supply with port Connect the printer to a wireless network. Using the control panel buttons and menus Using the control panel The display shows: • Printer status • Messages • Menus 26
Getting Started
Page 34
...to print a test page. Network Name, which shows the six characters unique to view: - For more information, see "Cleaning the print cartridge nozzles" in the "Maintaining the printer" chapter of minutes before the printer, if left unused, enters the Power Saver mode. Select: &#... Press or repeatedly until the submenu item you want appears. 5 Press . For more information, see "Saving settings" on the CD. • Align Cartridges to the previous menus and make other selections. Note: When you choose a value selection, an * appears next to the selected setting. 6 To go...
...to print a test page. Network Name, which shows the six characters unique to view: - For more information, see "Cleaning the print cartridge nozzles" in the "Maintaining the printer" chapter of minutes before the printer, if left unused, enters the Power Saver mode. Select: &#... Press or repeatedly until the submenu item you want appears. 5 Press . For more information, see "Saving settings" on the CD. • Align Cartridges to the previous menus and make other selections. Note: When you choose a value selection, an * appears next to the selected setting. 6 To go...
Getting Started
Page 37
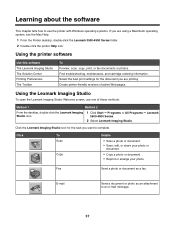
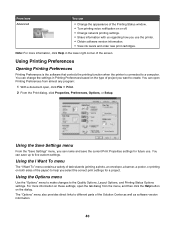
...the Lexmark Imaging Studio icon. 1 Click Start ΠPrograms or All Programs ΠLexmark 3500-4500 Series. 2 Select Lexmark Imaging Studio. Click the Lexmark Imaging...or photo as a fax. Using the Lexmark Imaging Studio To open the Lexmark Imaging Studio Welcome screen, use the printer... see the Mac Help: 1 From the Finder desktop, double-click the Lexmark 3500-4500 Series folder. 2 Double-click the printer Help icon. Click...enlarge your photo. Using the printer software Use this software The Lexmark Imaging Studio The Solution Center Printing Preferences The Toolbar To Preview, ...
...the Lexmark Imaging Studio icon. 1 Click Start ΠPrograms or All Programs ΠLexmark 3500-4500 Series. 2 Select Lexmark Imaging Studio. Click the Lexmark Imaging...or photo as a fax. Using the Lexmark Imaging Studio To open the Lexmark Imaging Studio Welcome screen, use the printer... see the Mac Help: 1 From the Finder desktop, double-click the Lexmark 3500-4500 Series folder. 2 Double-click the printer Help icon. Click...enlarge your photo. Using the printer software Use this software The Lexmark Imaging Studio The Solution Center Printing Preferences The Toolbar To Preview, ...
Getting Started
Page 38
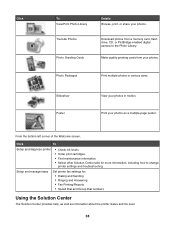
... from your photos. From the bottom left corner of the Welcome screen, Click To Setup and diagnose printer • Check ink levels. • Order print cartridges. • Find maintenance information. • Select other Solution Center tabs for : • Dialing and Sending • Ringing and Answering • Fax Printing/Reports • Speed...
... from your photos. From the bottom left corner of the Welcome screen, Click To Setup and diagnose printer • Check ink levels. • Order print cartridges. • Find maintenance information. • Select other Solution Center tabs for : • Dialing and Sending • Ringing and Answering • Fax Printing/Reports • Speed...
Getting Started
Page 39
... : - Maintenance Contact Information • Install a new print cartridge. The Solution Center appears with the Maintenance tab open the Solution Center, use one of these methods: Method 1 1 From the desktop, double-click the Lexmark Imaging Studio icon. 2 Click Setup and diagnose printer. The...tips about the current status. • Solve printer problems. • View ink levels and order new print cartridges. Method 2 1 Click Start Œ Programs or All Programs Œ Lexmark 3500-4500 Series. 2 Select Solution Center. Note: Wait until scanning is Busy Printing. • View ...
... : - Maintenance Contact Information • Install a new print cartridge. The Solution Center appears with the Maintenance tab open the Solution Center, use one of these methods: Method 1 1 From the desktop, double-click the Lexmark Imaging Studio icon. 2 Click Setup and diagnose printer. The...tips about the current status. • Solve printer problems. • View ink levels and order new print cartridges. Method 2 1 Click Start Œ Programs or All Programs Œ Lexmark 3500-4500 Series. 2 Select Solution Center. Note: Wait until scanning is Busy Printing. • View ...
Getting Started
Page 40
..." menu, you select the correct print settings for future use the printer. • Obtain software version information. • View ink levels and order new print cartridges.
..." menu, you select the correct print settings for future use the printer. • Obtain software version information. • View ink levels and order new print cartridges.
Getting Started
Page 43
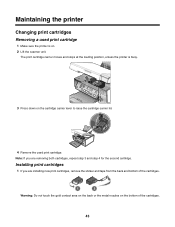
...the printer is busy. 3 Press down on the cartridge carrier lever to raise the cartridge carrier lid. 4 Remove the used print cartridge. Installing print cartridges 1 If you are installing new print cartridges, remove the sticker and tape from the back and bottom of the cartridges. 1 2 Warning: Do not touch the gold ...contact area on the back or the metal nozzles on . 2 Lift the scanner unit. The print cartridge carrier moves and stops at the loading position, unless the printer is...
...the printer is busy. 3 Press down on the cartridge carrier lever to raise the cartridge carrier lid. 4 Remove the used print cartridge. Installing print cartridges 1 If you are installing new print cartridges, remove the sticker and tape from the back and bottom of the cartridges. 1 2 Warning: Do not touch the gold ...contact area on the back or the metal nozzles on . 2 Lift the scanner unit. The print cartridge carrier moves and stops at the loading position, unless the printer is...
Getting Started
Page 44
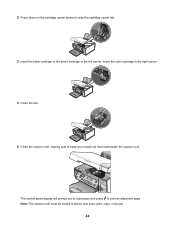
Note: The scanner unit must be closed to keep your hands out from underneath the scanner unit. Insert the color cartridge in the left carrier. The control panel display will prompt you to load paper and press to raise the cartridge carrier lids. 3 Insert the black cartridge or the photo cartridge in the right carrier. 4 Close the lids. 5 Close the scanner unit, making sure to start a new scan, print, copy, or fax job. 44 2 Press down on the cartridge carrier levers to print an alignment page.
Note: The scanner unit must be closed to keep your hands out from underneath the scanner unit. Insert the color cartridge in the left carrier. The control panel display will prompt you to load paper and press to raise the cartridge carrier lids. 3 Insert the black cartridge or the photo cartridge in the right carrier. 4 Close the lids. 5 Close the scanner unit, making sure to start a new scan, print, copy, or fax job. 44 2 Press down on the cartridge carrier levers to print an alignment page.
Getting Started
Page 45
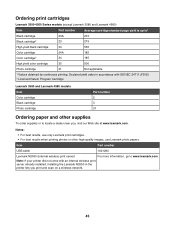
... not come with ISO/IEC 24711 (FDIS). 2 Licensed Return Program Cartridge Lexmark 3580 and Lexmark 4580 models Item Color cartridge Black cartridge Photo cartridge Part number 2 3 31 Ordering paper and other high-quality images, use Lexmark photo papers. Notes: • For best results, use only Lexmark print cartridges. • For best results when printing photos or other supplies To...
... not come with ISO/IEC 24711 (FDIS). 2 Licensed Return Program Cartridge Lexmark 3580 and Lexmark 4580 models Item Color cartridge Black cartridge Photo cartridge Part number 2 3 31 Ordering paper and other high-quality images, use Lexmark photo papers. Notes: • For best results, use only Lexmark print cartridges. • For best results when printing photos or other supplies To...
Getting Started
Page 49
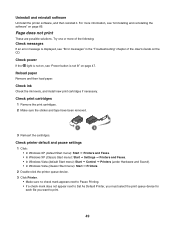
...Power button is displayed, see "Uninstalling and reinstalling the software" on page 66. Check ink Check the ink levels, and install new print cartridges if necessary. Check printer default and pause settings 1 Click: • In Windows XP (default Start menu): Start Œ Printers and ...select the print queue device for each file you want to print. 49 Check print cartridges 1 Remove the print cartridges. 2 Make sure the sticker and tape have been removed. 1 2 3 Reinsert the cartridges. Try one or more information, see "Error messages" in the "Troubleshooting" chapter of...
...Power button is displayed, see "Uninstalling and reinstalling the software" on page 66. Check ink Check the ink levels, and install new print cartridges if necessary. Check printer default and pause settings 1 Click: • In Windows XP (default Start menu): Start Œ Printers and ...select the print queue device for each file you want to print. 49 Check print cartridges 1 Remove the print cartridges. 2 Make sure the sticker and tape have been removed. 1 2 3 Reinsert the cartridges. Try one or more information, see "Error messages" in the "Troubleshooting" chapter of...
Getting Started
Page 72
... PURPOSE. If you don't have access to the Internet, you . Trademarks Lexmark and Lexmark with other products, programs, or services, except those expressly designated by mail: Lexmark International, Inc. A replacement cartridge sold without these terms is available at any time. Some states do not... allow disclaimer of purchase. Changes are periodically made at www.lexmark.com. * Products within the XX80 Series (including but not limited to Models X1380, X1480, X1580, X2580, X3580, and X4580)...
... PURPOSE. If you don't have access to the Internet, you . Trademarks Lexmark and Lexmark with other products, programs, or services, except those expressly designated by mail: Lexmark International, Inc. A replacement cartridge sold without these terms is available at any time. Some states do not... allow disclaimer of purchase. Changes are periodically made at www.lexmark.com. * Products within the XX80 Series (including but not limited to Models X1380, X1480, X1580, X2580, X3580, and X4580)...
User's Guide
Page 5
... better print quality...72 Improving print quality ...72 Aligning print cartridges ...72 Cleaning the print cartridge nozzles ...72 Wiping the print cartridge nozzles and contacts 73 Preserving the print cartridges...74 Cleaning the scanner glass...74 Ordering supplies...74 Ordering print cartridges...74 Ordering paper and other supplies ...75 Using genuine Lexmark print cartridges 75 Refilling a print...
... better print quality...72 Improving print quality ...72 Aligning print cartridges ...72 Cleaning the print cartridge nozzles ...72 Wiping the print cartridge nozzles and contacts 73 Preserving the print cartridges...74 Cleaning the scanner glass...74 Ordering supplies...74 Ordering print cartridges...74 Ordering paper and other supplies ...75 Using genuine Lexmark print cartridges 75 Refilling a print...
User's Guide
Page 6
Recycling Lexmark products...76 Troubleshooting...77 Setup troubleshooting...77 Incorrect language appears on the display 77 Power button is not lit ...78 Software does not install ...78 ... ...93 Nothing happens when memory card is inserted 93 Error messages...94 Alignment Error...94 Black Ink Low / Color Ink Low / Photo Ink Low 94 Cartridge Error (1102, 1203, 1204, or 120F 94 Clear Carrier Jam ...95 6
Recycling Lexmark products...76 Troubleshooting...77 Setup troubleshooting...77 Incorrect language appears on the display 77 Power button is not lit ...78 Software does not install ...78 ... ...93 Nothing happens when memory card is inserted 93 Error messages...94 Alignment Error...94 Black Ink Low / Color Ink Low / Photo Ink Low 94 Cartridge Error (1102, 1203, 1204, or 120F 94 Clear Carrier Jam ...95 6
User's Guide
Page 7
Computer not connected ...96 Could not detect a proof sheet ...96 Error 1104...96 Left Cartridge Error / Right Cartridge Error 97 Left Cartridge Incorrect / Right Cartridge Incorrect 97 Left Cartridge Missing / Right Cartridge Missing 97 Memory Failure...97 No images have been selected ...98 No photo/paper size selection has been made 98 No proof sheet information ...98...
Computer not connected ...96 Could not detect a proof sheet ...96 Error 1104...96 Left Cartridge Error / Right Cartridge Error 97 Left Cartridge Incorrect / Right Cartridge Incorrect 97 Left Cartridge Missing / Right Cartridge Missing 97 Memory Failure...97 No images have been selected ...98 No photo/paper size selection has been made 98 No proof sheet information ...98...
User's Guide
Page 12
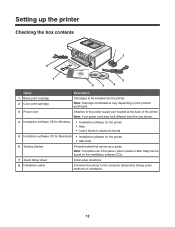
... that serves as a guide. Note: Complete user information (User's Guide or Mac Help) can be installed into the printer. Note: Cartridge combinations vary depending on the installation software CDs. 7 Quick Setup sheet Initial setup directions 8 Installation cable Connects the printer to the power ... the back of installation. 12 Setting up the printer Checking the box contents Name Description 1 Black print cartridge 2 Color print cartridge Cartridges to be found on the product purchased. 3 Power cord Attaches to the computer temporarily during some methods of the printer....
... that serves as a guide. Note: Complete user information (User's Guide or Mac Help) can be installed into the printer. Note: Cartridge combinations vary depending on the installation software CDs. 7 Quick Setup sheet Initial setup directions 8 Installation cable Connects the printer to the power ... the back of installation. 12 Setting up the printer Checking the box contents Name Description 1 Black print cartridge 2 Color print cartridge Cartridges to be found on the product purchased. 3 Power cord Attaches to the computer temporarily during some methods of the printer....
User's Guide
Page 17
... using a USB cable. 5 Power supply with port Connect the printer to a wireless network. Use the To 1 Scanner unit Access the print cartridges. 2 Print cartridge carrier Install, replace, or remove a print cartridge. 3 Lexmark N2050 (internal wireless print server) Connect the printer to a power source. Using the control panel buttons and menus Using the control panel...
... using a USB cable. 5 Power supply with port Connect the printer to a wireless network. Use the To 1 Scanner unit Access the print cartridges. 2 Print cartridge carrier Install, replace, or remove a print cartridge. 3 Lexmark N2050 (internal wireless print server) Connect the printer to a power source. Using the control panel buttons and menus Using the control panel...


