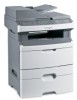
Wireless Setup Guide
Page 7
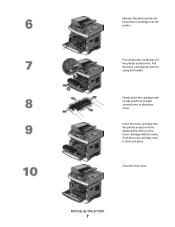
Firmly shake the cartridge side to side and front to back several times to distribute toner. Pull the toner cartridge up the printer 7 Setting up and out using the handle. Push the toner cartridge until it clicks into the printer. Reinsert the photoconductor kit and toner cartridge into place. Press the button on the toner cartridge with the tracks. Close the front door. Insert the toner cartridge into the photoconductor kit by aligning the rollers on the base of the photoconductor kit.
Firmly shake the cartridge side to side and front to back several times to distribute toner. Pull the toner cartridge up the printer 7 Setting up and out using the handle. Push the toner cartridge until it clicks into the printer. Reinsert the photoconductor kit and toner cartridge into place. Press the button on the toner cartridge with the tracks. Close the front door. Insert the toner cartridge into the photoconductor kit by aligning the rollers on the base of the photoconductor kit.

User's Guide
Page 4
... menu...117 Settings menu...123 Maintaining the printer 146 Cleaning the exterior of the printer...146 Cleaning the scanner glass...146 Cleaning the ADF separator rollers...147 Storing supplies...148 Checking the status of supplies from a network computer 149 Moving the printer to another location...149 Shipping the printer...149 Ordering...
... menu...117 Settings menu...123 Maintaining the printer 146 Cleaning the exterior of the printer...146 Cleaning the scanner glass...146 Cleaning the ADF separator rollers...147 Storing supplies...148 Checking the status of supplies from a network computer 149 Moving the printer to another location...149 Shipping the printer...149 Ordering...
User's Guide
Page 147
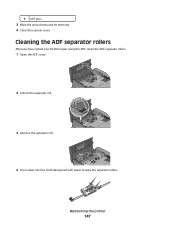
4 ADF glass 3 Wipe the areas shown and let them dry. 4 Close the scanner cover. Cleaning the ADF separator rollers After you have copied over 50,000 copies using the ADF, clean the ADF separator rollers. 1 Open the ADF cover. 2 Unlock the separator roll. 3 Remove the separator roll. 4 Use a clean, lint-free cloth dampened with water to wipe the separator rollers. Maintaining the printer 147
4 ADF glass 3 Wipe the areas shown and let them dry. 4 Close the scanner cover. Cleaning the ADF separator rollers After you have copied over 50,000 copies using the ADF, clean the ADF separator rollers. 1 Open the ADF cover. 2 Unlock the separator roll. 3 Remove the separator roll. 4 Use a clean, lint-free cloth dampened with water to wipe the separator rollers. Maintaining the printer 147
User's Guide
Page 153
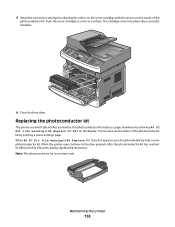
5 Install the new toner cartridge by aligning the rollers on the toner cartridge with the arrows on the display. Maintaining the printer 153 When 84 PC Kit life warning or 84 Replace PC Kit ...
5 Install the new toner cartridge by aligning the rollers on the toner cartridge with the arrows on the display. Maintaining the printer 153 When 84 PC Kit life warning or 84 Replace PC Kit ...
User's Guide
Page 155
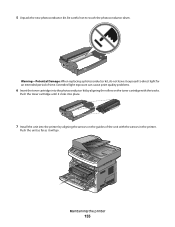
... kit, do not leave it will go. Extended light exposure can cause print quality problems. 6 Insert the toner cartridge into the printer by aligning the rollers on the guides of time.
... kit, do not leave it will go. Extended light exposure can cause print quality problems. 6 Insert the toner cartridge into the printer by aligning the rollers on the guides of time.
User's Guide
Page 228
...up 79 address book, fax using 99 ADF copying using 69 ADF pick assembly ordering 151 ADF separator roll ordering 151 ADF separator rollers, cleaning 147 adjusting Power Saver using the Embedded Web Server 37 using the printer control panel 37 Answering 176 AppleTalk menu 121 attaching... 65 checking an unresponsive printer 176 checking an unresponsive scanner 192 checking device status on Embedded Web Server 158 cleaning ADF separator rollers 147 exterior of the printer 146 scanner glass 146 Close front door 176 collating copies 74 configuration information wireless network 27 configurations ...
...up 79 address book, fax using 99 ADF copying using 69 ADF pick assembly ordering 151 ADF separator roll ordering 151 ADF separator rollers, cleaning 147 adjusting Power Saver using the Embedded Web Server 37 using the printer control panel 37 Answering 176 AppleTalk menu 121 attaching... 65 checking an unresponsive printer 176 checking an unresponsive scanner 192 checking device status on Embedded Web Server 158 cleaning ADF separator rollers 147 exterior of the printer 146 scanner glass 146 Close front door 176 collating copies 74 configuration information wireless network 27 configurations ...
Service Manual
Page 6
... to update the MFP firmware over USB 3-43 Scanner theory 3-45 Duplex ADF 3-45 Repair information 4-1 Handling ESD-sensitive parts 4-1 Removal procedures 4-2 ACM pick tire roller removal 4-3 ADF removal 4-4 ADF cable removal 4-7 ADF input tray removal 4-8 ADF scanner assembly removal 4-9 ADF separator pad removal 4-11 ADF separator roll assembly removal 4-12...
... to update the MFP firmware over USB 3-43 Scanner theory 3-45 Duplex ADF 3-45 Repair information 4-1 Handling ESD-sensitive parts 4-1 Removal procedures 4-2 ACM pick tire roller removal 4-3 ADF removal 4-4 ADF cable removal 4-7 ADF input tray removal 4-8 ADF scanner assembly removal 4-9 ADF separator pad removal 4-11 ADF separator roll assembly removal 4-12...

Service Manual
Page 46
...-sheet feed, media size (length) problem, pre-staged media in machine during warmup. 2-12 Service Manual Remove the upper front guide, and inspect the pinch rollers. Engine detected small gap or no trailing edge was ever seen at manual feeder sensor. 200.20 The media is approved. See "Main motor service...
...-sheet feed, media size (length) problem, pre-staged media in machine during warmup. 2-12 Service Manual Remove the upper front guide, and inspect the pinch rollers. Engine detected small gap or no trailing edge was ever seen at manual feeder sensor. 200.20 The media is approved. See "Main motor service...

Service Manual
Page 47
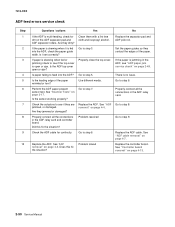
... 1 did make it is delayed at the alignment gate. Possible cause is that the media is not complete. See "ACM pick tire roller removal" on page 2-30. Retry alignment. 200.43 The media is designed to handle. 7013-XXX Error Description Action 200.27 Printhead ... ESD or noise on data collection during auto alignment 200.38 Interpage servo gap is smaller than the printhead jitter-stable specification. The alignment roller may be binding. See event beyond the wear strips. Check the main motor. See "Printhead service check" on page 2-43. "Printhead ...
... 1 did make it is delayed at the alignment gate. Possible cause is that the media is not complete. See "ACM pick tire roller removal" on page 2-30. Retry alignment. 200.43 The media is designed to handle. 7013-XXX Error Description Action 200.27 Printhead ... ESD or noise on data collection during auto alignment 200.38 Interpage servo gap is smaller than the printhead jitter-stable specification. The alignment roller may be binding. See event beyond the wear strips. Check the main motor. See "Printhead service check" on page 2-43. "Printhead ...

Service Manual
Page 48
... flag is likely that the jam was detected during warm-up . See "Fuser removal" on the exit sensor. It is located behind the fuser exit rollers, about mid printer. The flag is found, then replace the damaged part. Often, the leading edge of the media will indicate the vicinity of media... exit sensor. If there are none, then inspect for obstructions in the fuser, then replace the fuser. If damage is located behind the fuser exit rollers, about mid printer.
... flag is likely that the jam was detected during warm-up . See "Fuser removal" on the exit sensor. It is located behind the fuser exit rollers, about mid printer. The flag is found, then replace the damaged part. Often, the leading edge of the media will indicate the vicinity of media... exit sensor. If there are none, then inspect for obstructions in the fuser, then replace the fuser. If damage is located behind the fuser exit rollers, about mid printer.

Service Manual
Page 49
...duplex sensor never made by leading edge reversing into the duplex. See "Paper input and duplex sensor assembly removal" on page 4-3. Check the pick rollers. Remove Tray 2 and inspect for obstruction in the device Duplex sensor never broke by stopping the feed rolls, trailing edge was in the source, ...failed when media was detected at the manual feeder sensor, attempted to the output bin. 241.17 MISIDENTIFIED SMALL GAP JAM. Replace the pick rollers if they are no obstructions and the problem persists, then disconnect all of the cables, tilt the printer onto its back (be sure to...
...duplex sensor never made by leading edge reversing into the duplex. See "Paper input and duplex sensor assembly removal" on page 4-3. Check the pick rollers. Remove Tray 2 and inspect for obstruction in the device Duplex sensor never broke by stopping the feed rolls, trailing edge was in the source, ...failed when media was detected at the manual feeder sensor, attempted to the output bin. 241.17 MISIDENTIFIED SMALL GAP JAM. Replace the pick rollers if they are no obstructions and the problem persists, then disconnect all of the cables, tilt the printer onto its back (be sure to...
Service Manual
Page 50
... the job. Pages in an idle state. 292.00 Scanner jam, remove all originals from manual feeder. Replace if necessary. Inspect the pick roller on the MPF or the rollers on page 2-49. 290.10 Scanner Static Jam - 1st scanner sensor. Do not let the top sheets to the output bin. See... media was in too far. If the error recurs, see "ADF cover open . If the MPF pick roller is fed through the ADF. For a printer with a manual feed only (no MPF), clean the roller. 251.12 Second pick from the ADF. Remove the sheet of paper rom the ADF. Scanner Remove all...
... the job. Pages in an idle state. 292.00 Scanner jam, remove all originals from manual feeder. Replace if necessary. Inspect the pick roller on the MPF or the rollers on page 2-49. 290.10 Scanner Static Jam - 1st scanner sensor. Do not let the top sheets to the output bin. See... media was in too far. If the error recurs, see "ADF cover open . If the MPF pick roller is fed through the ADF. For a printer with a manual feed only (no MPF), clean the roller. 251.12 Second pick from the ADF. Remove the sheet of paper rom the ADF. Scanner Remove all...
Service Manual
Page 52
... calibration strip has excessive dark area: front excessive variability for identical values indicating bad cable and/or SCC card. Scanner Failure: pick roller engage failure Scanner Failure: pick roller disengage failure Scanner failure: lamp failure Front scan module output level error Front scan module lamp level too low: front Mono channel, Front...
... calibration strip has excessive dark area: front excessive variability for identical values indicating bad cable and/or SCC card. Scanner Failure: pick roller engage failure Scanner Failure: pick roller disengage failure Scanner failure: lamp failure Front scan module output level error Front scan module lamp level too low: front Mono channel, Front...

Service Manual
Page 73
... HVPS contact (transfer roll) for debris, binds, or damage. Loss of spilled toner. Verify the high voltage cable is primarily due to contaminate the transfer roller. If all components appear free of contamination, then replace the following FRUs one at a time in the order shown: • Transfer roll • LVPS/HVPS...
... HVPS contact (transfer roll) for debris, binds, or damage. Loss of spilled toner. Verify the high voltage cable is primarily due to contaminate the transfer roller. If all components appear free of contamination, then replace the following FRUs one at a time in the order shown: • Transfer roll • LVPS/HVPS...

Service Manual
Page 83
... all the connections properly connected? See "Scanner Tests" on the ADF mechanism cover damaged? Go to J4 on the ADF separator pad and ADF separator rollers. Check for dirt on the controller board? Pin 5 should be used if the paper feeds and jams in a way that would keep it set correctly...
... all the connections properly connected? See "Scanner Tests" on the ADF mechanism cover damaged? Go to J4 on the ADF separator pad and ADF separator rollers. Check for dirt on the controller board? Pin 5 should be used if the paper feeds and jams in a way that would keep it set correctly...
Service Manual
Page 84
... correctly? Is paper failing to step 6. See "Scanner Tests" on page 4-7. Check the ADF cable for dirt on the ADF separator pad and ADF separator rollers. Replace the ADF. Properly close the top cover. Replace the ADF. If the paper is jamming in the ADF relay card and controller board. There...
... correctly? Is paper failing to step 6. See "Scanner Tests" on page 4-7. Check the ADF cable for dirt on the ADF separator pad and ADF separator rollers. Replace the ADF. Properly close the top cover. Replace the ADF. If the paper is jamming in the ADF relay card and controller board. There...

Service Manual
Page 137
..., a calibration is sent to flatbed to move the CCD imaging unit to be placed in the correct position. The following illustration shows the paper path, rollers, and sensors used in the duplex ADF. 7013-XXX The duplex ADF enables the user to create duplex scans automatically, eliminating the need to stop... in the paper path during the scan process. The media must be scanned is located by default. 3. Actuating this sensor determines that this point the roller on the CCD. 5.
..., a calibration is sent to flatbed to move the CCD imaging unit to be placed in the correct position. The following illustration shows the paper path, rollers, and sensors used in the duplex ADF. 7013-XXX The duplex ADF enables the user to create duplex scans automatically, eliminating the need to stop... in the paper path during the scan process. The media must be scanned is located by default. 3. Actuating this sensor determines that this point the roller on the CCD. 5.
Service Manual
Page 138
... then moves the media to the take away roll and the ADF scan sensor. When the trailing edge of the media continues to the exit roller and exits the ADF. 10. The paper passes through the ADF scan area is simplex, only the media continues to the reverse point.
... then moves the media to the take away roll and the ADF scan sensor. When the trailing edge of the media continues to the exit roller and exits the ADF. 10. The paper passes through the ADF scan area is simplex, only the media continues to the reverse point.
Service Manual
Page 141
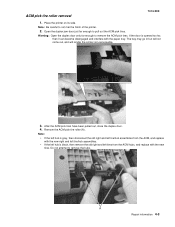
... the paper tray. The tray may go in but will not come out, and will render the printer non-serviceable. 3. Remove the ACM pick tire roller (A). Open the duplex jam door just far enough to remove the ACM pick tires. ACM pick tire...
... the paper tray. The tray may go in but will not come out, and will render the printer non-serviceable. 3. Remove the ACM pick tire roller (A). Open the duplex jam door just far enough to remove the ACM pick tires. ACM pick tire...


