
User's Guide
Page 2
... the power supply and power supply cord provided with other than those expressly designated by the manufacturer, are commercial computer software and documentation developed exclusively at private expense. Some states do not imply that is not intended to state or imply ...products, programs, or services do not allow disclaimer of publications related to Lexmark International Ltd., Marketing and Services Department, Westhorpe House, Westhorpe, Marlow Bucks SL7 3RQ. UNITED STATES GOVERNMENT RIGHTS This software and any existing intellectual property right may not apply to a product, ...
... the power supply and power supply cord provided with other than those expressly designated by the manufacturer, are commercial computer software and documentation developed exclusively at private expense. Some states do not imply that is not intended to state or imply ...products, programs, or services do not allow disclaimer of publications related to Lexmark International Ltd., Marketing and Services Department, Westhorpe House, Westhorpe, Marlow Bucks SL7 3RQ. UNITED STATES GOVERNMENT RIGHTS This software and any existing intellectual property right may not apply to a product, ...

User's Guide
Page 3
... about the printer 14 Understanding the parts of the printer 14 Using the control panel buttons and menus 15 Using the control panel...15 Navigating the control panel menus...16 Using the Copy menu...16 Using the Photo Card menu...16 Learning about the software 18 Using the printer software...18 Using ...the Imaging Studio...18 Using the All-In-One Center...20 Opening the All-In-One Center...20 Using the Scanning & Copying tab...20 Using the Saved Images tab...21...
... about the printer 14 Understanding the parts of the printer 14 Using the control panel buttons and menus 15 Using the control panel...15 Navigating the control panel menus...16 Using the Copy menu...16 Using the Photo Card menu...16 Learning about the software 18 Using the printer software...18 Using ...the Imaging Studio...18 Using the All-In-One Center...20 Opening the All-In-One Center...20 Using the Scanning & Copying tab...20 Using the Saved Images tab...21...
User's Guide
Page 5
... for editing...48 Scanning clear images from magazines or newspapers 49 Faxing...50 Sending a fax using the software...50 Receiving a fax using the software...50 Maintaining the printer 52 Changing a print cartridge...52 Removing a used print cartridge...52 Installing a print cartridge...52 Achieving...56 Ordering supplies...56 Using genuine Lexmark print cartridges 56 Refilling a print cartridge...57 Recycling Lexmark products...57 Troubleshooting...58 Setup troubleshooting...58 Incorrect language appears on the display 58 Power button is not lit...58 Software does not install...58 Page does...
... for editing...48 Scanning clear images from magazines or newspapers 49 Faxing...50 Sending a fax using the software...50 Receiving a fax using the software...50 Maintaining the printer 52 Changing a print cartridge...52 Removing a used print cartridge...52 Installing a print cartridge...52 Achieving...56 Ordering supplies...56 Using genuine Lexmark print cartridges 56 Refilling a print cartridge...57 Recycling Lexmark products...57 Troubleshooting...58 Setup troubleshooting...58 Incorrect language appears on the display 58 Power button is not lit...58 Software does not install...58 Page does...

User's Guide
Page 7
Please remove your camera to use your memory card 74 Some photos removed from card by host 74 There is a problem reading the memory card 74 Removing and reinstalling the software 74 Notices...76 Index...82 7
Please remove your camera to use your memory card 74 Some photos removed from card by host 74 There is a problem reading the memory card 74 Removing and reinstalling the software 74 Notices...76 Index...82 7
User's Guide
Page 9
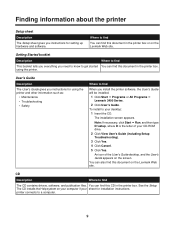
.... You can also find this document on the Lexmark Web site. printer connects to get started You can find this document in the printer box. Finding information about the printer Setup sheet Description The Setup sheet gives you install the printer software, the User's Guide will be installed. 1 ... installation instructions. You can find The CD contains drivers, software, and publication files. An icon of your desktop: 1 Insert the CD. Where to find this CD in the printer box or on the Lexmark Web site. The installation screen appears. Getting Started booklet...
.... You can also find this document on the Lexmark Web site. printer connects to get started You can find this document in the printer box. Finding information about the printer Setup sheet Description The Setup sheet gives you install the printer software, the User's Guide will be installed. 1 ... installation instructions. You can find The CD contains drivers, software, and publication files. An icon of your desktop: 1 Insert the CD. Where to find this CD in the printer box or on the Lexmark Web site. The installation screen appears. Getting Started booklet...
User's Guide
Page 10
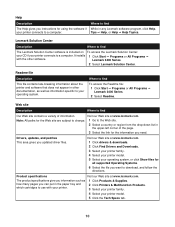
...the paper tray and which cartridges to a computer. Web site Description Where to find The Lexmark Solution Center software is included on To access the Lexmark Solution Center: your CD if your printer connects to use with the other documentation, as well as how many pages you need. ...site contains a variety of the page. 3 Select the link for using the software if your printer connects to your printer model. 5 Click the Tech Specs tab. 10 Product specifications Visit our Web site at www.lexmark.com. Drivers, updates, and patches This area gives you instructions for the ...
...the paper tray and which cartridges to a computer. Web site Description Where to find The Lexmark Solution Center software is included on To access the Lexmark Solution Center: your CD if your printer connects to use with the other documentation, as well as how many pages you need. ...site contains a variety of the page. 3 Select the link for using the software if your printer connects to your printer model. 5 Click the Tech Specs tab. 10 Product specifications Visit our Web site at www.lexmark.com. Drivers, updates, and patches This area gives you instructions for the ...
User's Guide
Page 13
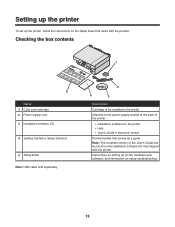
... or Setup Solutions 5 Setup sheet Note: USB cable sold separately 2 4 3 Description Cartridge to be installed in the printer Attaches to the power supply located at the back of the printer • Installation software for the printer • Help • User's Guide in electronic format Printed booklet that serves as a guide Note: The complete version...
... or Setup Solutions 5 Setup sheet Note: USB cable sold separately 2 4 3 Description Cartridge to be installed in the printer Attaches to the power supply located at the back of the printer • Installation software for the printer • Help • User's Guide in electronic format Printed booklet that serves as a guide Note: The complete version...
User's Guide
Page 18
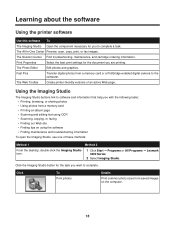
...-enabled digital camera to complete. The Web Toolbar Create printer-friendly versions of these methods: Method 1 Method 2 From the desktop, double-click the Imaging Studio icon. 1 Click Start ΠPrograms or All Programs ΠLexmark 3400 Series. 2 Select Imaging Studio. Click the Imaging... cartridge ordering information. The All-In-One Center Preview, scan, copy, print, or fax images. Using the Imaging Studio The Imaging Studio buttons link to complete a task. Learning about the software Using the printer software Use this software To The Imaging Studio Open the component...
...-enabled digital camera to complete. The Web Toolbar Create printer-friendly versions of these methods: Method 1 Method 2 From the desktop, double-click the Imaging Studio icon. 1 Click Start ΠPrograms or All Programs ΠLexmark 3400 Series. 2 Select Imaging Studio. Click the Imaging... cartridge ordering information. The All-In-One Center Preview, scan, copy, print, or fax images. Using the Imaging Studio The Imaging Studio buttons link to complete a task. Learning about the software Using the printer software Use this software To The Imaging Studio Open the component...

User's Guide
Page 19
...can do with various photo sizes. Access the Web Visit our Web site. Use Optical Character Recognition (OCR) to scan a document to keep the printer working properly. 19 Copy Fax • Copy photos or documents. • Enlarge, reduce, or change other features before printing. Print an album ...page Scan & edit text (OCR) Scan Print an album or scrapbook page with this software. View photos saved on the computer. Click To Share photos Use memory card photos Browse photos Details E-mail images or photos which are stored ...
...can do with various photo sizes. Access the Web Visit our Web site. Use Optical Character Recognition (OCR) to scan a document to keep the printer working properly. 19 Copy Fax • Copy photos or documents. • Enlarge, reduce, or change other features before printing. Print an album ...page Scan & edit text (OCR) Scan Print an album or scrapbook page with this software. View photos saved on the computer. Click To Share photos Use memory card photos Browse photos Details E-mail images or photos which are stored ...
User's Guide
Page 20
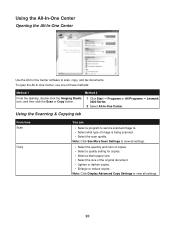
...double-click the Imaging Studio icon, and then click the Scan or Copy button. 1 Click Start Œ Programs or All Programs Œ Lexmark 3400 Series. 2 Select All-In-One Center. Using the Scanning & Copying tab From here Scan Copy You can • Select a program to send a scanned image to scan... of the original document. • Lighten or darken copies. • Enlarge or reduce copies. Using the All-In-One Center Opening the All-In-One Center Use the All-In-One Center software to . • Select what type of image is being scanned. • Select the scan quality. Note: Click ...
...double-click the Imaging Studio icon, and then click the Scan or Copy button. 1 Click Start Œ Programs or All Programs Œ Lexmark 3400 Series. 2 Select All-In-One Center. Using the Scanning & Copying tab From here Scan Copy You can • Select a program to send a scanned image to scan... of the original document. • Lighten or darken copies. • Enlarge or reduce copies. Using the All-In-One Center Opening the All-In-One Center Use the All-In-One Center software to . • Select what type of image is being scanned. • Select the scan quality. Note: Click ...
User's Guide
Page 22
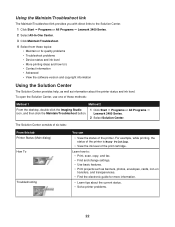
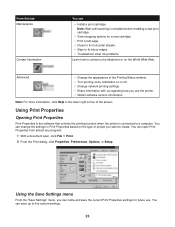
...consists of six tabs: From this tab Printer Status (Main dialog) How To Troubleshooting You can • View the status of the print cartridge. Learn how to 's • Contact information • Advanced • View the software version and copyright information Using the Solution Center...8226; View the ink level of the printer. Using the Maintain/Troubleshoot link The Maintain/Troubleshoot link provides you with direct links to the Solution Center. 1 Click Start Œ Programs or All Programs Œ Lexmark 3400 Series. 2 Select All-In-One Center. 3 Click Maintain/Troubleshoot. 4 Select...
...consists of six tabs: From this tab Printer Status (Main dialog) How To Troubleshooting You can • View the status of the print cartridge. Learn how to 's • Contact information • Advanced • View the software version and copyright information Using the Solution Center...8226; View the ink level of the printer. Using the Maintain/Troubleshoot link The Maintain/Troubleshoot link provides you with direct links to the Solution Center. 1 Click Start Œ Programs or All Programs Œ Lexmark 3400 Series. 2 Select All-In-One Center. 3 Click Maintain/Troubleshoot. 4 Select...
User's Guide
Page 23
... of the screen. Using Print Properties Opening Print Properties Print Properties is the software that controls the printing function when the printer is complete before installing a new print cartridge. • View shopping options for future use the printer. • Obtain software version information. Using the Save Settings menu From the "Save Settings" menu, you...
... of the screen. Using Print Properties Opening Print Properties Print Properties is the software that controls the printing function when the printer is complete before installing a new print cartridge. • View shopping options for future use the printer. • Obtain software version information. Using the Save Settings menu From the "Save Settings" menu, you...

User's Guide
Page 24
...• Select a Quality/Speed setting. • Select a Paper Type. • Customize how the printer prints several copies of a single print job: collated or normal. • Choose Automatic Image Sharpening.... in the top center of the paper, and select a duplexing preference. You can edit only one image at a time. • Move the mouse pointer over the tool for a project. ...of the screen. Using the Photo Editor Use the Photo Editor software to edit graphics or photos. 1 Click Start Œ Programs or All Programs Œ Lexmark 3400 Series. 2 Select Photo Editor. 3 Click File &#...
...• Select a Quality/Speed setting. • Select a Paper Type. • Customize how the printer prints several copies of a single print job: collated or normal. • Choose Automatic Image Sharpening.... in the top center of the paper, and select a duplexing preference. You can edit only one image at a time. • Move the mouse pointer over the tool for a project. ...of the screen. Using the Photo Editor Use the Photo Editor software to edit graphics or photos. 1 Click Start Œ Programs or All Programs Œ Lexmark 3400 Series. 2 Select Photo Editor. 3 Click File &#...
User's Guide
Page 26
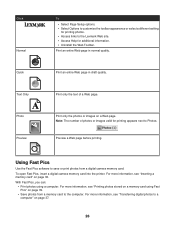
...26 With Fast Pics, you can: • Print photos using Fast Pics" on page 36. Using Fast Pics Use the Fast Pics software to the Lexmark Web site. • Access Help for printing appears next to a computer" on a Web page. For more information, see "Printing ...photos stored on a memory card using a computer. For more information, see "Transferring digital photos to Photos. To open Fast Pics, insert a digital camera memory card into the printer...
...26 With Fast Pics, you can: • Print photos using Fast Pics" on page 36. Using Fast Pics Use the Fast Pics software to the Lexmark Web site. • Access Help for printing appears next to a computer" on a Web page. For more information, see "Printing ...photos stored on a memory card using a computer. For more information, see "Transferring digital photos to Photos. To open Fast Pics, insert a digital camera memory card into the printer...
User's Guide
Page 32
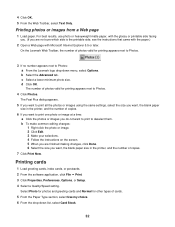
... Load greeting cards, index cards, or postcards. 2 From the software application, click File ΠPrint. 3 Click Properties, Preferences, ...Text Only. d Click OK. The number of photos valid for printing appears next to print one photo or image at a time: a Click the photos or images you are finished making ...want, the blank paper size in the printer, and the number of copies. 6 If you want , the blank paper size in the printer, and the number of cards. 5... want to print to Photos: a From the Lexmark logo drop-down list, select Card Stock. 32 Printing photos or images from a ...
... Load greeting cards, index cards, or postcards. 2 From the software application, click File ΠPrint. 3 Click Properties, Preferences, ...Text Only. d Click OK. The number of photos valid for printing appears next to print one photo or image at a time: a Click the photos or images you are finished making ...want, the blank paper size in the printer, and the number of copies. 6 If you want , the blank paper size in the printer, and the number of cards. 5... want to print to Photos: a From the Lexmark logo drop-down list, select Card Stock. 32 Printing photos or images from a ...
User's Guide
Page 33
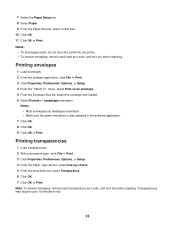
Printing envelopes 1 Load envelopes. 2 From the software application, click File Œ Print. 3 Click Properties, Preferences, Options, or Setup. 4 From the "I Want To" menu... 6 Click OK. 7 Click OK or Print. Notes: • To avoid paper jams, do not force the cards into the printer. • To prevent smudging, remove each transparency as it exits, and let it dry before stacking. Note: To prevent smudging, ...Most envelopes use landscape orientation. • Make sure the same orientation is also selected in the software application. 7 Click OK. 8 Click OK. 9 Click OK or Print.
Printing envelopes 1 Load envelopes. 2 From the software application, click File Œ Print. 3 Click Properties, Preferences, Options, or Setup. 4 From the "I Want To" menu... 6 Click OK. 7 Click OK or Print. Notes: • To avoid paper jams, do not force the cards into the printer. • To prevent smudging, remove each transparency as it exits, and let it dry before stacking. Note: To prevent smudging, ...Most envelopes use landscape orientation. • Make sure the same orientation is also selected in the software application. 7 Click OK. 8 Click OK. 9 Click OK or Print.
User's Guide
Page 46
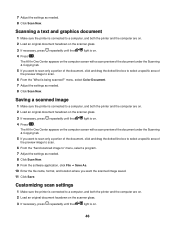
... as needed . 8 Click Scan Now. 9 From the software application, click File ΠSave As. 10 Enter the file name, format, and location where you want the scanned image saved. 11 Click Save. Customizing scan settings 1 Make sure the printer is connected to " menu, select a program. 7 Adjust... the settings as needed . 8 Click Scan Now. The All-In-One Center appears on the computer screen with a scan preview of the document under the...
... as needed . 8 Click Scan Now. 9 From the software application, click File ΠSave As. 10 Enter the file name, format, and location where you want the scanned image saved. 11 Click Save. Customizing scan settings 1 Make sure the printer is connected to " menu, select a program. 7 Adjust... the settings as needed . 8 Click Scan Now. The All-In-One Center appears on the computer screen with a scan preview of the document under the...

User's Guide
Page 48
... more information, see the documentation that ABBYY Fine Reader is installed. 1 Load an original document facedown on the computer screen. The All-In-One Center appears with the graphics program. 48 Note: Make sure that came with the Scanning & Copying tab expanded. 4 To scan only a ... opens in the preview section. Scanning images for editing Use the Optical Character Recognition (OCR) software feature to edit the text. 6 Click Send Now. 5 Click Scan and e-mail a photo. The All-In-One Center appears with step 5. 5 Select a word-processing program to turn scanned images into text...
... more information, see the documentation that ABBYY Fine Reader is installed. 1 Load an original document facedown on the computer screen. The All-In-One Center appears with the graphics program. 48 Note: Make sure that came with the Scanning & Copying tab expanded. 4 To scan only a ... opens in the preview section. Scanning images for editing Use the Optical Character Recognition (OCR) software feature to edit the text. 6 Click Send Now. 5 Click Scan and e-mail a photo. The All-In-One Center appears with step 5. 5 Select a word-processing program to turn scanned images into text...
User's Guide
Page 50
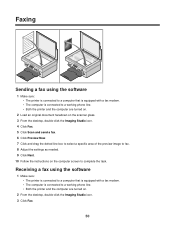
Faxing Sending a fax using the software 1 Make sure: • The printer is connected to a computer that is equipped with a fax modem. • The computer is connected to a working phone line. • Both the printer and the computer are turned on. 2 Load an original document facedown on the ...and drag the dotted line box to select a specific area of the preview image to complete the task. Receiving a fax using the software 1 Make sure: • The printer is connected to a computer that is equipped with a fax modem. • The computer is connected to a working phone line....
Faxing Sending a fax using the software 1 Make sure: • The printer is connected to a computer that is equipped with a fax modem. • The computer is connected to a working phone line. • Both the printer and the computer are turned on. 2 Load an original document facedown on the ...and drag the dotted line box to select a specific area of the preview image to complete the task. Receiving a fax using the software 1 Make sure: • The printer is connected to a computer that is equipped with a fax modem. • The computer is connected to a working phone line....

User's Guide
Page 51
4 Click Receive a fax or view settings/history. Note: If you want to print the fax. Note: You can receive faxes only when the fax software is open. 5 Double-click the fax in the status window to view it. 6 Click the printer icon to print faxes as they arrive, select Print Incoming Faxes. 51
4 Click Receive a fax or view settings/history. Note: If you want to print the fax. Note: You can receive faxes only when the fax software is open. 5 Double-click the fax in the status window to view it. 6 Click the printer icon to print faxes as they arrive, select Print Incoming Faxes. 51


