
User's Guide
Page 3
......20 Using the Scanning & Copying tab...20 Using the Saved Images tab...21 Using the Maintain/Troubleshoot link...22 Using the Solution Center...22 Using Print Properties...23 Opening Print Properties...23 Using the Save Settings menu...23 Using the I Want To menu...24 Using the Options menu...24 Using the... Print Properties tabs...24 Using the Photo Editor...24 Using the Web Toolbar...25 Using Fast Pics...26 Loading paper and original documents 27 Loading paper......
......20 Using the Scanning & Copying tab...20 Using the Saved Images tab...21 Using the Maintain/Troubleshoot link...22 Using the Solution Center...22 Using Print Properties...23 Opening Print Properties...23 Using the Save Settings menu...23 Using the I Want To menu...24 Using the Options menu...24 Using the... Print Properties tabs...24 Using the Photo Editor...24 Using the Web Toolbar...25 Using Fast Pics...26 Loading paper and original documents 27 Loading paper......

User's Guide
Page 4
...and photos from a Web page 31 Printing only the text from a Web page...31 Printing photos or images from a Web page 32 Printing cards...32 Printing envelopes...33 Printing transparencies...33 Printing collated copies...34 Printing multiple pages on one sheet 34 Printing the last page first (reverse page ...selecting photos stored on the computer 37 Printing photos...38 Printing photos stored on a memory card using the proof sheet 38 Printing photos stored on a memory card using Fast Pics 39 Printing photos from a digital camera using DPOF 39 Printing photos stored on the computer using the...
...and photos from a Web page 31 Printing only the text from a Web page...31 Printing photos or images from a Web page 32 Printing cards...32 Printing envelopes...33 Printing transparencies...33 Printing collated copies...34 Printing multiple pages on one sheet 34 Printing the last page first (reverse page ...selecting photos stored on the computer 37 Printing photos...38 Printing photos stored on a memory card using the proof sheet 38 Printing photos stored on a memory card using Fast Pics 39 Printing photos from a digital camera using DPOF 39 Printing photos stored on the computer using the...
User's Guide
Page 5
... a used print cartridge...52 Installing a print cartridge...52 Achieving better print quality...54 Improving print quality...54 Aligning the print cartridge using the computer 54 Cleaning the print cartridge nozzles...54 Wiping the print cartridge nozzles and contacts 55 Preserving the print cartridge...56 Cleaning the scanner glass...56 Ordering supplies...56 Using genuine Lexmark print cartridges 56 Refilling a print cartridge...
... a used print cartridge...52 Installing a print cartridge...52 Achieving better print quality...54 Improving print quality...54 Aligning the print cartridge using the computer 54 Cleaning the print cartridge nozzles...54 Wiping the print cartridge nozzles and contacts 55 Preserving the print cartridge...56 Cleaning the scanner glass...56 Ordering supplies...56 Using genuine Lexmark print cartridges 56 Refilling a print cartridge...
User's Guide
Page 6
... to an application...67 Fax troubleshooting...67 Tips for faxing using the Imaging Studio...67 Cannot send or receive a fax...67 Cannot print a fax or received fax has poor print quality 68 Received fax is blank...68 Jams and misfeeds troubleshooting 68 Paper jam in the printer...68 Paper jam in the...
... to an application...67 Fax troubleshooting...67 Tips for faxing using the Imaging Studio...67 Cannot send or receive a fax...67 Cannot print a fax or received fax has poor print quality 68 Received fax is blank...68 Jams and misfeeds troubleshooting 68 Paper jam in the printer...68 Paper jam in the...
User's Guide
Page 11
...printer will be free of defects in material and with this limited Lexmark International, Inc. retail location near you, contact a sales representative,...us at www.lexmark.com. and gives information about parts, service providers, and safety. Visit our Web site at www.lexmark.com. date...view the limitations and conditions of this unit or set forth at www.lexmark.com. 1 Click Products & Supplies. 2 Click Supplies. 3 Select... form, and then click Submit Request. 11 Visit our Web site at www.lexmark.com. 1 Click customer support. 2 Click Technical Support. 3 Select your printer...
...printer will be free of defects in material and with this limited Lexmark International, Inc. retail location near you, contact a sales representative,...us at www.lexmark.com. and gives information about parts, service providers, and safety. Visit our Web site at www.lexmark.com. date...view the limitations and conditions of this unit or set forth at www.lexmark.com. 1 Click Products & Supplies. 2 Click Supplies. 3 Select... form, and then click Submit Request. 11 Visit our Web site at www.lexmark.com. 1 Click customer support. 2 Click Technical Support. 3 Select your printer...
User's Guide
Page 13
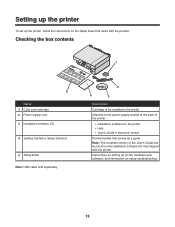
...setting up the printer, follow the instructions on the Setup sheet that shipped with the product. Checking the box contents 1 ?? ? 5 Name 1 Color print cartridge 2 Power supply cord 3 Installation software CD 4 Getting Started or Setup Solutions 5 Setup sheet Note: USB cable sold separately 2 4 3 Description ...located at the back of the printer • Installation software for the printer • Help • User's Guide in electronic format Printed booklet that serves as a guide Note: The complete version of the User's Guide can be found on the installation software CD that ...
...setting up the printer, follow the instructions on the Setup sheet that shipped with the product. Checking the box contents 1 ?? ? 5 Name 1 Color print cartridge 2 Power supply cord 3 Installation software CD 4 Getting Started or Setup Solutions 5 Setup sheet Note: USB cable sold separately 2 4 3 Description ...located at the back of the printer • Installation software for the printer • Help • User's Guide in electronic format Printed booklet that serves as a guide Note: The complete version of the User's Guide can be found on the installation software CD that ...
User's Guide
Page 15
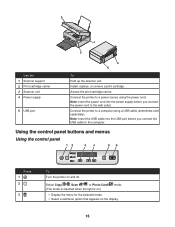
...the power cord to a power source using a USB cable (sometimes sold separately). Install, replace, or remove a print cartridge. Connect the printer to the computer. Access the print cartridge carrier. Using the control panel buttons and menus Using the control panel Press 1 2 3 To Turn the ...printer on the display. 15 3 1 2 Use the 1 Scanner support 2 Print cartridge carrier 3 Scanner unit 4 Power supply 5 USB port 4 5 To Hold up the scanner unit. Select Copy , Scan , or Photo Card (The mode...
...the power cord to a power source using a USB cable (sometimes sold separately). Install, replace, or remove a print cartridge. Connect the printer to the computer. Access the print cartridge carrier. Using the control panel buttons and menus Using the control panel Press 1 2 3 To Turn the ...printer on the display. 15 3 1 2 Use the 1 Scanner support 2 Print cartridge carrier 3 Scanner unit 4 Power supply 5 USB port 4 5 To Hold up the scanner unit. Select Copy , Scan , or Photo Card (The mode...
User's Guide
Page 16
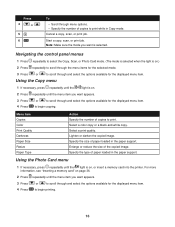
...menu item. Using the Photo Card menu 1 If necessary, press repeatedly until the menu item you want appears. 3 Press 4 Press or to print while in Copy mode. Specify the type of copies to scroll through menu options. • Specify the number of paper loaded in the paper ...support. For more information, see "Inserting a memory card" on , or insert a memory card into the printer. Menu item Copies Color Print Quality Darkness Paper Size Resize Paper Type Action Specify the number of the copied image. Select a color copy or a black-and-white copy. Lighten ...
...menu item. Using the Photo Card menu 1 If necessary, press repeatedly until the menu item you want appears. 3 Press 4 Press or to print while in Copy mode. Specify the type of copies to scroll through menu options. • Specify the number of paper loaded in the paper ...support. For more information, see "Inserting a memory card" on , or insert a memory card into the printer. Menu item Copies Color Print Quality Darkness Paper Size Resize Paper Type Action Specify the number of the copied image. Select a color copy or a black-and-white copy. Lighten ...

User's Guide
Page 17
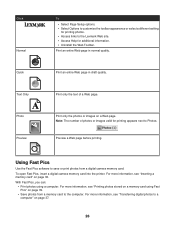
Menu item Print Proof Sheet Scan Proof Sheet Print DPOF Print All Action Print a proof sheet: • for the most recent 20 photos • by date For more information, see "Printing photos stored on a memory card using the available paper size options. 17 Print all photos on the memory card • for all photos on the memory card using the proof sheet" on the memory card. Scan the proof sheet to print selected photos. Print photos directly from a memory card. Note: This menu selection appears only if a valid DPOF file is present on page 38.
Menu item Print Proof Sheet Scan Proof Sheet Print DPOF Print All Action Print a proof sheet: • for the most recent 20 photos • by date For more information, see "Printing photos stored on a memory card using the available paper size options. 17 Print all photos on the memory card • for all photos on the memory card using the proof sheet" on the memory card. Scan the proof sheet to print selected photos. Print photos directly from a memory card. Note: This menu selection appears only if a valid DPOF file is present on page 38.
User's Guide
Page 18
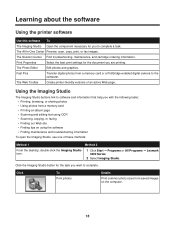
...-click the Imaging Studio icon. 1 Click Start ΠPrograms or All Programs ΠLexmark 3400 Series. 2 Select Imaging Studio. The Solution Center Find troubleshooting, maintenance, and cartridge ordering information. The All-In-One Center Preview, scan, copy, print, or fax images. Fast Pics Transfer digital photos from saved images on using the...
...-click the Imaging Studio icon. 1 Click Start ΠPrograms or All Programs ΠLexmark 3400 Series. 2 Select Imaging Studio. The Solution Center Find troubleshooting, maintenance, and cartridge ordering information. The All-In-One Center Preview, scan, copy, print, or fax images. Fast Pics Transfer digital photos from saved images on using the...

User's Guide
Page 19
Click To Share photos Use memory card photos Browse photos Details E-mail images or photos which are stored on the computer. Save or print photos from an inserted memory card. Learn more about what you can do with various photo sizes. Use Optical Character Recognition (OCR) to scan a... a word processor so you can edit the text. Copy Fax • Copy photos or documents. • Enlarge, reduce, or change other features before printing. Access the Web Visit our Web site. Print an album page Scan & edit text (OCR) Scan Print an album or scrapbook page with this software.
Click To Share photos Use memory card photos Browse photos Details E-mail images or photos which are stored on the computer. Save or print photos from an inserted memory card. Learn more about what you can do with various photo sizes. Use Optical Character Recognition (OCR) to scan a... a word processor so you can edit the text. Copy Fax • Copy photos or documents. • Enlarge, reduce, or change other features before printing. Access the Web Visit our Web site. Print an album page Scan & edit text (OCR) Scan Print an album or scrapbook page with this software.
User's Guide
Page 21
...-Save multiple photos. • Edit - Note: For more information about the Scanning & Copying tab, click Help in the top center of the screen. 21 Print an image as a multiple-page poster. • Share - Modify an image with various photo sizes. - E-mail an image. - Save an image on ...one page. - Enlarge or reduce an image. - Fax using your computer modem. • Edit - Select where to print selected photos in the top center of the screen. From here Creative Tasks Preview You can • Show or create folders. • Preview and select...
...-Save multiple photos. • Edit - Note: For more information about the Scanning & Copying tab, click Help in the top center of the screen. 21 Print an image as a multiple-page poster. • Share - Modify an image with various photo sizes. - E-mail an image. - Save an image on ...one page. - Enlarge or reduce an image. - Fax using your computer modem. • Edit - Select where to print selected photos in the top center of the screen. From here Creative Tasks Preview You can • Show or create folders. • Preview and select...
User's Guide
Page 22
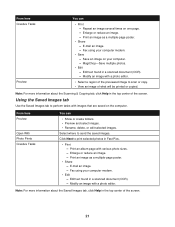
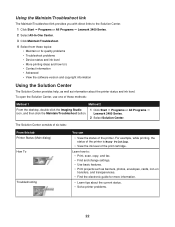
... these topics: • Maintain or fix quality problems • Troubleshoot problems • Device status and ink level • More printing ideas and how to's • Contact information • Advanced • View the software version and copyright information Using the Solution ... • Print projects such as information about the current status. • Solve printer problems. 22 Using the Maintain/Troubleshoot link The Maintain/Troubleshoot link provides you with direct links to the Solution Center. 1 Click Start Œ Programs or All Programs Œ Lexmark 3400 Series. ...
... these topics: • Maintain or fix quality problems • Troubleshoot problems • Device status and ink level • More printing ideas and how to's • Contact information • Advanced • View the software version and copyright information Using the Solution ... • Print projects such as information about the current status. • Solve printer problems. 22 Using the Maintain/Troubleshoot link The Maintain/Troubleshoot link provides you with direct links to the Solution Center. 1 Click Start Œ Programs or All Programs Œ Lexmark 3400 Series. ...
User's Guide
Page 23
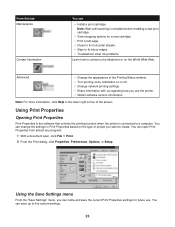
... the printer. • Obtain software version information. Advanced • Change the appearance of the Printing Status window. • Turn printing voice notification on or off. • Change network printing settings. • Share information with us by telephone or on the World Wide Web. You... menu From the "Save Settings" menu, you use . From this tab Maintenance Contact Information You can save the current Print Properties settings for a new cartridge. • Print a test page. • Clean to fix horizontal streaks. • Align to fix blurry edges. • Troubleshoot ...
... the printer. • Obtain software version information. Advanced • Change the appearance of the Printing Status window. • Turn printing voice notification on or off. • Change network printing settings. • Share information with us by telephone or on the World Wide Web. You... menu From the "Save Settings" menu, you use . From this tab Maintenance Contact Information You can save the current Print Properties settings for a new cartridge. • Print a test page. • Clean to fix horizontal streaks. • Align to fix blurry edges. • Troubleshoot ...

User's Guide
Page 24
...at a time. • Move the mouse pointer over the tool for a project. Using the Print Properties tabs All of the print settings are on both sides of the paper) to help you want to print. • Choose to Undo in the top center of the screen. Using the Options menu ...Photo Editor software to edit graphics or photos. 1 Click Start Œ Programs or All Programs Œ Lexmark 3400 Series. 2 Select Photo Editor. 3 Click File Œ Open to select the image you select the correct print settings for a description. • To undo or redo changes, click the corresponding arrow next to...
...at a time. • Move the mouse pointer over the tool for a project. Using the Print Properties tabs All of the print settings are on both sides of the paper) to help you want to print. • Choose to Undo in the top center of the screen. Using the Options menu ...Photo Editor software to edit graphics or photos. 1 Click Start Œ Programs or All Programs Œ Lexmark 3400 Series. 2 Select Photo Editor. 3 Click File Œ Open to select the image you select the correct print settings for a description. • To undo or redo changes, click the corresponding arrow next to...
User's Guide
Page 26
...With Fast Pics, you can: • Print photos using Fast Pics" on page 36. Print only the text of photos or images valid for printing appears next to save or print photos from a memory card to the Lexmark Web site. • Access Help for printing photos. • Access links to the... computer. For more information, see "Transferring digital photos to a computer" on a Web page. Print an entire Web ...
...With Fast Pics, you can: • Print photos using Fast Pics" on page 36. Print only the text of photos or images valid for printing appears next to save or print photos from a memory card to the Lexmark Web site. • Access Help for printing photos. • Access links to the... computer. For more information, see "Transferring digital photos to a computer" on a Web page. Print an entire Web ...

User's Guide
Page 28
...cards 25 photo cards 25 postcards 10 envelopes Make sure • You follow the loading instructions that came with the iron-on transfers. • The print side of the transfers faces you. • The transfers are loaded against the right side of the paper support. • The paper guide rests ...support. • The paper guide rests against the left edge of the transfers. Note: For best results, load transfers one at a time. • The print side of the cards faces you . • The stamp location is in the upper left corner. • The envelopes are designed for use envelopes that...
...cards 25 photo cards 25 postcards 10 envelopes Make sure • You follow the loading instructions that came with the iron-on transfers. • The print side of the transfers faces you. • The transfers are loaded against the right side of the paper support. • The paper guide rests ...support. • The paper guide rests against the left edge of the transfers. Note: For best results, load transfers one at a time. • The print side of the cards faces you . • The stamp location is in the upper left corner. • The envelopes are designed for use envelopes that...
User's Guide
Page 29
.... Notes: • Transparencies with areas exposed by missing labels) may cause labels to peel off during printing, resulting in a paper jam. • The labels are loaded against the right side of the paper..., each sheet of labels as it exits, and allow it to dry to avoid ink smudging. • The print side of the paper faces you. • The paper size fits within 1 mm of the edge of the ... up to 25 sheets of labels 50 transparencies 100 sheets of custom-size paper Make sure • The print side of the labels faces you. • The top of the labels feeds into the printer first. ...
.... Notes: • Transparencies with areas exposed by missing labels) may cause labels to peel off during printing, resulting in a paper jam. • The labels are loaded against the right side of the paper..., each sheet of labels as it exits, and allow it to dry to avoid ink smudging. • The print side of the paper faces you. • The paper size fits within 1 mm of the edge of the ... up to 25 sheets of labels 50 transparencies 100 sheets of custom-size paper Make sure • The print side of the labels faces you. • The top of the labels feeds into the printer first. ...
User's Guide
Page 30
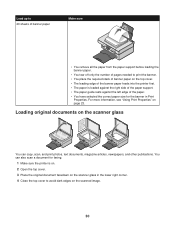
... is on. 2 Open the top cover. 3 Place the original document facedown on the scanner glass in the lower right corner. 4 Close the top cover to print the banner. • You place the required stack of banner paper on the scanner glass You can also scan a document for the banner in...
... is on. 2 Open the top cover. 3 Place the original document facedown on the scanner glass in the lower right corner. 4 Close the top cover to print the banner. • You place the required stack of banner paper on the scanner glass You can also scan a document for the banner in...

User's Guide
Page 31
...cards, envelopes, transparencies, or iron-on transfers, you are loading. 5 Click OK. 6 Click OK or Print. Printing a document 1 Load paper. 2 With a document open , click File ΠPrint. 3 From the Print dialog, click Properties, Preferences, Options, or Setup. 4 From the Paper Type section, select the paper ... Click OK. 6 Click OK or Print. The Page Setup dialog appears. 3 Adjust the print settings for the Web page. 31 Printing only the text from a Web page 1 Load paper. 2 With the Web page open , click File ΠPage Setup. Printing a Web page Printing the text and photos from a Web...
...cards, envelopes, transparencies, or iron-on transfers, you are loading. 5 Click OK. 6 Click OK or Print. Printing a document 1 Load paper. 2 With a document open , click File ΠPrint. 3 From the Print dialog, click Properties, Preferences, Options, or Setup. 4 From the Paper Type section, select the paper ... Click OK. 6 Click OK or Print. The Page Setup dialog appears. 3 Adjust the print settings for the Web page. 31 Printing only the text from a Web page 1 Load paper. 2 With the Web page open , click File ΠPage Setup. Printing a Web page Printing the text and photos from a Web...


