
Setup Sheet
Page 1
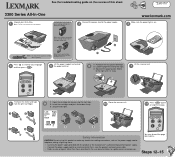
... CAUTION: Do not set up this product or make any open cartridges not in the user documentation, to the right until it prints. Connect the power cord to an electrical outlet that is snug. 2 3 1 Lift the scanner unit. 7 Remove the sticker and tape 8 from the print cartridge storage unit. Left:...-In-One may need to print an alignment page. Note: You may include a photo cartridge instead of this product or the manufacturer's authorized replacement power supply. • Connect the power supply cord to the power supply. 2 www.lexmark.com Make sure the power light is on geography.
... CAUTION: Do not set up this product or make any open cartridges not in the user documentation, to the right until it prints. Connect the power cord to an electrical outlet that is snug. 2 3 1 Lift the scanner unit. 7 Remove the sticker and tape 8 from the print cartridge storage unit. Left:...-In-One may need to print an alignment page. Note: You may include a photo cartridge instead of this product or the manufacturer's authorized replacement power supply. • Connect the power supply cord to the power supply. 2 www.lexmark.com Make sure the power light is on geography.
Setup Sheet
Page 2
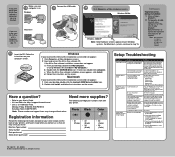
... See "Error messages troubleshooting" in the wrong language Did you select a language? 1 Press the Power button to re-enable your User's Guide. • Visit our Web site: http://support.lexmark.com/. • Call us so that we may change without a computer, you are finished....Macintosh Connect the USB cable. 13 2 1 14 Important! Press the Power button. See step 6. P/N 23A0170 E.C. 9E0002 © 2005 Lexmark International, Inc. Follow the instructions on the screen. electrical outlet that language. If the Power light does not come on ? Remove the print cartridges, check for ...
... See "Error messages troubleshooting" in the wrong language Did you select a language? 1 Press the Power button to re-enable your User's Guide. • Visit our Web site: http://support.lexmark.com/. • Call us so that we may change without a computer, you are finished....Macintosh Connect the USB cable. 13 2 1 14 Important! Press the Power button. See step 6. P/N 23A0170 E.C. 9E0002 © 2005 Lexmark International, Inc. Follow the instructions on the screen. electrical outlet that language. If the Power light does not come on ? Remove the print cartridges, check for ...


