
User's Guide
Page 4
... copy...39 Copying 4 x 6 photos...39 Scanning 40 Scanning original documents...40 Canceling scan jobs...41 Faxing 42 Sending a fax...42 Receiving a fax automatically...42 Maintaining the printer 44 Maintaining print cartridges...44 Installing print cartridges...44 Removing used print cartridges......45 Refilling print cartridges...46 Using genuine Lexmark print cartridges...46 Wiping the print cartridge nozzles and ...
... copy...39 Copying 4 x 6 photos...39 Scanning 40 Scanning original documents...40 Canceling scan jobs...41 Faxing 42 Sending a fax...42 Receiving a fax automatically...42 Maintaining the printer 44 Maintaining print cartridges...44 Installing print cartridges...44 Removing used print cartridges......45 Refilling print cartridges...46 Using genuine Lexmark print cartridges...46 Wiping the print cartridge nozzles and ...
User's Guide
Page 16
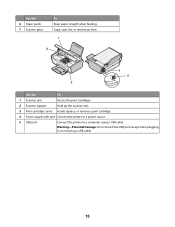
Use the 6 Paper guide 7 Scanner glass To Keep paper straight when feeding. Copy, scan, fax, or remove an item. 1 2 4 5 3 Use the To 1 Scanner unit Access the print cartridges. 2 Scanner support Hold up the scanner unit. 3 Print cartridge carrier Install, replace, or remove a print cartridge. 4 Power supply with port Connect the printer to a power source. 5 USB port Connect the printer to a computer using a USB cable. Warning-Potential Damage: Do not touch the USB port except when plugging in or removing a USB cable. 16
Use the 6 Paper guide 7 Scanner glass To Keep paper straight when feeding. Copy, scan, fax, or remove an item. 1 2 4 5 3 Use the To 1 Scanner unit Access the print cartridges. 2 Scanner support Hold up the scanner unit. 3 Print cartridge carrier Install, replace, or remove a print cartridge. 4 Power supply with port Connect the printer to a power source. 5 USB port Connect the printer to a computer using a USB cable. Warning-Potential Damage: Do not touch the USB port except when plugging in or removing a USB cable. 16
User's Guide
Page 20
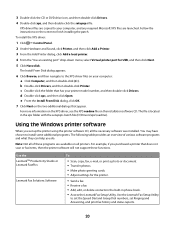
...up the printer using the printer software CD, all the necessary software was installed. Use the LexmarkTM Productivity Studio or Lexmark FastPics Lexmark Fax Solutions Software To • Scan, copy, fax, e-mail, or print a photo or document. • Transfer photos. • Make photo greeting cards. ...• Adjust settings for USB, and then click Next. 5 Click Have disk. Use the Lexmark Fax Setup Utility to install some additional programs. The following table provides an overview of these functions. b Double-click Drivers, and then double-...
...up the printer using the printer software CD, all the necessary software was installed. Use the LexmarkTM Productivity Studio or Lexmark FastPics Lexmark Fax Solutions Software To • Scan, copy, fax, e-mail, or print a photo or document. • Transfer photos. • Make photo greeting cards. ...• Adjust settings for USB, and then click Next. 5 Click Have disk. Use the Lexmark Fax Setup Utility to install some additional programs. The following table provides an overview of these functions. b Double-click Drivers, and then double-...
User's Guide
Page 21
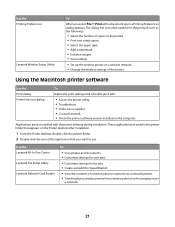
... folder. 2 Double-click the icon of the printer. These applications are also installed with a document open, a Printing Preferences dialog appears. Use the Lexmark All-In-One Center Lexmark Fax Setup Utility Lexmark Network Card Reader To • Scan photos and documents. • Customize settings for scan jobs. • Customize settings for the print job...
... folder. 2 Double-click the icon of the printer. These applications are also installed with a document open, a Printing Preferences dialog appears. Use the Lexmark All-In-One Center Lexmark Fax Setup Utility Lexmark Network Card Reader To • Scan photos and documents. • Customize settings for scan jobs. • Customize settings for the print job...
User's Guide
Page 26
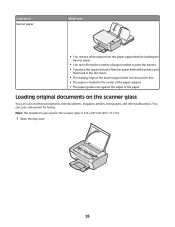
... the top cover. 26 You can scan and then print photos, text documents, magazine articles, newspapers, and other publications. Note: The maximum scan area for faxing.
... the top cover. 26 You can scan and then print photos, text documents, magazine articles, newspapers, and other publications. Note: The maximum scan area for faxing.
User's Guide
Page 31
... in the taskbar. 2 Right-click the document name, and then select Pause. 31 b Click Control Panel. c Under Hardware and Sound, click Printer. b Click Printers and Faxes. In Windows 2000 a Click Start. 5 Click OK to print a border around each page image, then choose an option from the Border pop-up menu. 3 Click...
... in the taskbar. 2 Right-click the document name, and then select Pause. 31 b Click Control Panel. c Under Hardware and Sound, click Printer. b Click Printers and Faxes. In Windows 2000 a Click Start. 5 Click OK to print a border around each page image, then choose an option from the Border pop-up menu. 3 Click...
User's Guide
Page 32
... part of the following: • If you want to cancel all print jobs in the Dock. c Under Hardware and Sound, click Printer. b Click Printers and Faxes. In Windows XP a Click Start. Using the printer folder in the queue, click Printer Œ Cancel All Documents. 32 Click Cancel Printing to pause all...
... part of the following: • If you want to cancel all print jobs in the Dock. c Under Hardware and Sound, click Printer. b Click Printers and Faxes. In Windows XP a Click Start. Using the printer folder in the queue, click Printer Œ Cancel All Documents. 32 Click Cancel Printing to pause all...
User's Guide
Page 40
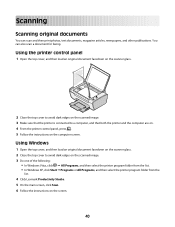
Scanning Scanning original documents You can also scan a document for faxing. Using the printer control panel 1 Open the top cover, and then load an original document facedown on the scanner glass. 2 Close the top cover to ... from the list. • In Windows XP, click Start Œ Programs or All Programs, and then select the printer program folder from the list. 4 Click Lexmark Productivity Studio. 5 On the main screen, click Scan. 6 Follow the instructions on the computer screen.
Scanning Scanning original documents You can also scan a document for faxing. Using the printer control panel 1 Open the top cover, and then load an original document facedown on the scanner glass. 2 Close the top cover to ... from the list. • In Windows XP, click Start Œ Programs or All Programs, and then select the printer program folder from the list. 4 Click Lexmark Productivity Studio. 5 On the main screen, click Scan. 6 Follow the instructions on the computer screen.
User's Guide
Page 42
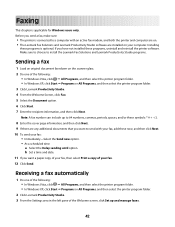
...• In Windows XP, click Start Œ Programs or All Programs, and then select the printer program folder. 3 Click Lexmark Productivity Studio. 4 From the Welcome Screen, click Fax. 5 Select the Document option. 6 Click Start. 7 Enter the recipient information, and then click Next. If you want a.../or these symbols 8 Enter the cover page information, and then click Next. 9 If there are installed on . • The Lexmark Fax Solutions and Lexmark Productivity Studio software are any additional documents that you have not installed these now, and then click Next. 10 To send your...
...• In Windows XP, click Start Œ Programs or All Programs, and then select the printer program folder. 3 Click Lexmark Productivity Studio. 4 From the Welcome Screen, click Fax. 5 Select the Document option. 6 Click Start. 7 Enter the recipient information, and then click Next. If you want a.../or these symbols 8 Enter the cover page information, and then click Next. 9 If there are installed on . • The Lexmark Fax Solutions and Lexmark Productivity Studio software are any additional documents that you have not installed these now, and then click Next. 10 To send your...

User's Guide
Page 43
4 From the "I Want To" menu, click Adjust speed dial list and other fax settings. 5 Click the Ringing and Answering tab. 6 From the "Automatically answer incoming calls as a fax" area, select On from the Auto Answer drop-down list. 7 To turn the Auto Answer feature on and off at scheduled times, select the settings that you want from the drop-down lists. 8 To set the number of telephone rings before the printer automatically receives faxes, select a setting from the "Pick-up on the" drop-down list in the "Answering on your phone line type" area. 9 Click OK to save the settings. 43
4 From the "I Want To" menu, click Adjust speed dial list and other fax settings. 5 Click the Ringing and Answering tab. 6 From the "Automatically answer incoming calls as a fax" area, select On from the Auto Answer drop-down list. 7 To turn the Auto Answer feature on and off at scheduled times, select the settings that you want from the drop-down lists. 8 To set the number of telephone rings before the printer automatically receives faxes, select a setting from the "Pick-up on the" drop-down list in the "Answering on your phone line type" area. 9 Click OK to save the settings. 43
User's Guide
Page 53
... to Set As Default Printer, then you must select the printer for each file that the print job is the default printer. b Click Printers and Faxes. If you want to resume a particular print job, choose the document name, and then click Resume. - Make sure that you want to resume all print... file that the print job is on hold : - Using Macintosh For Mac OS X version 10.5 1 From the Finder desktop, click ΠSystem Preferences ΠPrint & Fax. 2 From the Default Printer pop-up menu. 3 Click Open Print Queue. If you want to print.
... to Set As Default Printer, then you must select the printer for each file that the print job is the default printer. b Click Printers and Faxes. If you want to resume a particular print job, choose the document name, and then click Resume. - Make sure that you want to resume all print... file that the print job is on hold : - Using Macintosh For Mac OS X version 10.5 1 From the Finder desktop, click ΠSystem Preferences ΠPrint & Fax. 2 From the Default Printer pop-up menu. 3 Click Open Print Queue. If you want to print.
User's Guide
Page 68
... Up arrow 17 C canceling print jobs 32 scan job 41 cards loading 25 cartridges, print installing 44 ordering 48 preserving 47 removing 45 using genuine Lexmark 46 wiping 46 cleaning exterior of the printer 48 copying 39 4 x 6 photos 39 custom-size paper, loading 25, 36 custom-size paper, printing 36... the printer control panel 40 E emission notices 58, 59, 60, 61, 62 envelopes loading 24, 34 printing 34 exterior of the printer cleaning 48 F fax modem 42 receiving 42 FCC notices 58, 59 finding information 8 publications 8 Web site 8 G glossy and photo paper, loading 28 glossy paper, loading 23 ...
... Up arrow 17 C canceling print jobs 32 scan job 41 cards loading 25 cartridges, print installing 44 ordering 48 preserving 47 removing 45 using genuine Lexmark 46 wiping 46 cleaning exterior of the printer 48 copying 39 4 x 6 photos 39 custom-size paper, loading 25, 36 custom-size paper, printing 36... the printer control panel 40 E emission notices 58, 59, 60, 61, 62 envelopes loading 24, 34 printing 34 exterior of the printer cleaning 48 F fax modem 42 receiving 42 FCC notices 58, 59 finding information 8 publications 8 Web site 8 G glossy and photo paper, loading 28 glossy paper, loading 23 ...
User's Guide
Page 69
...50 power supply port 16 print cartridge carrier 16 print cartridges installing 44 ordering 48 preserving 47 refilling 46 removing 45 using genuine Lexmark 46 wiping 46 print jobs, canceling 32 print settings saving and deleting 37 printer setting up without a computer 10 printer control ... 30 photos using FastPics or Productivity Studio 33 reverse page order 30 specialty documents 37 Web page 28 publications, finding 8 R receiving a fax 42 recycling WEEE statement 62 refilling print cartridges 46 removing print cartridges 45 reverse page order 30 S safety information 7 saving and deleting print...
...50 power supply port 16 print cartridge carrier 16 print cartridges installing 44 ordering 48 preserving 47 refilling 46 removing 45 using genuine Lexmark 46 wiping 46 print jobs, canceling 32 print settings saving and deleting 37 printer setting up without a computer 10 printer control ... 30 photos using FastPics or Productivity Studio 33 reverse page order 30 specialty documents 37 Web page 28 publications, finding 8 R receiving a fax 42 recycling WEEE statement 62 refilling print cartridges 46 removing print cartridges 45 reverse page order 30 S safety information 7 saving and deleting print...


