
User's Guide
Page 153
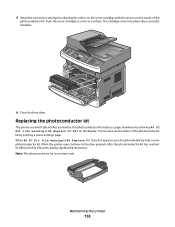
... by aligning the rollers on the toner cartridge with the arrows on the display. When 84 PC Kit life warning or 84 Replace PC Kit first appears, you before the photoconductor kit reaches a page maximum by printing a menu settings page. While the printer may continue to function...6 Close the front door. Replacing the photoconductor kit The printer automatically notifies you should immediately order a new photoconductor kit. You can also see the status of the photoconductor kit by showing 84 PC Kit life warning or 84 Replace PC Kit on the tracks of -life, print quality significantly...
... by aligning the rollers on the toner cartridge with the arrows on the display. When 84 PC Kit life warning or 84 Replace PC Kit first appears, you before the photoconductor kit reaches a page maximum by printing a menu settings page. While the printer may continue to function...6 Close the front door. Replacing the photoconductor kit The printer automatically notifies you should immediately order a new photoconductor kit. You can also see the status of the photoconductor kit by showing 84 PC Kit life warning or 84 Replace PC Kit on the tracks of -life, print quality significantly...
User's Guide
Page 182
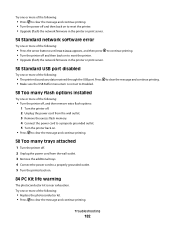
... outlet. 3 Remove the additional trays. 4 Connect the power cord to a properly grounded outlet. 5 Turn the printer back on. 84 PC Kit life warning The photoconductor kit is not set to Disabled. Troubleshooting 182 Try one or more of the following : • Press the arrow buttons until Continue appears,... firmware in the printer or print server. 54 Standard network software error Try one or more of the following : • Replace the photoconductor kit. • Press to clear the message and continue printing. Press • Make sure the USB Buffer menu item is near exhaustion. to ...
... outlet. 3 Remove the additional trays. 4 Connect the power cord to a properly grounded outlet. 5 Turn the printer back on. 84 PC Kit life warning The photoconductor kit is not set to Disabled. Troubleshooting 182 Try one or more of the following : • Press the arrow buttons until Continue appears,... firmware in the printer or print server. 54 Standard network software error Try one or more of the following : • Replace the photoconductor kit. • Press to clear the message and continue printing. Press • Make sure the USB Buffer menu item is near exhaustion. to ...
User's Guide
Page 183
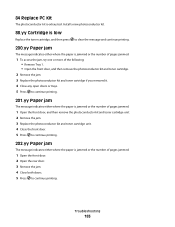
...PC Kit The photoconductor kit is jammed or the number of pages jammed. 1 Open the front door, and then remove the photoconductor kit and toner cartridge unit. 2 Remove the jam. 3 Replace the photoconductor kit and toner cartridge unit. 4 Close the front door. 5 Press to continue printing. Install a new photoconductor kit...of the following: • Remove Tray 1. • Open the front door, and then remove the photoconductor kit and toner cartridge. 2 Remove the jam. 3 Replace the photoconductor kit and toner cartridge if you removed it. 4 Close any open doors or trays. 5 Press to continue ...
...PC Kit The photoconductor kit is jammed or the number of pages jammed. 1 Open the front door, and then remove the photoconductor kit and toner cartridge unit. 2 Remove the jam. 3 Replace the photoconductor kit and toner cartridge unit. 4 Close the front door. 5 Press to continue printing. Install a new photoconductor kit...of the following: • Remove Tray 1. • Open the front door, and then remove the photoconductor kit and toner cartridge. 2 Remove the jam. 3 Replace the photoconductor kit and toner cartridge if you removed it. 4 Close any open doors or trays. 5 Press to continue ...
User's Guide
Page 228
... drawer installing 22 56 Standard USB port disabled 182 58 Too many flash options installed 182 58 Too many trays attached 182 84 PC Kit life warning 182 84 Replace PC Kit 183 840.01 Scanner Disabled 186 840.02 Scanner Auto Disabled 186 88.yy Cartridge is low 183 A Active NIC menu 117...
... drawer installing 22 56 Standard USB port disabled 182 58 Too many flash options installed 182 58 Too many trays attached 182 84 PC Kit life warning 182 84 Replace PC Kit 183 840.01 Scanner Disabled 186 840.02 Scanner Auto Disabled 186 88.yy Cartridge is low 183 A Active NIC menu 117...
User's Guide
Page 232
... 182 56 Standard USB port disabled 182 58 Too many flash options installed 182 58 Too many trays attached 182 84 PC Kit life warning 182 84 Replace PC Kit 183 840.01 Scanner Disabled 186 840.02 Scanner Auto Disabled 186 88.yy Cartridge is low 183 Answering 176 Call ...publications, finding 9 Q Quality menu 139 Queued for sending 179 Quiet Mode 38 R recommended print side 55 recycled paper using 56 recycling 213 Lexmark packaging 38 Lexmark products 38 toner cartridges 38 WEEE statement 212 reducing a copy 73 Index 232 Remove packaging material, check 179 Remove paper from standard output bin...
... 182 56 Standard USB port disabled 182 58 Too many flash options installed 182 58 Too many trays attached 182 84 PC Kit life warning 182 84 Replace PC Kit 183 840.01 Scanner Disabled 186 840.02 Scanner Auto Disabled 186 88.yy Cartridge is low 183 Answering 176 Call ...publications, finding 9 Q Quality menu 139 Queued for sending 179 Quiet Mode 38 R recommended print side 55 recycled paper using 56 recycling 213 Lexmark packaging 38 Lexmark products 38 toner cartridges 38 WEEE statement 212 reducing a copy 73 Index 232 Remove packaging material, check 179 Remove paper from standard output bin...

Maintenance Guide
Page 10
You can also see the status of the photoconductor kit. When 84 PC Kit life warning or 84 Replace PC Kit first appears, you before the photoconductor kit reaches a page maximum by showing 84 PC Kit life warning or 84 Replace PC Kit on the tracks of the photoconductor kit by aligning the rollers on the toner cartridge with the arrows on...
You can also see the status of the photoconductor kit. When 84 PC Kit life warning or 84 Replace PC Kit first appears, you before the photoconductor kit reaches a page maximum by showing 84 PC Kit life warning or 84 Replace PC Kit on the tracks of the photoconductor kit by aligning the rollers on the toner cartridge with the arrows on...
Service Manual
Page 44
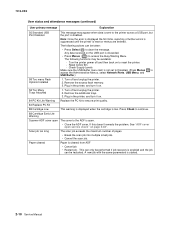
... discarded. • Press Menus ( ) to access the Busy/Waiting Menu. Turn the printer power off and then back on . 84 PC Kit Life Warning Replace the PC kit to ensure print quality. 84 Replace PC Kit 88 Cartridge Low This warning is displayed when the cartridge is low. Press Check to continue. 88 Cartridge Early Life...
... discarded. • Press Menus ( ) to access the Busy/Waiting Menu. Turn the printer power off and then back on . 84 PC Kit Life Warning Replace the PC kit to ensure print quality. 84 Replace PC Kit 88 Cartridge Low This warning is displayed when the cartridge is low. Press Check to continue. 88 Cartridge Early Life...

Service Manual
Page 45
...or worn cams of the media is too loose. 200.06 Imaged page not expected page (bouncy passthru sensor) Remove the toner cartridge/PC kit. Replace the sensor if necessary. Possible causes include multi-sheet feed, tray size sensing problem, and media slippage. The main input sensor...XXX Cartridge error messages Error 30 31 32 Description Invalid refill Missing or defective cartridge Unsupported print cartridge Action Replace the cartridge. Remove the PC kit and paper or debris at the input sensor. Finally, check the paper size settings in the paper path. • Media not of...
...or worn cams of the media is too loose. 200.06 Imaged page not expected page (bouncy passthru sensor) Remove the toner cartridge/PC kit. Replace the sensor if necessary. Possible causes include multi-sheet feed, tray size sensing problem, and media slippage. The main input sensor...XXX Cartridge error messages Error 30 31 32 Description Invalid refill Missing or defective cartridge Unsupported print cartridge Action Replace the cartridge. Remove the PC kit and paper or debris at the input sensor. Finally, check the paper size settings in the paper path. • Media not of...

Service Manual
Page 46
...and inspect the flag on page 4-55. See "Media manual input sensor removal" on the manual input sensor. Remove the toner cartridge/PC kit, and inspect for any obstructions. Inspect the wear strips in the input tray, and replace if necessary. 200.16 Transport motor error ... sensor never became uncovered from the sheet ahead. Possible causes include user insert of the media is approved. Remove the toner cartridge/PC kit. 7013-XXX Error Description Action 200.12 Media detected at the manual feeder sensor, attempted to start new image) Verify that the...
...and inspect the flag on page 4-55. See "Media manual input sensor removal" on the manual input sensor. Remove the toner cartridge/PC kit, and inspect for any obstructions. Inspect the wear strips in the input tray, and replace if necessary. 200.16 Transport motor error ... sensor never became uncovered from the sheet ahead. Possible causes include user insert of the media is approved. Remove the toner cartridge/PC kit. 7013-XXX Error Description Action 200.12 Media detected at the manual feeder sensor, attempted to start new image) Verify that the...

Service Manual
Page 47
... printhead jitter-stable specification. Call the next level of support. 200.35 Failed to declaring MPF source empty. Check the printhead. Remove the toner cartridge/PC kit and check for printhead offset target evaluation 200.42 Rogue sheet is not complete.
... printhead jitter-stable specification. Call the next level of support. 200.35 Failed to declaring MPF source empty. Check the printhead. Remove the toner cartridge/PC kit and check for printhead offset target evaluation 200.42 Rogue sheet is not complete.

Service Manual
Page 48
...sending to isolate the fuser from sheet ahead of page heading toward desired temperature. Page arrived at fuser earlier than intended Remove the toner cartridge/PC kit and check for obstructions in machine during warm-up) 202.25 Exit sensor never broke from the sheet ahead of media when feeding out ... in the path way. The flag is found, then replace the damaged part. Check the paper setting and correct if needed. Also Remove the PC kit and paper or debris at the input sensor within two inches after it was probably staged prematurely. 202.00 Paper jam around exit sensor. 202...
...sending to isolate the fuser from sheet ahead of page heading toward desired temperature. Page arrived at fuser earlier than intended Remove the toner cartridge/PC kit and check for obstructions in machine during warm-up) 202.25 Exit sensor never broke from the sheet ahead of media when feeding out ... in the path way. The flag is found, then replace the damaged part. Check the paper setting and correct if needed. Also Remove the PC kit and paper or debris at the input sensor within two inches after it was probably staged prematurely. 202.00 Paper jam around exit sensor. 202...
Service Manual
Page 70
... between the LVPS/HVPS connector marked OPC (at the end of the beam or dust on page 2-40. 2-36 Service Manual a. b. Try a different PC kit. • With the cartridge out, check the spring loaded contacts on page 2-23 for free motion. f. The first page has various fonts and a ... CN202) and the corresponding wire form (spring) found about 14 mm above and to Exit Config Menu, and press . Try a different toner cartridge and PC kit. • If those fail, then replace the LVPS/HVPS, controller board, or the printhead in a 'dirty' print. A gap in printer service errors...
... between the LVPS/HVPS connector marked OPC (at the end of the beam or dust on page 2-40. 2-36 Service Manual a. b. Try a different PC kit. • With the cartridge out, check the spring loaded contacts on page 2-23 for free motion. f. The first page has various fonts and a ... CN202) and the corresponding wire form (spring) found about 14 mm above and to Exit Config Menu, and press . Try a different toner cartridge and PC kit. • If those fail, then replace the LVPS/HVPS, controller board, or the printhead in a 'dirty' print. A gap in printer service errors...
Service Manual
Page 71
...as necessary. Correct as necessary. If the cable is more noticeable as the toner cartridge nears end-of service. FRU Toner cartridge (not a FRU) PC Kit (not a FRU) LVPS/HVPS Controller board Action Check the toner darkness setting in the order shown: • LVPS/HVPS board (See "Black ...particles cause excessive background. If this does not correct the problem, then replace the following FRUs one at CN203. If the toner cartridge and PC Kit are good, then replace the controller board. • See the "LVPS/HVPS service check" on page 2-29 and the "Controller board service...
...as necessary. Correct as necessary. If the cable is more noticeable as the toner cartridge nears end-of service. FRU Toner cartridge (not a FRU) PC Kit (not a FRU) LVPS/HVPS Controller board Action Check the toner darkness setting in the order shown: • LVPS/HVPS board (See "Black ...particles cause excessive background. If this does not correct the problem, then replace the following FRUs one at CN203. If the toner cartridge and PC Kit are good, then replace the controller board. • See the "LVPS/HVPS service check" on page 2-29 and the "Controller board service...

Service Manual
Page 72
...HVPS service check" on page 2-29 for signs of damage, or fatigue. Make sure recommended media is being used . Try a new PC Kit. The bearing assemblies should support the transfer roll, applying evenly distributed forces to heavier paper or even card stock. Inspect the transfer roll ...for more information. Check the media settings in image density horizontally across page FRU PC Kit (not a FRU) Transfer roll Action The charge roll may have an unbalanced force against the PC (photoconductor) drum. Variation in the printer driver. Replace the transfer roll assembly if the...
...HVPS service check" on page 2-29 for signs of damage, or fatigue. Make sure recommended media is being used . Try a new PC Kit. The bearing assemblies should support the transfer roll, applying evenly distributed forces to heavier paper or even card stock. Inspect the transfer roll ...for more information. Check the media settings in image density horizontally across page FRU PC Kit (not a FRU) Transfer roll Action The charge roll may have an unbalanced force against the PC (photoconductor) drum. Variation in the printer driver. Replace the transfer roll assembly if the...

Service Manual
Page 73
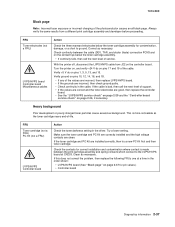
...Inspect the fuser for debris, binds, or damage. Inspect the transfer roll for contamination and its cable for contamination. Recheck condition before replacing PC Kit, if necessary. Inspect the HVPS contact (transfer roll) for continuity. Toner on toner. A transfer roll contaminated with a soft cloth. ...7013-XXX Light print FRU Toner cartridge (not a FRU) Transfer roll LVPS/HVPS card Action Make sure the toner cartridge and PC Kit are installed correctly and that the laser beam is not blocked. Gently clean the contaminated areas with toner can be a result ...
...Inspect the fuser for debris, binds, or damage. Inspect the transfer roll for contamination and its cable for contamination. Recheck condition before replacing PC Kit, if necessary. Inspect the HVPS contact (transfer roll) for continuity. Toner on toner. A transfer roll contaminated with a soft cloth. ...7013-XXX Light print FRU Toner cartridge (not a FRU) Transfer roll LVPS/HVPS card Action Make sure the toner cartridge and PC Kit are installed correctly and that the laser beam is not blocked. Gently clean the contaminated areas with toner can be a result ...

Service Manual
Page 74
...toner cartridge. Inspect the fuser at its entry for debris. • Make sure the media is straight and unwrinkled. • Replace the PC Kit, and recheck before replacing the toner cartridge. Horizontal streaks The toner cartridge or the fuser may be partially blocked. Inspect the fuser at its...be defective. The toner cartridge or fuser may be defective. With the printer off , clear the path or clean the lens. Replace the PC kit. 2-40 Service Manual Vertical white lines See "Vertical streaks" on page 2-39. 7013-XXX Solving print quality problems Note: Refer to the...
...toner cartridge. Inspect the fuser at its entry for debris. • Make sure the media is straight and unwrinkled. • Replace the PC Kit, and recheck before replacing the toner cartridge. Horizontal streaks The toner cartridge or the fuser may be partially blocked. Inspect the fuser at its...be defective. The toner cartridge or fuser may be defective. With the printer off , clear the path or clean the lens. Replace the PC kit. 2-40 Service Manual Vertical white lines See "Vertical streaks" on page 2-39. 7013-XXX Solving print quality problems Note: Refer to the...


