User's Guide
Page 59
... is blinking, see "Removing and reinstalling the software" on page 72. 2 If the software still does not install correctly, visit our Web site at www.lexmark.com to install the software. 1 Uninstall the printer software, and then reinstall it. The USB port is marked with the USB symbol. 1 Turn off . 2 Disconnect... supply to the printer. 5 Plug the power cord into the USB port of the lights is not lit" on the computer screen to check for drivers or downloads.
... is blinking, see "Removing and reinstalling the software" on page 72. 2 If the software still does not install correctly, visit our Web site at www.lexmark.com to install the software. 1 Uninstall the printer software, and then reinstall it. The USB port is marked with the USB symbol. 1 Turn off . 2 Disconnect... supply to the printer. 5 Plug the power cord into the USB port of the lights is not lit" on the computer screen to check for drivers or downloads.
User's Guide
Page 60
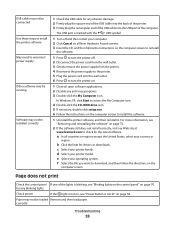
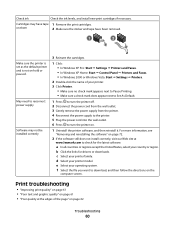
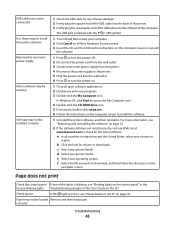
... supply from the printer. 4 Reconnect the power supply to the printer. 5 Plug the power cord into the wall outlet. 6 Press to check for drivers or downloads. Print troubleshooting • "Improving print quality" on page 61 • "Poor text and graphic quality" on page 62 Troubleshooting 60 Cartridges... Vista: Start Œ Settings Œ Printers. 2 Double-click the name of the page" on page 61 • "Poor quality at www.lexmark.com to turn the printer on hold or paused. May need to download, and then follow the directions on them 2 Make sure the sticker and...
... supply from the printer. 4 Reconnect the power supply to the printer. 5 Plug the power cord into the wall outlet. 6 Press to check for drivers or downloads. Print troubleshooting • "Improving print quality" on page 61 • "Poor text and graphic quality" on page 62 Troubleshooting 60 Cartridges... Vista: Start Œ Settings Œ Printers. 2 Double-click the name of the page" on page 61 • "Poor quality at www.lexmark.com to turn the printer on hold or paused. May need to download, and then follow the directions on them 2 Make sure the sticker and...
Getting Started
Page 43
.... 1 Turn off . 2 Disconnect the power cord from the wall outlet. 3 Gently remove the power supply from the printer. 4 Reconnect the power supply to check for drivers or downloads. c Select your computer. 2 Click Cancel on all New Hardware Found screens. 3 Insert the CD, and then follow the directions on the computer screen... want to download, and then follow the instructions on page 55. 2 If the software still does not install correctly, visit our Web site at www.lexmark.com to the printer. 5 Plug the power cord into the USB port of the User's Guide on the CD.
.... 1 Turn off . 2 Disconnect the power cord from the wall outlet. 3 Gently remove the power supply from the printer. 4 Reconnect the power supply to check for drivers or downloads. c Select your computer. 2 Click Cancel on all New Hardware Found screens. 3 Insert the CD, and then follow the directions on the computer screen... want to download, and then follow the instructions on page 55. 2 If the software still does not install correctly, visit our Web site at www.lexmark.com to the printer. 5 Plug the power cord into the USB port of the User's Guide on the CD.
Getting Started
Page 44
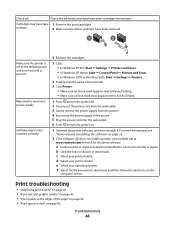
...the name of the page" on page 46 • "Print speed is not on the computer screen. f Select the file you want to check for drivers or downloads. Print troubleshooting • "Improving print quality" on page 45 • "Poor text and graphic quality" on page 45 • "Poor quality... at www.lexmark.com to download, and then follow the directions on hold or paused. Check ink Check the ink levels, and install new print cartridges if necessary. ...
...the name of the page" on page 46 • "Print speed is not on the computer screen. f Select the file you want to check for drivers or downloads. Print troubleshooting • "Improving print quality" on page 45 • "Poor text and graphic quality" on page 45 • "Poor quality... at www.lexmark.com to download, and then follow the directions on hold or paused. Check ink Check the ink levels, and install new print cartridges if necessary. ...


