User's Guide
Page 7
...; A Readme file This file provides last-minute updates about technical changes to the All-In-One. Lexmark Imaging Studio - Finding more information The Lexmark™ 2300 Series All-In-One comes with helpful resources. Resource Setup sheet CD Lexmark Web site Description Instructions on how to set up the hardware and software and information on...
...; A Readme file This file provides last-minute updates about technical changes to the All-In-One. Lexmark Imaging Studio - Finding more information The Lexmark™ 2300 Series All-In-One comes with helpful resources. Resource Setup sheet CD Lexmark Web site Description Instructions on how to set up the hardware and software and information on...
User's Guide
Page 12
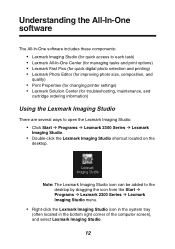
...; Lexmark 2300 Series Æ Lexmark Imaging Studio menu. • Right-click the Lexmark Imaging Studio icon in the system tray (often located in the bottom right corner of the computer screen), and select Lexmark Imaging Studio. 12 Note: The Lexmark Imaging Studio icon can be added to open the Lexmark Imaging Studio: • Click Start Æ Programs Æ Lexmark 2300 Series Æ Lexmark Imaging Studio. • Double-click the Lexmark Imaging Studio shortcut...
...; Lexmark 2300 Series Æ Lexmark Imaging Studio menu. • Right-click the Lexmark Imaging Studio icon in the system tray (often located in the bottom right corner of the computer screen), and select Lexmark Imaging Studio. 12 Note: The Lexmark Imaging Studio icon can be added to open the Lexmark Imaging Studio: • Click Start Æ Programs Æ Lexmark 2300 Series Æ Lexmark Imaging Studio. • Double-click the Lexmark Imaging Studio shortcut...
User's Guide
Page 13
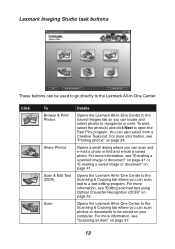
...more information, see "Printing photos" on your computer. For more information, see "E-mailing a scanned image or document" on page 41 or "E-mailing a saved image or document" on page 41. Opens the Lexmark All-in-One Center to the Scanning & Copying tab where you can scan text to be used ... Text (OCR) Scan Details Opens the Lexmark All-In-One Center to the Saved Images tab so you can scan and e-mail a photo or find and e-mail a saved photo. To print, select the photo(s) and click Next to reorganize or print. Lexmark Imaging Studio task buttons These buttons can be stored ...
...more information, see "Printing photos" on your computer. For more information, see "E-mailing a scanned image or document" on page 41 or "E-mailing a saved image or document" on page 41. Opens the Lexmark All-in-One Center to the Scanning & Copying tab where you can scan text to be used ... Text (OCR) Scan Details Opens the Lexmark All-In-One Center to the Saved Images tab so you can scan and e-mail a photo or find and e-mail a saved photo. To print, select the photo(s) and click Next to reorganize or print. Lexmark Imaging Studio task buttons These buttons can be stored ...
User's Guide
Page 15
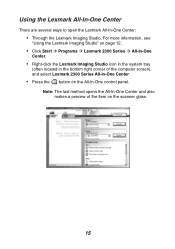
...preview of the computer screen), and select Lexmark 2300 Series All-In-One Center. • Press the button on the scanner glass. 15 For more information, see "Using the Lexmark Imaging Studio" on page 12. • Click Start Æ Programs Æ Lexmark 2300 Series Æ All-In-One ...Center. • Right-click the Lexmark Imaging Studio icon in the system tray (often located in the bottom right corner...
...preview of the computer screen), and select Lexmark 2300 Series All-In-One Center. • Press the button on the scanner glass. 15 For more information, see "Using the Lexmark Imaging Studio" on page 12. • Click Start Æ Programs Æ Lexmark 2300 Series Æ All-In-One ...Center. • Right-click the Lexmark Imaging Studio icon in the system tray (often located in the bottom right corner...
User's Guide
Page 25
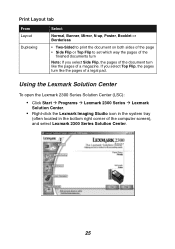
... Series Solution Center (LSC): • Click Start Æ Programs Æ Lexmark 2300 Series Æ Lexmark Solution Center. • Right-click the Lexmark Imaging Studio icon in the system tray (often located in the bottom right corner of a legal pad. Print Layout tab From Layout Duplexing Select Normal, Banner, Mirror, ... pages of the finished documents turn Note: If you select Top Flip, the pages turn like the pages of the computer screen), and select Lexmark 2300 Series Solution Center. 25 If you select Side Flip, the pages of the document turn like the pages of a magazine.
... Series Solution Center (LSC): • Click Start Æ Programs Æ Lexmark 2300 Series Æ Lexmark Solution Center. • Right-click the Lexmark Imaging Studio icon in the system tray (often located in the bottom right corner of a legal pad. Print Layout tab From Layout Duplexing Select Normal, Banner, Mirror, ... pages of the finished documents turn Note: If you select Top Flip, the pages turn like the pages of the computer screen), and select Lexmark 2300 Series Solution Center. 25 If you select Side Flip, the pages of the document turn like the pages of a magazine.
User's Guide
Page 41
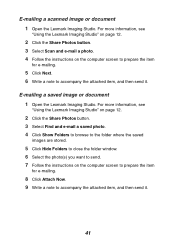
... item for e-mailing. 8 Click Attach Now. 9 Write a note to accompany the attached item, and then send it . 41 E-mailing a scanned image or document 1 Open the Lexmark Imaging Studio. For more information, see "Using the Lexmark Imaging Studio" on page 12. 2 Click the Share Photos button. 3 Select Scan and e-mail a photo. 4 Follow the instructions on the computer screen...
... item for e-mailing. 8 Click Attach Now. 9 Write a note to accompany the attached item, and then send it . 41 E-mailing a scanned image or document 1 Open the Lexmark Imaging Studio. For more information, see "Using the Lexmark Imaging Studio" on page 12. 2 Click the Share Photos button. 3 Select Scan and e-mail a photo. 4 Follow the instructions on the computer screen...
User's Guide
Page 42
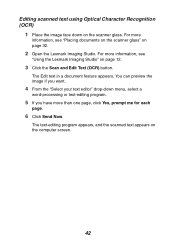
... on the scanner glass. For more information, see "Placing documents on the scanner glass" on page 32. 2 Open the Lexmark Imaging Studio. You can preview the image if you have more information, see "Using the Lexmark Imaging Studio" on the computer screen. 42 The text-editing program appears, and the scanned text appears on page 12. 3 Click...
... on the scanner glass. For more information, see "Placing documents on the scanner glass" on page 32. 2 Open the Lexmark Imaging Studio. You can preview the image if you have more information, see "Using the Lexmark Imaging Studio" on the computer screen. 42 The text-editing program appears, and the scanned text appears on page 12. 3 Click...

User's Guide
Page 44
...; Lighten or darken the document. 5 Click Display Advanced Copy Settings to change options such as paper size or quality. For more information, see "Using the Lexmark Imaging Studio" on page 45. 6 When you are finished customizing the copy settings, click OK. 7 On the main page, click Copy Now. 44 Changing copy settings 1 Open...
...; Lighten or darken the document. 5 Click Display Advanced Copy Settings to change options such as paper size or quality. For more information, see "Using the Lexmark Imaging Studio" on page 45. 6 When you are finished customizing the copy settings, click OK. 7 On the main page, click Copy Now. 44 Changing copy settings 1 Open...
User's Guide
Page 47
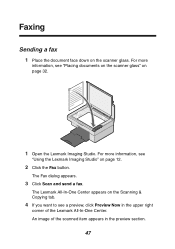
An image of the Lexmark All-In-One Center. The Fax dialog appears. 3 Click Scan and send a fax. Faxing Sending a fax 1 Place the document face down on page 32. 1 Open the Lexmark Imaging Studio. For more information, see "Using the Lexmark Imaging Studio" on page 12. 2 Click the Fax button. For more information, see a preview, click Preview Now in the upper right corner of the scanned item appears in the preview section. 47 The Lexmark All-In-One Center appears on the Scanning & Copying tab. 4 If you want to see "Placing documents on the scanner glass" on the scanner glass.
An image of the Lexmark All-In-One Center. The Fax dialog appears. 3 Click Scan and send a fax. Faxing Sending a fax 1 Place the document face down on page 32. 1 Open the Lexmark Imaging Studio. For more information, see "Using the Lexmark Imaging Studio" on page 12. 2 Click the Fax button. For more information, see a preview, click Preview Now in the upper right corner of the scanned item appears in the preview section. 47 The Lexmark All-In-One Center appears on the Scanning & Copying tab. 4 If you want to see "Placing documents on the scanner glass" on the scanner glass.
User's Guide
Page 48
For more information, see "Using the Lexmark Imaging Studio" on the computer screen to print the fax. 48 Note: Faxes can be received only when the fax software is received, you can double-click ... the fax software. Note: This is only a quick preview. The Fax dialog appears. 3 Click Receive a fax or view settings/history to receive a fax: 1 Open the Lexmark Imaging Studio. You scan the image in the status window to view it. 4 Click the printer icon to complete the task.
For more information, see "Using the Lexmark Imaging Studio" on the computer screen to print the fax. 48 Note: Faxes can be received only when the fax software is received, you can double-click ... the fax software. Note: This is only a quick preview. The Fax dialog appears. 3 Click Receive a fax or view settings/history to receive a fax: 1 Open the Lexmark Imaging Studio. You scan the image in the status window to view it. 4 Click the printer icon to complete the task.
User's Guide
Page 75
..., 4x6 46 Creative Tasks section 16, 17 customizing print settings 33 E editing document text (OCR) 42 graphics 20 e-mailing document 41 image 41 emission statement 72 envelopes 31 error messages Ink Low 71 Paper Jam 71 Paper Out 71 F Fast Pics 18 faxing receiving 48 sending... 54 software 64 iron-on transfers 28 J jams and misfeeds 65 L Lexmark All-In-One Center 15 Lexmark Fast Pics 18 Lexmark Imaging Studio 13 Lexmark Photo Editor 20 Lexmark products ordering 60 recycling 60 Lexmark Solution Center (LSC) 25 Lexmark Solution Center tabs Advanced 26 Contact Information 26 How To 26 Maintenance 26...
..., 4x6 46 Creative Tasks section 16, 17 customizing print settings 33 E editing document text (OCR) 42 graphics 20 e-mailing document 41 image 41 emission statement 72 envelopes 31 error messages Ink Low 71 Paper Jam 71 Paper Out 71 F Fast Pics 18 faxing receiving 48 sending... 54 software 64 iron-on transfers 28 J jams and misfeeds 65 L Lexmark All-In-One Center 15 Lexmark Fast Pics 18 Lexmark Imaging Studio 13 Lexmark Photo Editor 20 Lexmark products ordering 60 recycling 60 Lexmark Solution Center (LSC) 25 Lexmark Solution Center tabs Advanced 26 Contact Information 26 How To 26 Maintenance 26...

User's Guide
Page 77
...Lexmark Fast Pics 18 Lexmark Imaging Studio 13 Lexmark Photo Editor 20 Lexmark Solution Center 25 Print Properties 22 reinstalling 64 removing 64 understanding 12 uninstalling 64 specialty paper banner paper 29 envelopes 31 greeting cards 29 photo/glossy paper 28 postcards 29 transparencies 30 supplies ordering 60 recycling 60 install 62 Troubleshooting tab 26 U understanding Lexmark... Solution Center 25 Print Properties 22 uninstalling software 64 USB cable 60 W Web site, Lexmark 60 wiping print cartridge nozzles 58 T top ...
...Lexmark Fast Pics 18 Lexmark Imaging Studio 13 Lexmark Photo Editor 20 Lexmark Solution Center 25 Print Properties 22 reinstalling 64 removing 64 understanding 12 uninstalling 64 specialty paper banner paper 29 envelopes 31 greeting cards 29 photo/glossy paper 28 postcards 29 transparencies 30 supplies ordering 60 recycling 60 install 62 Troubleshooting tab 26 U understanding Lexmark... Solution Center 25 Print Properties 22 uninstalling software 64 USB cable 60 W Web site, Lexmark 60 wiping print cartridge nozzles 58 T top ...


