
User's Guide
Page 4
This guide tells you for purchasing a Lexmark X1100 Series All-In-One! Removing and reinstalling the software 26 Other help sources 26 Thank you how to perform printing, copying, scanning, and faxing tasks. Congratulations on the market today. The Lexmark™ X1100 Series All-In-One combines the functionality of an inkjet printer, a scanner, a copier, and a fax machine all into a single, multifunction device, making it one of the most exciting products on your purchase. iv Also included are sections describing the All-In-One software and troubleshooting information.
This guide tells you for purchasing a Lexmark X1100 Series All-In-One! Removing and reinstalling the software 26 Other help sources 26 Thank you how to perform printing, copying, scanning, and faxing tasks. Congratulations on the market today. The Lexmark™ X1100 Series All-In-One combines the functionality of an inkjet printer, a scanner, a copier, and a fax machine all into a single, multifunction device, making it one of the most exciting products on your purchase. iv Also included are sections describing the All-In-One software and troubleshooting information.
User's Guide
Page 5
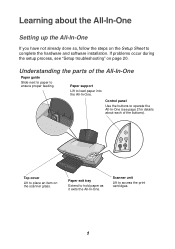
... Setting up the All-In-One If you have not already done so, follow the steps on the Setup Sheet to complete the hardware and software installation. Scanner unit Lift to load paper into the All-In-One. Control panel Use the buttons to operate the All-In-One (see "Setup troubleshooting..." on the scanner glass. Paper support Lift to access the print cartridges. 1 Top cover Lift to place an item on page 20. Paper exit tray Extend to hold...
... Setting up the All-In-One If you have not already done so, follow the steps on the Setup Sheet to complete the hardware and software installation. Scanner unit Lift to load paper into the All-In-One. Control panel Use the buttons to operate the All-In-One (see "Setup troubleshooting..." on the scanner glass. Paper support Lift to access the print cartridges. 1 Top cover Lift to place an item on page 20. Paper exit tray Extend to hold...
User's Guide
Page 18
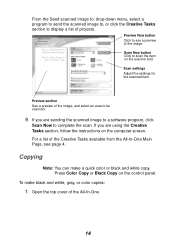
Preview Now button Click to scan the item on the scanner bed. Scan settings Adjust the settings for the scanned item. Copying Note: You can make black and white, gray, or color copies: 1 Open the top ... All-In-One Main Page, see a preview of the image, and select an area to be scanned. 9 If you are sending the scanned image to a software program, click Scan Now to display a list of the All-In-One. 14 Preview section See a preview of the image. From the Send scanned image...
Preview Now button Click to scan the item on the scanner bed. Scan settings Adjust the settings for the scanned item. Copying Note: You can make black and white, gray, or color copies: 1 Open the top ... All-In-One Main Page, see a preview of the image, and select an area to be scanned. 9 If you are sending the scanned image to a software program, click Scan Now to display a list of the All-In-One. 14 Preview section See a preview of the image. From the Send scanned image...
User's Guide
Page 34
......section 5 voice notification turning on the glass 13 settings, saving for future use 7 setup 1 setup troubleshooting 20 software reinstalling 26 removing 26 sound, see voice notification Status tab 8 T top cover 1 transparencies 10 troubleshooting copying problems ...printing 10 banners 6 envelopes 6 photos 6 posters 6 Printing Status window changing appearance of 9 Q Quality/Copies tab 7 R reinstalling software 26 removing software 26 S safety information ii Save Settings menu 7 saved images viewing 5 Scan button 2 scan settings 4 scanner unit 1 scanning 13 placing an item on or off 9 30
......section 5 voice notification turning on the glass 13 settings, saving for future use 7 setup 1 setup troubleshooting 20 software reinstalling 26 removing 26 sound, see voice notification Status tab 8 T top cover 1 transparencies 10 troubleshooting copying problems ...printing 10 banners 6 envelopes 6 photos 6 posters 6 Printing Status window changing appearance of 9 Q Quality/Copies tab 7 R reinstalling software 26 removing software 26 S safety information ii Save Settings menu 7 saved images viewing 5 Scan button 2 scan settings 4 scanner unit 1 scanning 13 placing an item on or off 9 30


