

Setup Sheet
Page 1
... is on . Lift the paper support, and extend the paper exit tray. 1 2 Load paper and adjust the paper guide. Monday-Friday (9:00 AM-9:00 PM EST) Saturday (Noon-6:00 PM EST) Phone number and support times may change without notice. Lift the scanner unit. CAUTION: Do not use the fax feature during a lightning storm. Turn your User's Guide. 2 Visit our Web site. X1100 Series All-In-One For more help: 1 Refer to a professional service person.
... is on . Lift the paper support, and extend the paper exit tray. 1 2 Load paper and adjust the paper guide. Monday-Friday (9:00 AM-9:00 PM EST) Saturday (Noon-6:00 PM EST) Phone number and support times may change without notice. Lift the scanner unit. CAUTION: Do not use the fax feature during a lightning storm. Turn your User's Guide. 2 Visit our Web site. X1100 Series All-In-One For more help: 1 Refer to a professional service person.
User's Guide
Page 2
... that the manufacturer intends to make any way it operates. In the United Kingdom and Eire, send to you supply in conjunction with this product or make these changes will be addressed to a professional service person. Lexmark may be used instead. Any reference to a product, program, or service is near the product and easily accessible. • Refer service or repairs, other countries, contact your...
... that the manufacturer intends to make any way it operates. In the United Kingdom and Eire, send to you supply in conjunction with this product or make these changes will be addressed to a professional service person. Lexmark may be used instead. Any reference to a product, program, or service is near the product and easily accessible. • Refer service or repairs, other countries, contact your...
User's Guide
Page 5
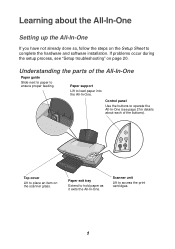
... the Setup Sheet to load paper into the All-In-One. Learning about each of the All-In-One Paper guide Slide next to paper to access the print cartridges. 1 Paper exit tray Extend to place an item on page 20. Top cover Lift to hold paper as it exits the All-In-One. Scanner unit Lift to ensure proper feeding. Control panel Use the buttons to operate the All-In-One (see "Setup troubleshooting...
... the Setup Sheet to load paper into the All-In-One. Learning about each of the All-In-One Paper guide Slide next to paper to access the print cartridges. 1 Paper exit tray Extend to place an item on page 20. Top cover Lift to hold paper as it exits the All-In-One. Scanner unit Lift to ensure proper feeding. Control panel Use the buttons to operate the All-In-One (see "Setup troubleshooting...
User's Guide
Page 6
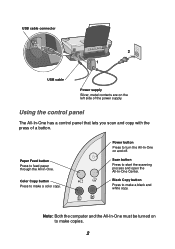
...-One has a control panel that lets you scan and copy with the press of the power supply. Scan button Press to turn the All-In-One on and off. Note: Both the computer and the All-In-One must be turned on to make copies. 2 Paper Feed button Press to make a black and white copy. Color Copy button Press to make a color copy. Black Copy button Press to feed paper through the All-In-One. USB cable connector 2 1 USB cable Power supply Silver...
...-One has a control panel that lets you scan and copy with the press of the power supply. Scan button Press to turn the All-In-One on and off. Note: Both the computer and the All-In-One must be turned on to make copies. 2 Paper Feed button Press to make a black and white copy. Color Copy button Press to make a color copy. Black Copy button Press to feed paper through the All-In-One. USB cable connector 2 1 USB cable Power supply Silver...
User's Guide
Page 8
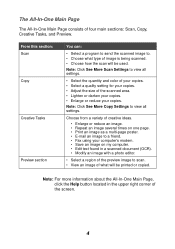
... Scan Settings to a friend. • Fax using your copies. Choose from a variety of creative ideas. • Enlarge or reduce an image. • Repeat an image several times on one page. • Print an image as a multi-page poster. • E-mail an image to view all settings. Note: For more information about the All-In-One Main Page, click the Help button located in a scanned document (OCR). • Modify an image with a photo...
... Scan Settings to a friend. • Fax using your copies. Choose from a variety of creative ideas. • Enlarge or reduce an image. • Repeat an image several times on one page. • Print an image as a multi-page poster. • E-mail an image to view all settings. Note: For more information about the All-In-One Main Page, click the Help button located in a scanned document (OCR). • Modify an image with a photo...
User's Guide
Page 10
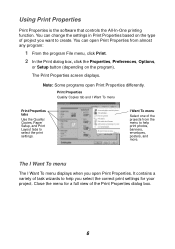
... menu Print Properties tabs Use the Quality/ Copies, Paper Setup, and Print Layout tabs to create. Using Print Properties Print Properties is the software that controls the All-In-One printing function. Print Properties Quality Copies tab and I Want To menu Select one of task wizards to help you select the correct print settings for a full view of project you open Print Properties. Note: Some programs open Print Properties from the menu to help print photos, banners, envelopes...
... menu Print Properties tabs Use the Quality/ Copies, Paper Setup, and Print Layout tabs to create. Using Print Properties Print Properties is the software that controls the All-In-One printing function. Print Properties Quality Copies tab and I Want To menu Select one of task wizards to help you select the correct print settings for a full view of project you open Print Properties. Note: Some programs open Print Properties from the menu to help print photos, banners, envelopes...
User's Guide
Page 11
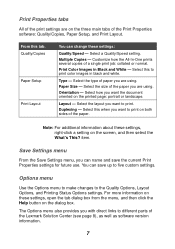
... software: Quality/Copies, Paper Setup, and Print Layout. Print Properties tabs All of the print settings are using . Type - Orientation - Duplexing - Print Color Images in black and white. Options menu Use the Options menu to make changes to different parts of paper you with direct links to the Quality Options, Layout Options, and Printing Status Options settings. From this tab: Quality/Copies Paper Setup Print Layout You can name and save up to print. Multiple Copies - Select the type of the Lexmark Solution Center (see page...
... software: Quality/Copies, Paper Setup, and Print Layout. Print Properties tabs All of the print settings are using . Type - Orientation - Duplexing - Print Color Images in black and white. Options menu Use the Options menu to make changes to different parts of paper you with direct links to the Quality Options, Layout Options, and Printing Status Options settings. From this tab: Quality/Copies Paper Setup Print Layout You can name and save up to print. Multiple Copies - Select the type of the Lexmark Solution Center (see page...
User's Guide
Page 12
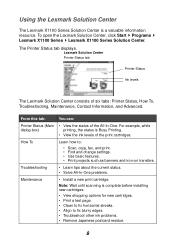
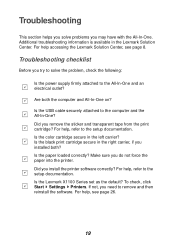
...; Clean to fix horizontal streaks. • Align to : • Scan, copy, fax, and print. • Find and change settings. • Use basic features. • Print projects such as banners and iron-on transfers. Lexmark Solution Center Printer Status tab Printer Status Ink levels The Lexmark Solution Center consists of six tabs: Printer Status, How To, Troubleshooting, Maintenance, Contact Information, and Advanced. Troubleshooting • Learn tips about the current status. • Solve All-In-One problems. Maintenance • Install a new print cartridge. To open...
...; Clean to fix horizontal streaks. • Align to : • Scan, copy, fax, and print. • Find and change settings. • Use basic features. • Print projects such as banners and iron-on transfers. Lexmark Solution Center Printer Status tab Printer Status Ink levels The Lexmark Solution Center consists of six tabs: Printer Status, How To, Troubleshooting, Maintenance, Contact Information, and Advanced. Troubleshooting • Learn tips about the current status. • Solve All-In-One problems. Maintenance • Install a new print cartridge. To open...
User's Guide
Page 18
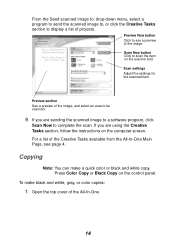
... a software program, click Scan Now to display a list of the All-In-One. 14 To make a quick color or black and white copy. If you are using the Creative Tasks section, follow the instructions on the control panel. Press Color Copy or Black Copy on the computer screen. From the Send scanned image to: drop-down menu, select a program to send the scanned image to, or click the Creative Tasks section to complete the scan. Scan settings Adjust...
... a software program, click Scan Now to display a list of the All-In-One. 14 To make a quick color or black and white copy. If you are using the Creative Tasks section, follow the instructions on the control panel. Press Color Copy or Black Copy on the computer screen. From the Send scanned image to: drop-down menu, select a program to send the scanned image to, or click the Creative Tasks section to complete the scan. Scan settings Adjust...
User's Guide
Page 21
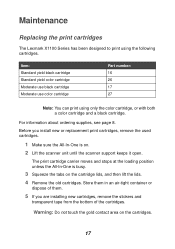
... print cartridges The Lexmark X1100 Series has been designed to print using only the color cartridge, or with both a color cartridge and a black cartridge. Before you are installing new cartridges, remove the stickers and transparent tape from the bottom of the cartridges. The print cartridge carrier moves and stops at the loading position unless the All-In-One is on. 2 Lift the scanner unit until the scanner support keeps it open. Item: Standard yield black cartridge Standard yield color cartridge Moderate use black cartridge Moderate use color cartridge Part number...
... print cartridges The Lexmark X1100 Series has been designed to print using only the color cartridge, or with both a color cartridge and a black cartridge. Before you are installing new cartridges, remove the stickers and transparent tape from the bottom of the cartridges. The print cartridge carrier moves and stops at the loading position unless the All-In-One is on. 2 Lift the scanner unit until the scanner support keeps it open. Item: Standard yield black cartridge Standard yield color cartridge Moderate use black cartridge Moderate use color cartridge Part number...
User's Guide
Page 23
... force the paper into the printer. For help , see page 8. Is the paper loaded correctly? Are both ? Is the color cartridge secure in the Lexmark Solution Center. Make sure you need to remove and then reinstall the software. To check, click Start Settings Printers. Is the Lexmark X1100 Series set as the default? Did you try to solve the problem, check the following: Is the power supply firmly attached to the setup documentation. Is the black print cartridge secure...
... force the paper into the printer. For help , see page 8. Is the paper loaded correctly? Are both ? Is the color cartridge secure in the Lexmark Solution Center. Make sure you need to remove and then reinstall the software. To check, click Start Settings Printers. Is the Lexmark X1100 Series set as the default? Did you try to solve the problem, check the following: Is the power supply firmly attached to the setup documentation. Is the black print cartridge secure...
User's Guide
Page 24
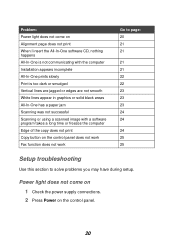
... on 1 Check the power supply connections. 2 Press Power on the control panel does not work Fax function does not work Go to page: 20 21 21 21 21 22 22 23 23 23 24 24 24 25 25 Setup troubleshooting Use this section to solve problems you may have during setup. Power light does not come on Alignment page does not print When I insert the All-In-One software CD, nothing...
... on 1 Check the power supply connections. 2 Press Power on the control panel does not work Fax function does not work Go to page: 20 21 21 21 21 22 22 23 23 23 24 24 24 25 25 Setup troubleshooting Use this section to solve problems you may have during setup. Power light does not come on Alignment page does not print When I insert the All-In-One software CD, nothing...
User's Guide
Page 25
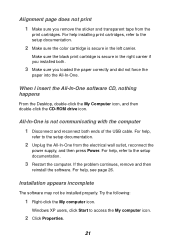
... loaded the paper correctly and did not force the paper into the All-In-One. Try the following: 1 Right-click the My computer icon. Installation appears incomplete The software may not be installed properly. For help , refer to the setup documentation. 2 Make sure the color cartridge is secure in the right carrier if you installed both ends of the USB cable. For help installing print cartridges, refer to the setup documentation...
... loaded the paper correctly and did not force the paper into the All-In-One. Try the following: 1 Right-click the My computer icon. Installation appears incomplete The software may not be installed properly. For help , refer to the setup documentation. 2 Make sure the color cartridge is secure in the right carrier if you installed both ends of the USB cable. For help installing print cartridges, refer to the setup documentation...
User's Guide
Page 26
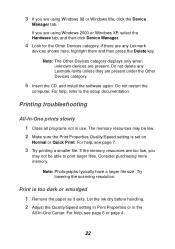
.... Print is set on Normal or Quick Print. If you may be able to the setup documentation. For help , see page 6 or page 4. 22 For help , refer to print larger files. Consider purchasing more memory. Let the ink dry before handling. 2 Adjust the Quality/Speed setting in Print Properties or in use. Do not delete any Lexmark devices shown here, highlight them and then press the Delete key. Printing troubleshooting All...
.... Print is set on Normal or Quick Print. If you may be able to the setup documentation. For help , see page 6 or page 4. 22 For help , refer to print larger files. Consider purchasing more memory. Let the ink dry before handling. 2 Adjust the Quality/Speed setting in Print Properties or in use. Do not delete any Lexmark devices shown here, highlight them and then press the Delete key. Printing troubleshooting All...
User's Guide
Page 27
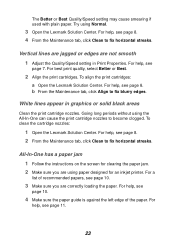
... printer. To align the print cartridges: a Open the Lexmark Solution Center. For help , see page 8. 4 From the Maintenance tab, click Clean to fix horizontal streaks. For help , see page 7. The Better or Best Quality/Speed setting may cause smearing if used with plain paper. For help , see page 8. 2 From the Maintenance tab, click Clean to fix horizontal streaks. For help , see page 11. 23 Try using paper designed for clearing the paper jam. 2 Make sure you are using Normal. 3 Open the Lexmark...
... printer. To align the print cartridges: a Open the Lexmark Solution Center. For help , see page 8. 4 From the Maintenance tab, click Clean to fix horizontal streaks. For help , see page 7. The Better or Best Quality/Speed setting may cause smearing if used with plain paper. For help , see page 8. 2 From the Maintenance tab, click Clean to fix horizontal streaks. For help , see page 11. 23 Try using paper designed for clearing the paper jam. 2 Make sure you are using Normal. 3 Open the Lexmark...
User's Guide
Page 28
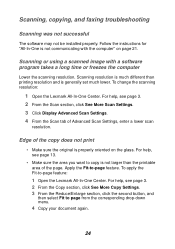
... instructions for "All-In-One is not communicating with a software program takes a long time or freezes the computer Lower the scanning resolution. To apply the Fit-to -page feature. Scanning, copying, and faxing troubleshooting Scanning was not successful The software may not be installed properly. To change the scanning resolution: 1 Open the Lexmark All-In-One Center. For help , see page 3. 2 From the Scan section, click See More Scan Settings. 3 Click Display...
... instructions for "All-In-One is not communicating with a software program takes a long time or freezes the computer Lower the scanning resolution. To apply the Fit-to -page feature. Scanning, copying, and faxing troubleshooting Scanning was not successful The software may not be installed properly. To change the scanning resolution: 1 Open the Lexmark All-In-One Center. For help , see page 3. 2 From the Scan section, click See More Scan Settings. 3 Click Display...
User's Guide
Page 30
... side of the screen. • Visit our Web site at http://support.lexmark.com/ for more troubleshooting information: 1 Click Start Programs Lexmark X1100 Series Lexmark X1100 Series Solution Center. 2 Click the Troubleshooting tab on the menu, see "All-In-One is not functioning properly or a communications error message displays when you try to use the All-In-One, you may need to the setup documentation. For help . 26 Removing and reinstalling the software...
... side of the screen. • Visit our Web site at http://support.lexmark.com/ for more troubleshooting information: 1 Click Start Programs Lexmark X1100 Series Lexmark X1100 Series Solution Center. 2 Click the Troubleshooting tab on the menu, see "All-In-One is not functioning properly or a communications error message displays when you try to use the All-In-One, you may need to the setup documentation. For help . 26 Removing and reinstalling the software...
User's Guide
Page 31
... grounded cable such as Lexmark part number 1329605 for parallel attach or 12A2405 for energy efficiency. European Community (EC) directives conformity This product is in a residential installation. A declaration of conformity with the instructions, may not cause harmful interference, and (2) this device must accept any radio or television interference caused by using other than recommended cables or by unauthorized changes or...
... grounded cable such as Lexmark part number 1329605 for parallel attach or 12A2405 for energy efficiency. European Community (EC) directives conformity This product is in a residential installation. A declaration of conformity with the instructions, may not cause harmful interference, and (2) this device must accept any radio or television interference caused by using other than recommended cables or by unauthorized changes or...
User's Guide
Page 33
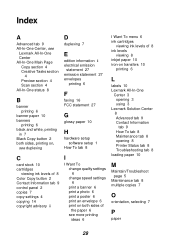
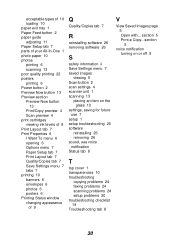
... D duplexing 7 E edition information ii electrical emission statement 27 emission statement 27 envelopes printing 6 F faxing 16 FCC statement 27 G glossy paper 10 H hardware setup software setup 1 How To tab 8 I I Want To change quality settings 6 change speed settings 6 print a banner 6 print a photo 6 print a poster 6 print an envelope 6 print on both sides of the paper 6 see more printing ideas 6 I Want To menu 6 ink cartridges viewing ink levels of 8 ink levels viewing 8 inkjet paper 10 iron-on transfers 10 printing 6 L labels 10 Lexmark All-In-One Center 3 opening 3 using 3 Lexmark...
... D duplexing 7 E edition information ii electrical emission statement 27 emission statement 27 envelopes printing 6 F faxing 16 FCC statement 27 G glossy paper 10 H hardware setup software setup 1 How To tab 8 I I Want To change quality settings 6 change speed settings 6 print a banner 6 print a photo 6 print a poster 6 print an envelope 6 print on both sides of the paper 6 see more printing ideas 6 I Want To menu 6 ink cartridges viewing ink levels of 8 ink levels viewing 8 inkjet paper 10 iron-on transfers 10 printing 6 L labels 10 Lexmark All-In-One Center 3 opening 3 using 3 Lexmark...
User's Guide
Page 34
... To menu 6 opening 6 Options menu 7 Paper Setup tab 7 Print Layout tab 7 Quality/Copies tab 7 Save Settings menu 7 tabs 7 printing 10 banners 6 envelopes 6 photos 6 posters 6 Printing Status window changing appearance of 9 Q Quality/Copies tab 7 R reinstalling software 26 removing software 26 S safety information ii Save Settings menu 7 saved images viewing 5 Scan button 2 scan settings 4 scanner unit 1 scanning 13 placing an item on or off 9 30 section 5 Print a Copy...section 5 voice notification turning on the glass 13 settings, saving for future use 7 setup 1 setup troubleshooting 20...
... To menu 6 opening 6 Options menu 7 Paper Setup tab 7 Print Layout tab 7 Quality/Copies tab 7 Save Settings menu 7 tabs 7 printing 10 banners 6 envelopes 6 photos 6 posters 6 Printing Status window changing appearance of 9 Q Quality/Copies tab 7 R reinstalling software 26 removing software 26 S safety information ii Save Settings menu 7 saved images viewing 5 Scan button 2 scan settings 4 scanner unit 1 scanning 13 placing an item on or off 9 30 section 5 Print a Copy...section 5 voice notification turning on the glass 13 settings, saving for future use 7 setup 1 setup troubleshooting 20...


