Setup Guide
Page 4
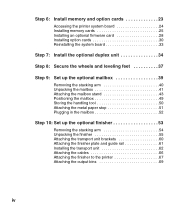
Step 6: Install memory and option cards 23 Accessing the printer system board 24 Installing memory cards 25 Installing an optional firmware card 28 Installing option cards 30 Reinstalling the system board 33 Step 7: Install the ... mailbox 52 Step 10: Set up the optional finisher 53 Removing the stacking arm 54 Unpacking the finisher 55 Attaching the transport unit brackets 60 Attaching the finisher plate and guide rail 61 Installing the transport unit 62 Attaching the cables 66 Attaching the finisher to the printer 67 Attaching the output bins 69 iv
Step 6: Install memory and option cards 23 Accessing the printer system board 24 Installing memory cards 25 Installing an optional firmware card 28 Installing option cards 30 Reinstalling the system board 33 Step 7: Install the ... mailbox 52 Step 10: Set up the optional finisher 53 Removing the stacking arm 54 Unpacking the finisher 55 Attaching the transport unit brackets 60 Attaching the finisher plate and guide rail 61 Installing the transport unit 62 Attaching the cables 66 Attaching the finisher to the printer 67 Attaching the output bins 69 iv
Setup Guide
Page 8
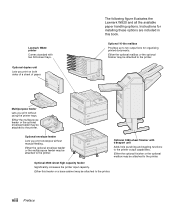
.... Optional 10-bin mailbox Provides up to the printer output capabilities. Lexmark W820 printer Comes standard with transport unit Adds hole punching and stapling functions to ten output bins for installing these options are included in this feeder or a base cabinet may be attached to the printer. Optional 3250-sheet finisher with two 500-sheet trays.
.... Optional 10-bin mailbox Provides up to the printer output capabilities. Lexmark W820 printer Comes standard with transport unit Adds hole punching and stapling functions to ten output bins for installing these options are included in this feeder or a base cabinet may be attached to the printer. Optional 3250-sheet finisher with two 500-sheet trays.
Setup Guide
Page 15
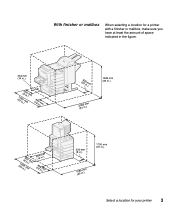
With finisher or mailbox When selecting a location for a printer with a finisher or mailbox, make sure you have at least the amount of space indicated in the figure. 364 mm (14 in.) (4120i6n0(.8)2m0inm0.)mm (1486i0n.m) m (26530inm.) m 1520 mm (60 in.) 2(08619inm.)m (41206in(08.)2mi0n0m.)mm 364 (14 mm in.) (1486i0n.m) m 200 mm (8 in.) 1700 mm (67 in.) 1(04834inm.)m Select a location for your printer 3
With finisher or mailbox When selecting a location for a printer with a finisher or mailbox, make sure you have at least the amount of space indicated in the figure. 364 mm (14 in.) (4120i6n0(.8)2m0inm0.)mm (1486i0n.m) m (26530inm.) m 1520 mm (60 in.) 2(08619inm.)m (41206in(08.)2mi0n0m.)mm 364 (14 mm in.) (1486i0n.m) m 200 mm (8 in.) 1700 mm (67 in.) 1(04834inm.)m Select a location for your printer 3
Setup Guide
Page 21
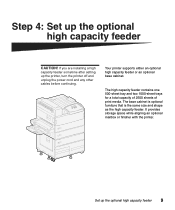
...the same size and shape as the high capacity feeder. Step 4: Set up the printer, turn the printer off and unplug the power cord and any other cables before continuing. Your printer supports either an optional high capacity feeder or an optional base cabinet. If you ...are installing a high capacity feeder sometime after setting up the optional high capacity feeder CAUTION! Set up the optional high capacity feeder 9 It provides storage space while aligning an optional mailbox or finisher...
...the same size and shape as the high capacity feeder. Step 4: Set up the printer, turn the printer off and unplug the power cord and any other cables before continuing. Your printer supports either an optional high capacity feeder or an optional base cabinet. If you ...are installing a high capacity feeder sometime after setting up the optional high capacity feeder CAUTION! Set up the optional high capacity feeder 9 It provides storage space while aligning an optional mailbox or finisher...

Setup Guide
Page 50
What do I do next? Task Set up the optional mailbox Set up the optional finisher Install the optional envelope feeder Load print media Go to page... 39 53 71 73 38 Secure the wheels and leveling feet
What do I do next? Task Set up the optional mailbox Set up the optional finisher Install the optional envelope feeder Load print media Go to page... 39 53 71 73 38 Secure the wheels and leveling feet

Setup Guide
Page 51
For help setting up the optional mailbox Note: The printer can attach a mailbox, you must install either a mailbox or a finisher, but not both at the same time. Step 9: Set up a high capacity feeder or a base cabinet, see page 9. Before you organize your printed documents. Note: The illustrations in this section show the printer with a high capacity feeder attached. Set up the optional mailbox 39 Your printer supports an optional10-bin mailbox that helps you can support either a high capacity feeder or a base cabinet.
For help setting up the optional mailbox Note: The printer can attach a mailbox, you must install either a mailbox or a finisher, but not both at the same time. Step 9: Set up a high capacity feeder or a base cabinet, see page 9. Before you organize your printed documents. Note: The illustrations in this section show the printer with a high capacity feeder attached. Set up the optional mailbox 39 Your printer supports an optional10-bin mailbox that helps you can support either a high capacity feeder or a base cabinet.

Setup Guide
Page 65
For help setting up the optional finisher 53 Set up a high capacity feeder or a base cabinet, see page 9. Step 10: Set up the optional finisher Note: The printer can attach a finisher, you must install either a mailbox or a finisher, but not both at the same time. Before you can support either a high capacity feeder or a base cabinet. Note: The illustrations in this section show the printer with a high capacity feeder attached. Your printer supports an optional finisher that adds hole punching and stapling functions to the printer output capabilities.
For help setting up the optional finisher 53 Set up a high capacity feeder or a base cabinet, see page 9. Step 10: Set up the optional finisher Note: The printer can attach a finisher, you must install either a mailbox or a finisher, but not both at the same time. Before you can support either a high capacity feeder or a base cabinet. Note: The illustrations in this section show the printer with a high capacity feeder attached. Your printer supports an optional finisher that adds hole punching and stapling functions to the printer output capabilities.

Setup Guide
Page 66
Be sure to save the stacking arm so you can attach a finisher, you must remove the stacking arm from the printer. To remove the stacking arm, push the tab on the top of the arm toward the printer output bin until it if you remove the finisher. 54 Set up the optional finisher Removing the stacking arm Stacking arm Before you can reattach it snaps loose.
Be sure to save the stacking arm so you can attach a finisher, you must remove the stacking arm from the printer. To remove the stacking arm, push the tab on the top of the arm toward the printer output bin until it if you remove the finisher. 54 Set up the optional finisher Removing the stacking arm Stacking arm Before you can reattach it snaps loose.

Setup Guide
Page 67
Metal locking bracket 1 Remove the cardboard box by lifting it to the side. 2 Remove the foam from the top of the finisher and by the legs. 3 Lightly press on the tabs located on the metal locking brackets near each leg, and move both brackets toward the middle of the finisher. If you are installing the finisher sometime after initial printer setup, turn the printer off and unplug the power cord before continuing. Unpacking the finisher CAUTION! Tabs Set up and setting it straight up the optional finisher 55
Metal locking bracket 1 Remove the cardboard box by lifting it to the side. 2 Remove the foam from the top of the finisher and by the legs. 3 Lightly press on the tabs located on the metal locking brackets near each leg, and move both brackets toward the middle of the finisher. If you are installing the finisher sometime after initial printer setup, turn the printer off and unplug the power cord before continuing. Unpacking the finisher CAUTION! Tabs Set up and setting it straight up the optional finisher 55

Setup Guide
Page 68
4 Lift the bottom of the legs. Be sure to align the holes in the legs with the pins on the inside of the finisher up slightly and extend the legs fully until you see molded arrows on the locking brackets. 5 Push the locking brackets back into place. 56 Set up the optional finisher
4 Lift the bottom of the legs. Be sure to align the holes in the legs with the pins on the inside of the finisher up slightly and extend the legs fully until you see molded arrows on the locking brackets. 5 Push the locking brackets back into place. 56 Set up the optional finisher

Setup Guide
Page 69
The finisher weighs 44.1 kg (97 lbs) and requires at least two people to lift it safely. 6 Have someone help you lift the finisher to note the tape in the places shown. Set up the optional finisher 57 Be sure to the upright position. 7 Remove any plastic wrapping and shipping tape. CAUTION!
The finisher weighs 44.1 kg (97 lbs) and requires at least two people to lift it safely. 6 Have someone help you lift the finisher to note the tape in the places shown. Set up the optional finisher 57 Be sure to the upright position. 7 Remove any plastic wrapping and shipping tape. CAUTION!

Setup Guide
Page 70
Remove any plastic wrapping. Save the carton and packing materials in case you need to repack the finisher. Discard the plate and wingnuts. 10 Remove the other items from their packaging. The staple head locking plate is not removed, the stapling unit can not function and an error will occur. 8 Remove the two wingnuts holding the metal staple head locking plate. 9 Slide the plate up the optional finisher Staple head locking plate Warning! Wingnuts 58 Set up and remove it. If it is used for shipping purposes only.
Remove any plastic wrapping. Save the carton and packing materials in case you need to repack the finisher. Discard the plate and wingnuts. 10 Remove the other items from their packaging. The staple head locking plate is not removed, the stapling unit can not function and an error will occur. 8 Remove the two wingnuts holding the metal staple head locking plate. 9 Slide the plate up the optional finisher Staple head locking plate Warning! Wingnuts 58 Set up and remove it. If it is used for shipping purposes only.
Setup Guide
Page 71
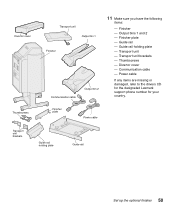
Guide rail holding plate Guide rail Set up the optional finisher 59 Thumbscrews - Finisher - Finisher plate Power cable Transport unit brackets Guide rail holding plate - Divertor cover Thumbscrews Transport unit Output bin 1 Finisher Communication cable Output bin 2 11 Make sure you have the following ...items: - Transport unit - Communication cable - Power cable If any items are missing or damaged, refer to the drivers CD for the designated Lexmark support phone number for...
Guide rail holding plate Guide rail Set up the optional finisher 59 Thumbscrews - Finisher - Finisher plate Power cable Transport unit brackets Guide rail holding plate - Divertor cover Thumbscrews Transport unit Output bin 1 Finisher Communication cable Output bin 2 11 Make sure you have the following ...items: - Transport unit - Communication cable - Power cable If any items are missing or damaged, refer to the drivers CD for the designated Lexmark support phone number for...

Setup Guide
Page 72
Attaching the transport unit brackets 1 Attach the two metal transport unit brackets to the back of the finisher using the four thumbscrews. 60 Set up the optional finisher
Attaching the transport unit brackets 1 Attach the two metal transport unit brackets to the back of the finisher using the four thumbscrews. 60 Set up the optional finisher

Setup Guide
Page 73
...holding plate by tightening the thumbscrews. Be sure to orient the plate so that it does not cover the socket directly above it. 2 Secure the finisher plate to the printer using the thumbscrews. 3 Orient the holding plate with the screws as shown. 4 Slide the bottom lip under the...the plate with the holes in the side of the printer. 6 Secure the holding plate to the holding plate. Sticker Guide rail Attaching the finisher plate and guide rail Finisher plate Guide rail holding plate Alignment knobs 1 Line up the thumbscrews on the finisher plate with the two holes on which way the knobs...
...holding plate by tightening the thumbscrews. Be sure to orient the plate so that it does not cover the socket directly above it. 2 Secure the finisher plate to the printer using the thumbscrews. 3 Orient the holding plate with the screws as shown. 4 Slide the bottom lip under the...the plate with the holes in the side of the printer. 6 Secure the holding plate to the holding plate. Sticker Guide rail Attaching the finisher plate and guide rail Finisher plate Guide rail holding plate Alignment knobs 1 Line up the thumbscrews on the finisher plate with the two holes on which way the knobs...

Setup Guide
Page 74
Attaching the divertor cover 1 Be sure you have removed the stacking arm (see "Removing the stacking arm" on the side of the guide rail. 12 Tighten the tip plate thumbscrews. Installing the transport unit The transport unit carries the printed pages across the top of the printer to the finisher. Tip plate thumbscrew Tip plate 10 Loosen the two tip plate thumbscrews in the middle of the guide rail. 11 Fully extend the tip plates on page 54). 62 Set up the optional finisher
Attaching the divertor cover 1 Be sure you have removed the stacking arm (see "Removing the stacking arm" on the side of the guide rail. 12 Tighten the tip plate thumbscrews. Installing the transport unit The transport unit carries the printed pages across the top of the printer to the finisher. Tip plate thumbscrew Tip plate 10 Loosen the two tip plate thumbscrews in the middle of the guide rail. 11 Fully extend the tip plates on page 54). 62 Set up the optional finisher

Setup Guide
Page 75
Gently press the assembly in place first, then rotate the divertor cover as shown. Extended tabs 2 Install the divertor cover on the top of the printer. Be sure the side with the extended tabs is in place. Set up the optional finisher 63
Gently press the assembly in place first, then rotate the divertor cover as shown. Extended tabs 2 Install the divertor cover on the top of the printer. Be sure the side with the extended tabs is in place. Set up the optional finisher 63

Setup Guide
Page 76
Metal pegs 4 Rotate the transport unit as shown. 2 Align the metal pegs on the transport unit with the u-shaped slots on the metal brackets. 3 Place the pegs into the slots. Positioning the transport unit 1 Hold the transport unit as shown and hold it. 64 Set up the optional finisher
Metal pegs 4 Rotate the transport unit as shown. 2 Align the metal pegs on the transport unit with the u-shaped slots on the metal brackets. 3 Place the pegs into the slots. Positioning the transport unit 1 Hold the transport unit as shown and hold it. 64 Set up the optional finisher

Setup Guide
Page 77
Set up the optional finisher 65 You may need to disconnect the finisher from the printer, make sure to use the latch to the printer yet. Refer to the printer yet. 5 Rotate the two metal arms on the finisher. If you need to lift the bottom of the finisher slightly to get it to the publications ...CD for more information. Release latch 6 Gently push the finisher onto the edge of the transport unit down until it is partially on the guide rail, but do not connect it onto the tracks. 7 Push the finisher toward the printer until they slip into the grooves on the bottom of the...
Set up the optional finisher 65 You may need to disconnect the finisher from the printer, make sure to use the latch to the printer yet. Refer to the printer yet. 5 Rotate the two metal arms on the finisher. If you need to lift the bottom of the finisher slightly to get it to the publications ...CD for more information. Release latch 6 Gently push the finisher onto the edge of the transport unit down until it is partially on the guide rail, but do not connect it onto the tracks. 7 Push the finisher toward the printer until they slip into the grooves on the bottom of the...

Setup Guide
Page 78
... cable to the transport unit. 1 Attach one cable is turned off and unplugged before continuing. Make sure the printer is pre-attached to the middle connector on the finisher. Attaching the cables CAUTION! Tighten the thumbscrews to ensure a good connection. 2 Attach the other end of the... power cable into the middle connector labeled "Output" on the printer. 3 Attach the transport unit cable to the bottom connector on the finisher. 5 Attach the other end of the cables connect the finisher with the printer and one end of the printer. 66 Set up the optional...
... cable to the transport unit. 1 Attach one cable is turned off and unplugged before continuing. Make sure the printer is pre-attached to the middle connector on the finisher. Attaching the cables CAUTION! Tighten the thumbscrews to ensure a good connection. 2 Attach the other end of the... power cable into the middle connector labeled "Output" on the printer. 3 Attach the transport unit cable to the bottom connector on the finisher. 5 Attach the other end of the cables connect the finisher with the printer and one end of the printer. 66 Set up the optional...