
User's Guide
Page 211
... display shows only diamonds 175 display, printer control panel 15 documents, printing from Macintosh 72 from Windows 72 drawers, paper installing 34 duplex unit installing 35 E Embedded Web Server 172 administrator settings 172 checking device status 172 does not open 175 networking settings 172 setting up e-mail ... held jobs 75 printing for Macintosh users 75 printing for Windows users 75 Help menu 143 Hex Trace ready 148 HTML menu 140 I Image menu 141 Insert staple cartridge 148 Index 211 Insert Tray 148 Install bin 148 Install duplex 149 Install envelope feeder 149 Install MICR Cartridge...
... display shows only diamonds 175 display, printer control panel 15 documents, printing from Macintosh 72 from Windows 72 drawers, paper installing 34 duplex unit installing 35 E Embedded Web Server 172 administrator settings 172 checking device status 172 does not open 175 networking settings 172 setting up e-mail ... held jobs 75 printing for Macintosh users 75 printing for Windows users 75 Help menu 143 Hex Trace ready 148 HTML menu 140 I Image menu 141 Insert staple cartridge 148 Index 211 Insert Tray 148 Install bin 148 Install duplex 149 Install envelope feeder 149 Install MICR Cartridge...
User's Guide
Page 212
... 105 Default Source 95 diagram of 94 Disk Wiping 123 Envelope Enhance 99 Finishing 131 Flash Drive 141 General Settings 126 Help 143 HTML 140 Image 141 IPv6 112 LexLink 114 Miscellaneous 122 NetWare 113 Network 108 Network Card 110 Network Reports 110 Paper Loading 103 Paper Size/Type 95 Paper... to cancel 151 No recognized file types 151 noise emission levels 198 Not Ready 151 notices 196, 197, 198, 199, 200, 201, 202 O options duplex unit 35 fax card 17 firmware card 21 firmware cards 17 flash memory card 21 internal 17 Internal Solutions Port 24 memory card 20 memory cards...
... 105 Default Source 95 diagram of 94 Disk Wiping 123 Envelope Enhance 99 Finishing 131 Flash Drive 141 General Settings 126 Help 143 HTML 140 Image 141 IPv6 112 LexLink 114 Miscellaneous 122 NetWare 113 Network 108 Network Card 110 Network Reports 110 Paper Loading 103 Paper Size/Type 95 Paper... to cancel 151 No recognized file types 151 noise emission levels 198 Not Ready 151 notices 196, 197, 198, 199, 200, 201, 202 O options duplex unit 35 fax card 17 firmware card 21 firmware cards 17 flash memory card 21 internal 17 Internal Solutions Port 24 memory card 20 memory cards...
User's Guide
Page 216
ghost images 184 gray background 185 poor transparency quality 193 print irregularities 186 print is too dark 187 print is too light 188 print quality test pages ... 191 toner fog or background shading 192 toner rubs off 192 toner specks 193 troubleshooting, printer options 2000-sheet tray 180 5-bin mailbox 181 duplex unit 181 envelope feeder 180 flash memory card 181 hard disk with adapter 182 high capacity output expander 181 Internal Solutions Port 182 memory card 181...
ghost images 184 gray background 185 poor transparency quality 193 print irregularities 186 print is too dark 187 print is too light 188 print quality test pages ... 191 toner fog or background shading 192 toner rubs off 192 toner specks 193 troubleshooting, printer options 2000-sheet tray 180 5-bin mailbox 181 duplex unit 181 envelope feeder 180 flash memory card 181 hard disk with adapter 182 high capacity output expander 181 Internal Solutions Port 182 memory card 181...
Service Manual
Page 33
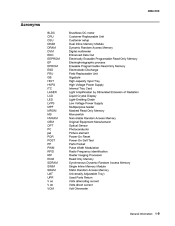
...Data Out Electrically Erasable Programable Read-Only Memory Electrophotographic process Erasable Programmable Read-Only Memory Electrostatic Discharge Field Replaceable Unit Gigabyte High-capacity Input Tray High Voltage Power Supply Internal Tray Card Light Amplification by Stimulated Emission of ...Photoconductor Picture element Power-On Reset Power-On Self Test Parts Packet Pulse Width Modulation Radio Frequency Identification Raster Imaging Processor Read Only Memory Synchronous Dynamic Random Access Memory Single Inline Memory Module Static Random Access Memory Universally Adjustable ...
...Data Out Electrically Erasable Programable Read-Only Memory Electrophotographic process Erasable Programmable Read-Only Memory Electrostatic Discharge Field Replaceable Unit Gigabyte High-capacity Input Tray High Voltage Power Supply Internal Tray Card Light Amplification by Stimulated Emission of ...Photoconductor Picture element Power-On Reset Power-On Self Test Parts Packet Pulse Width Modulation Radio Frequency Identification Raster Imaging Processor Read Only Memory Synchronous Dynamic Random Access Memory Single Inline Memory Module Static Random Access Memory Universally Adjustable ...

Service Manual
Page 200
...) Leading edge Trailing edge Step 1 Check Check the media condition. Go to "Fuser unit assembly removal (T650, T652, T654)" on the heat roll and/or pressure roll? 7 Perform a print test. Horizontal stripes (side to step 2. Re-print the defective image. Check the media route for proper installation. Is the above component properly installed...
...) Leading edge Trailing edge Step 1 Check Check the media condition. Go to "Fuser unit assembly removal (T650, T652, T654)" on the heat roll and/or pressure roll? 7 Perform a print test. Horizontal stripes (side to step 2. Re-print the defective image. Check the media route for proper installation. Is the above component properly installed...

Service Manual
Page 205
... Step 1 Check Check the media condition. Yes Go to step 4. Does the error continue? Replace the fuser unit assembly. Go to cool down. Re-print the defective image. Does the problem remain? No Problem solved. 2 Check the heat roll and pressure roll. Contact next highest ... Trailing edge The ghost appears on the media which, may be the image from the previous page or part of tech support. Diagnostic information 2-171 CAUTION: : Allow the fuser unit assembly to "Fuser unit assembly removal (T650, T652, T654)" on the heat roll and/or pressure roll? 3 Perform...
... Step 1 Check Check the media condition. Yes Go to step 4. Does the error continue? Replace the fuser unit assembly. Go to cool down. Re-print the defective image. Does the problem remain? No Problem solved. 2 Check the heat roll and pressure roll. Contact next highest ... Trailing edge The ghost appears on the media which, may be the image from the previous page or part of tech support. Diagnostic information 2-171 CAUTION: : Allow the fuser unit assembly to "Fuser unit assembly removal (T650, T652, T654)" on the heat roll and/or pressure roll? 3 Perform...
Service Manual
Page 207
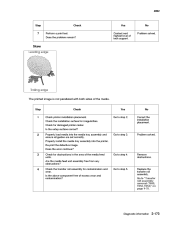
4062 Step Check Perform a print test. Yes Go to step 4. Re-print the defective image. Are the media feed unit assembly free from any obstructions? Go to step 2. Properly install the media tray assembly into the media tray assembly and ... (T650, T652, T654)" on page 4-78. No Correct the installation placement. 2 Properly load media into the printer. Problem solved. 3 Check for irregularities. Yes Contact next highest level of the media feed units. Diagnostic information 2-173 No Problem solved. 7 Skew Leading edge Trailing edge The printed image is not ...
4062 Step Check Perform a print test. Yes Go to step 4. Re-print the defective image. Are the media feed unit assembly free from any obstructions? Go to step 2. Properly install the media tray assembly into the media tray assembly and ... (T650, T652, T654)" on page 4-78. No Correct the installation placement. 2 Properly load media into the printer. Problem solved. 3 Check for irregularities. Yes Contact next highest level of the media feed units. Diagnostic information 2-173 No Problem solved. 7 Skew Leading edge Trailing edge The printed image is not ...

Service Manual
Page 210
... Re-print the defective image. CAUTION: : Allow the fuser unit assembly to step 2. Replace the LVPS card assembly. Yes Go to cool down. Load new, dry, recommended media. Go to step 4. No Reinstall the fuser unit assembly. Is the fuser unit assembly properly installed? Go to "Fuser unit assembly removal (T650, T652, T654)" on the heat...
... Re-print the defective image. CAUTION: : Allow the fuser unit assembly to step 2. Replace the LVPS card assembly. Yes Go to cool down. Load new, dry, recommended media. Go to step 4. No Reinstall the fuser unit assembly. Is the fuser unit assembly properly installed? Go to "Fuser unit assembly removal (T650, T652, T654)" on the heat...


