User Guide
Page 2
... 17 Installing a memory card ...19 Installing a flash memory or firmware card...20 Installing an Internal Solutions Port...23 Installing a printer hard disk ...29 Installing hardware options...33 Order of installation...33 Installing paper drawers ...33 Installing an optional duplex unit (T650 ... wireless printing...39 Information you will need to set up the printer on a wireless network 39 Installing the printer on a wireless network (Windows 40 Installing the printer on a wireless network (Macintosh 42 Installing the printer on a wired network 44 Changing port settings after installing a ...
... 17 Installing a memory card ...19 Installing a flash memory or firmware card...20 Installing an Internal Solutions Port...23 Installing a printer hard disk ...29 Installing hardware options...33 Order of installation...33 Installing paper drawers ...33 Installing an optional duplex unit (T650 ... wireless printing...39 Information you will need to set up the printer on a wireless network 39 Installing the printer on a wireless network (Windows 40 Installing the printer on a wireless network (Macintosh 42 Installing the printer on a wired network 44 Changing port settings after installing a ...
User Guide
Page 3
...recycled paper ...68 Storing paper ...69 Supported paper sizes, types, and weights 69 Paper sizes supported by the printer...69 Paper types and weights supported by the printer 71 Paper types and weights supported by the output bins 71 Printing...73 Printing a document...73 Printing on specialty ... envelopes...74 Tips on using labels ...75 Tips on using card stock...75 Printing confidential and other held jobs 76 Holding jobs in the printer ...76 Printing confidential and other held jobs ...76 Printing from a flash drive...78 Printing information pages...79 Printing a font sample list ......
...recycled paper ...68 Storing paper ...69 Supported paper sizes, types, and weights 69 Paper sizes supported by the printer...69 Paper types and weights supported by the printer 71 Paper types and weights supported by the output bins 71 Printing...73 Printing a document...73 Printing on specialty ... envelopes...74 Tips on using labels ...75 Tips on using card stock...75 Printing confidential and other held jobs 76 Holding jobs in the printer ...76 Printing confidential and other held jobs ...76 Printing from a flash drive...78 Printing information pages...79 Printing a font sample list ......
User Guide
Page 4
... paper jam...90 271-279 paper jams...91 280 paper jams...91 281 paper jam...92 282 paper jam...92 283 staple jam...93 Understanding printer menus 95 Menus list...95 Paper menu...96 Default Source menu ...96 Paper Size/Type menu ...96 Configure MP menu...99 Envelope Enhance...100 Substitute...
... paper jam...90 271-279 paper jams...91 280 paper jams...91 281 paper jam...92 282 paper jam...92 283 staple jam...93 Understanding printer menus 95 Menus list...95 Paper menu...96 Default Source menu ...96 Paper Size/Type menu ...96 Configure MP menu...99 Envelope Enhance...100 Substitute...
User Guide
Page 5
......141 Image menu ...142 Flash Drive menu ...142 Help menu...144 Understanding printer messages 146 List of status and error messages...146 Maintaining the printer 168 Cleaning the exterior of the printer...168 Storing supplies...168 Conserving supplies...168 Checking the status of supplies...169 ...Checking the status of supplies from the printer control panel 169 Checking the status of supplies ...
......141 Image menu ...142 Flash Drive menu ...142 Help menu...144 Understanding printer messages 146 List of status and error messages...146 Maintaining the printer 168 Cleaning the exterior of the printer...168 Storing supplies...168 Conserving supplies...168 Checking the status of supplies...169 ...Checking the status of supplies from the printer control panel 169 Checking the status of supplies ...

User Guide
Page 6
......172 Ordering staple cartridges ...172 Ordering a transfer roller...172 Recycling Lexmark products...172 Moving the printer...172 Before moving the printer ...172 Moving the printer to another location...173 Shipping the printer ...173 Administrative support 174 Finding advanced networking and administrator information 174 ...Adjusting Power Saver...175 Restoring the factory default settings 176 Troubleshooting 177 Solving basic problems...177 Solving basic printer problems ...177 Printer control panel display is blank or displays only diamonds 177 Embedded Web Server does not open ...177 ...
......172 Ordering staple cartridges ...172 Ordering a transfer roller...172 Recycling Lexmark products...172 Moving the printer...172 Before moving the printer ...172 Moving the printer to another location...173 Shipping the printer ...173 Administrative support 174 Finding advanced networking and administrator information 174 ...Adjusting Power Saver...175 Restoring the factory default settings 176 Troubleshooting 177 Solving basic problems...177 Solving basic printer problems ...177 Printer control panel display is blank or displays only diamonds 177 Embedded Web Server does not open ...177 ...
User Guide
Page 8
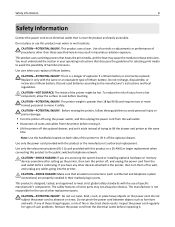
... same or an equivalent type of lithium battery. This product is designed, tested, and approved to lift the drawer and printer at the same time. CAUTION-POTENTIAL INJURY: This product uses a laser. Do not recharge, disassemble, or incinerate a lithium battery. CAUTION-POTENTIAL INJURY: Before moving it . CAUTION-SHOCK HAZARD: Make sure that...
... same or an equivalent type of lithium battery. This product is designed, tested, and approved to lift the drawer and printer at the same time. CAUTION-POTENTIAL INJURY: This product uses a laser. Do not recharge, disassemble, or incinerate a lithium battery. CAUTION-POTENTIAL INJURY: Before moving it . CAUTION-SHOCK HAZARD: Make sure that...

User Guide
Page 9
... additional furniture for stability. If you purchased a multifunction printer (MFP) that scans, copies, and faxes, you are using a high-capacity input tray, a duplex unit and an input option, or more information, see www.lexmark.com/multifunctionprinters. You must use the fax feature during ...a lightning storm. SAVE THESE INSTRUCTIONS. CAUTION-SHOCK HAZARD: Do not use either a printer stand or printer base if you may need additional furniture. For more than...
... additional furniture for stability. If you purchased a multifunction printer (MFP) that scans, copies, and faxes, you are using a high-capacity input tray, a duplex unit and an input option, or more information, see www.lexmark.com/multifunctionprinters. You must use the fax feature during ...a lightning storm. SAVE THESE INSTRUCTIONS. CAUTION-SHOCK HAZARD: Do not use either a printer stand or printer base if you may need additional furniture. For more than...
User Guide
Page 10
... numbers available, see the printed warranty that came with your printer. Note: For additional information about the printer Setup information Description Where to find The Setup information gives you instructions for setting up You can find While in any Lexmark software program, click Help, Tips > Help, or Help ...-Friday (8:00 AM-8:00 PM ET) Note: Telephone numbers and support times may change without notice. Learning about the printer 10 Learning about the printer Finding information about contacting Lexmark, see the printed warranty statement that came with your...
... numbers available, see the printed warranty that came with your printer. Note: For additional information about the printer Setup information Description Where to find The Setup information gives you instructions for setting up You can find While in any Lexmark software program, click Help, Tips > Help, or Help ...-Friday (8:00 AM-8:00 PM ET) Note: Telephone numbers and support times may change without notice. Learning about the printer 10 Learning about the printer Finding information about contacting Lexmark, see the printed warranty statement that came with your...
User Guide
Page 11
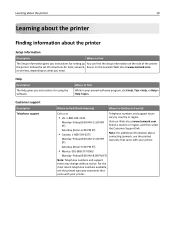
...Submit Request. Visit our Web site at www.lexmark.com. Select a country or region, and then select the Customer Support link. Printer configurations Basic model 1 2 3 4 Feature Paper Capacity* 1 Standard exit bin 350 or 550 sheets 2 Printer control panel Not applicable 3 Multipurpose feeder 100 ...using a high-capacity input tray, a duplex unit and an input option, or more information, see www.lexmark.com/multifunctionprinters. Note: For additional information about the printer 11 Description E-mail support Where to find (North America) Where to find (rest of world) For ...
...Submit Request. Visit our Web site at www.lexmark.com. Select a country or region, and then select the Customer Support link. Printer configurations Basic model 1 2 3 4 Feature Paper Capacity* 1 Standard exit bin 350 or 550 sheets 2 Printer control panel Not applicable 3 Multipurpose feeder 100 ...using a high-capacity input tray, a duplex unit and an input option, or more information, see www.lexmark.com/multifunctionprinters. Note: For additional information about the printer 11 Description E-mail support Where to find (North America) Where to find (rest of world) For ...

User Guide
Page 12
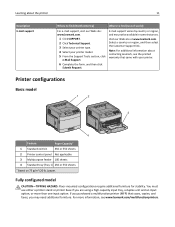
Learning about the printer 4 5 12 1 2 3 6 7 8 9 Feature/Option Paper Capacity1 1 5‑bin mailbox2 500 sheets 2 5‑bin mailbox 500 sheets 3 Envelope feeder 85 envelopes 4 Standard tray (Tray 1) 250 or 550 ... (Tray 3) 250 or 550 sheets 8 Optional 2000‑sheet tray (Tray 4) 2000 sheets 9 Caster base Not applicable 1 Based on 75 g/m2 (20 lb.) paper. 2 The printer supports up to three output expander units, two 5-bin mailboxes, one high capacity output expander (not depicted), or one stapler unit (not depicted). 3 An optional...
Learning about the printer 4 5 12 1 2 3 6 7 8 9 Feature/Option Paper Capacity1 1 5‑bin mailbox2 500 sheets 2 5‑bin mailbox 500 sheets 3 Envelope feeder 85 envelopes 4 Standard tray (Tray 1) 250 or 550 ... (Tray 3) 250 or 550 sheets 8 Optional 2000‑sheet tray (Tray 4) 2000 sheets 9 Caster base Not applicable 1 Based on 75 g/m2 (20 lb.) paper. 2 The printer supports up to three output expander units, two 5-bin mailboxes, one high capacity output expander (not depicted), or one stapler unit (not depicted). 3 An optional...
User Guide
Page 13
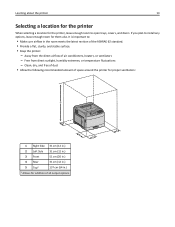
...- Free from the direct airflow of air conditioners, heaters, or ventilators - It is important to: • Make sure airflow in .) 1 Allows for the printer, leave enough room to install any options, leave enough room for them also. Clean, dry, and free of dust • Allow the following recommended amount... of space around the printer for proper ventilation: 5 4 1 3 2 1 Right Side 31 cm (12 in.) 2 Left Side 31 cm (12 in.) 3 Front 51 cm (20 in.) 4 Rear 31 ...
...- Free from the direct airflow of air conditioners, heaters, or ventilators - It is important to: • Make sure airflow in .) 1 Allows for the printer, leave enough room to install any options, leave enough room for them also. Clean, dry, and free of dust • Allow the following recommended amount... of space around the printer for proper ventilation: 5 4 1 3 2 1 Right Side 31 cm (12 in.) 2 Left Side 31 cm (12 in.) 3 Front 51 cm (20 in.) 4 Rear 31 ...

User Guide
Page 14
...display. Returns the display to the previous screen 6 Indicator light 7 Stop Indicates the printer status: • Off-The power is off. • Blinking green-The printer is warming up or down arrow buttons to scroll through text that communicate the status ...restored. • Settings chosen from a software program can also change or override the user default settings selected from the printer control panel. Learning about the printer 14 Understanding the printer control panel 1 23 4 9 8 76 5 Item Description 1 Display Shows messages and pictures that rolls to another ...
...display. Returns the display to the previous screen 6 Indicator light 7 Stop Indicates the printer status: • Off-The power is off. • Blinking green-The printer is warming up or down arrow buttons to scroll through text that communicate the status ...restored. • Settings chosen from a software program can also change or override the user default settings selected from the printer control panel. Learning about the printer 14 Understanding the printer control panel 1 23 4 9 8 76 5 Item Description 1 Display Shows messages and pictures that rolls to another ...

User Guide
Page 15
Learning about the printer 15 Item 8 Menu Description Opens the menu index Note: The menus are available only when the printer is in the Ready state. 9 USB port Insert a flash drive into the front of the printer to print saved files. Note: Only the front USB port supports flash drives.
Learning about the printer 15 Item 8 Menu Description Opens the menu index Note: The menus are available only when the printer is in the Ready state. 9 USB port Insert a flash drive into the front of the printer to print saved files. Note: Only the front USB port supports flash drives.

User Guide
Page 16
...Wireless ISP - If you are accessing the system board or installing optional hardware or memory devices sometime after setting up the printer, then turn them off , and unplug the power cord from the wall outlet before continuing. Fonts • Firmware cards - Additional... options CAUTION-SHOCK HAZARD: If you have any other devices attached to the printer, then turn the printer off as well, and unplug any cables going into the printer. MarkNet N8130 10/100 Fiber ISP - PrintCryptionTM • Printer hard disk • LexmarkTM Internal Solutions Ports (ISP) - Flash memory -...
...Wireless ISP - If you are accessing the system board or installing optional hardware or memory devices sometime after setting up the printer, then turn them off , and unplug the power cord from the wall outlet before continuing. Fonts • Firmware cards - Additional... options CAUTION-SHOCK HAZARD: If you have any other devices attached to the printer, then turn the printer off as well, and unplug any cables going into the printer. MarkNet N8130 10/100 Fiber ISP - PrintCryptionTM • Printer hard disk • LexmarkTM Internal Solutions Ports (ISP) - Flash memory -...

User Guide
Page 17
CAUTION-SHOCK HAZARD: If you have any other devices attached to install internal options Note: This task requires a flathead screwdriver. If you are accessing the system board or installing optional hardware or memory devices sometime after setting up the printer, then turn them off , and unplug the power cord from the wall outlet before continuing. Additional printer setup 17 Accessing the system board to the printer, then turn the printer off as well, and unplug any cables going into the printer. 1 Open the system board door. 2 Loosen the screw on the system board cover.
CAUTION-SHOCK HAZARD: If you have any other devices attached to install internal options Note: This task requires a flathead screwdriver. If you are accessing the system board or installing optional hardware or memory devices sometime after setting up the printer, then turn them off , and unplug the power cord from the wall outlet before continuing. Additional printer setup 17 Accessing the system board to the printer, then turn the printer off as well, and unplug any cables going into the printer. 1 Open the system board door. 2 Loosen the screw on the system board cover.

User Guide
Page 18
Warning-Potential Damage: System board electronic components are easily damaged by static electricity. Additional printer setup 18 3 Remove the system board cover. 4 Use the illustration below to locate the appropriate connector. Touch something metal on the printer before touching any system board electronic components or connectors. 1 2 3 1 Firmware and flash memory card connectors 2 Memory card connector 3 Lexmark Internal Solutions Port or printer hard disk connector
Warning-Potential Damage: System board electronic components are easily damaged by static electricity. Additional printer setup 18 3 Remove the system board cover. 4 Use the illustration below to locate the appropriate connector. Touch something metal on the printer before touching any system board electronic components or connectors. 1 2 3 1 Firmware and flash memory card connectors 2 Memory card connector 3 Lexmark Internal Solutions Port or printer hard disk connector
User Guide
Page 19
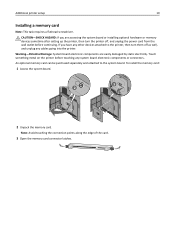
...card. 3 Open the memory card connector latches. If you are easily damaged by static electricity. Touch something metal on the printer before continuing. Warning-Potential Damage: System board electronic components are accessing the system board or installing optional hardware or memory devices sometime... after setting up the printer, then turn them off , and unplug the power cord from the wall outlet before touching any other devices attached to the...
...card. 3 Open the memory card connector latches. If you are easily damaged by static electricity. Touch something metal on the printer before continuing. Warning-Potential Damage: System board electronic components are accessing the system board or installing optional hardware or memory devices sometime... after setting up the printer, then turn them off , and unplug the power cord from the wall outlet before touching any other devices attached to the...

User Guide
Page 20
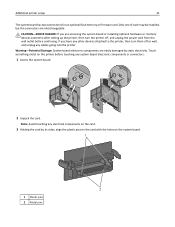
Additional printer setup 20 4 Align the notches on the memory card with the ridges on the connector. 2 1 1 Notches 2 Ridges 5 Push the memory card straight into the connector until it snaps into place. 6 Replace the system board cover and close the system board door. 1 2 3 Installing a flash memory or firmware card Note: This task requires a flathead screwdriver.
Additional printer setup 20 4 Align the notches on the memory card with the ridges on the connector. 2 1 1 Notches 2 Ridges 5 Push the memory card straight into the connector until it snaps into place. 6 Replace the system board cover and close the system board door. 1 2 3 Installing a flash memory or firmware card Note: This task requires a flathead screwdriver.
User Guide
Page 21
... HAZARD: If you have any other devices attached to the printer, then turn the printer off as well, and unplug any electrical components on the printer before continuing. Note: Avoid touching any cables going into the printer. If you are accessing the system board or installing optional... wall outlet before touching any system board electronic components or connectors. 1 Access the system board. 3 2 1 2 Unpack the card. Additional printer setup 21 The system board has two connections for an optional flash memory or firmware card. Touch something metal on the card. 3 Holding the...
... HAZARD: If you have any other devices attached to the printer, then turn the printer off as well, and unplug any electrical components on the printer before continuing. Note: Avoid touching any cables going into the printer. If you are accessing the system board or installing optional... wall outlet before touching any system board electronic components or connectors. 1 Access the system board. 3 2 1 2 Unpack the card. Additional printer setup 21 The system board has two connections for an optional flash memory or firmware card. Touch something metal on the card. 3 Holding the...

User Guide
Page 22
Additional printer setup 22 4 Push the card firmly into place. Notes: • The entire length of the connector on the card must touch and be flush against the system board. • Be careful not to damage the connectors. 5 Replace the system board cover and close the system board door. 1 2 3
Additional printer setup 22 4 Push the card firmly into place. Notes: • The entire length of the connector on the card must touch and be flush against the system board. • Be careful not to damage the connectors. 5 Replace the system board cover and close the system board door. 1 2 3


