User Guide
Page 2
... Installing an optional duplex unit (T650 only 34 Attaching cables...36 Verifying printer setup...37 Printing a menu settings page ...37 Printing a network setup page...37 Setting up the printer software...38 Installing printer software ...38 Updating available options in the printer driver 38 Setting up wireless printing...39 Information you will need to set up...
... Installing an optional duplex unit (T650 only 34 Attaching cables...36 Verifying printer setup...37 Printing a menu settings page ...37 Printing a network setup page...37 Setting up the printer software...38 Installing printer software ...38 Updating available options in the printer driver 38 Setting up wireless printing...39 Information you will need to set up...

User Guide
Page 38
... Setting up the printer software Installing printer software A printer driver is typically installed during the initial printer setup. Using the World Wide Web 1 Go to the Lexmark Web site at www.lexmark.com. 2 From the Drivers & Downloads menu, click Driver Finder. 3 Select your printer, and then select your operating system. 4 Download the driver and install the printer software. The printer software is software...
... Setting up the printer software Installing printer software A printer driver is typically installed during the initial printer setup. Using the World Wide Web 1 Go to the Lexmark Web site at www.lexmark.com. 2 From the Drivers & Downloads menu, click Driver Finder. 3 Select your printer, and then select your operating system. 4 Download the driver and install the printer software. The printer software is software...

User Guide
Page 39
...if you will also require the auto setting. The choices are three basic options for the same type on the router and on the printer, or the printer will be either infrastructure or ad hoc. • Channel (for ad hoc networks)-The channel defaults to select. • Security Method... In Mac OS X version 10.5 or later 1 From the Apple menu, choose System Preferences. 2 Click Print & Fax. 3 Select the printer, and then click Options & Supplies. 4 Click Driver, and then add any installed hardware options, and then click Apply Changes. Setting up to four in use on the network by...
...if you will also require the auto setting. The choices are three basic options for the same type on the router and on the printer, or the printer will be either infrastructure or ad hoc. • Channel (for ad hoc networks)-The channel defaults to select. • Security Method... In Mac OS X version 10.5 or later 1 From the Apple menu, choose System Preferences. 2 Click Print & Fax. 3 Select the printer, and then click Options & Supplies. 4 Click Driver, and then add any installed hardware options, and then click Apply Changes. Setting up to four in use on the network by...

User Guide
Page 45
... Restart when installation is complete. All the necessary software is the letter of your configured printer does not appear in the list of printers discovered on a different subnet than the printer. 4 Install the drivers and add the printer. Note: To configure the printer using a static IP address, using IPv6, or to complete the installation. b Add the...
... Restart when installation is complete. All the necessary software is the letter of your configured printer does not appear in the list of printers discovered on a different subnet than the printer. 4 Install the drivers and add the printer. Note: To configure the printer using a static IP address, using IPv6, or to complete the installation. b Add the...
User Guide
Page 49
... the port under the Select Port menu, and then click Add Port. If the correct port is checked. l Make sure the box next to the printer driver. a Open the Device Manager. 1 Click , or click Start and then click Run. 2 In the Start Search or Run box, type devmgmt.msc. ...than parallel printing, it is the preferred option when there is a great deal of the printer from the menu, and then click Add Printer. d Save the new settings. e Print a menu settings page. 2 Install the printer driver: a Insert the Software and Documentation CD. The serial parameters in the COM port must ...
... the port under the Select Port menu, and then click Add Port. If the correct port is checked. l Make sure the box next to the printer driver. a Open the Device Manager. 1 Click , or click Start and then click Run. 2 In the Start Search or Run box, type devmgmt.msc. ...than parallel printing, it is the preferred option when there is a great deal of the printer from the menu, and then click Add Printer. d Save the new settings. e Print a menu settings page. 2 Install the printer driver: a Insert the Software and Documentation CD. The serial parameters in the COM port must ...
User Guide
Page 75
... • Do not print within 1 mm (0.04 in .) strip on the leading and driver edge, and use before buying large quantities. For more information, see the Card Stock & Label Guide available on the Lexmark Web site at least 1 mm (0.04 in a jam. Check with the manufacturer or vendor..., resulting in .) away from a 250‑sheet tray, a 550‑sheet tray, or the multipurpose feeder. • Use labels designed specifically for laser printers. Many of the label. • Be sure adhesive backing does not reach to the sheet edge. Notes: • Paper, dual‑web paper, polyester...
... • Do not print within 1 mm (0.04 in .) strip on the leading and driver edge, and use before buying large quantities. For more information, see the Card Stock & Label Guide available on the Lexmark Web site at least 1 mm (0.04 in a jam. Check with the manufacturer or vendor..., resulting in .) away from a 250‑sheet tray, a 550‑sheet tray, or the multipurpose feeder. • Use labels designed specifically for laser printers. Many of the label. • Be sure adhesive backing does not reach to the sheet edge. Notes: • Paper, dual‑web paper, polyester...
User Guide
Page 135
...Adjusts the degree of difference between levels of text and images. • Both Directions darkens horizontal and vertical lines on text and images. The printer driver default is the factory default setting. • Higher settings show more difference between levels of printed output Note: Auto is the factory default ... Notes: • 0 is the factory default setting. • To set Enhance Fine Lines using the Embedded Web Server, type the network printer IP address in printed output Notes: • 0 is 1200 IQ. Adjusts the gray value of gray in a browser window. Understanding...
...Adjusts the degree of difference between levels of text and images. • Both Directions darkens horizontal and vertical lines on text and images. The printer driver default is the factory default setting. • Higher settings show more difference between levels of printed output Note: Auto is the factory default ... Notes: • 0 is the factory default setting. • To set Enhance Fine Lines using the Embedded Web Server, type the network printer IP address in printed output Notes: • 0 is 1200 IQ. Adjusts the gray value of gray in a browser window. Understanding...
User Guide
Page 177
... host computer, print server, option, or other network device. • All options are properly installed. • The printer driver settings are possible solutions. Printer control panel display is turned on . CHECK THE NETWORK SETTINGS Depending on the network settings, you have checked each of ...the following: CHECK THE NETWORK CONNECTIONS Make sure the printer and computer are turned on . Check the printer power switch. • The printer cable is securely attached to the same network. Try one or more information, see your system ...
... host computer, print server, option, or other network device. • All options are properly installed. • The printer driver settings are possible solutions. Printer control panel display is turned on . CHECK THE NETWORK SETTINGS Depending on the network settings, you have checked each of ...the following: CHECK THE NETWORK CONNECTIONS Make sure the printer and computer are turned on . Check the printer power switch. • The printer cable is securely attached to the same network. Try one or more information, see your system ...
User Guide
Page 182
MAKE SURE THE PAPER TRAY IS INSTALLED CORRECTLY If the paper tray is turned on our Web site at www.lexmark.com/publications. MAKE SURE THE LIST OF OPTIONS IN THE PRINTER DRIVER IS UP TO DATE From the computer you are printing from , verify that came with the paper tray, or see "Updating... available options in the printer driver" on page 38. 2000‑sheet tray These are aligned against the edges of the following : THE ELEVATOR TRAY IS NOT WORKING PROPERLY • Make ...
MAKE SURE THE PAPER TRAY IS INSTALLED CORRECTLY If the paper tray is turned on our Web site at www.lexmark.com/publications. MAKE SURE THE LIST OF OPTIONS IN THE PRINTER DRIVER IS UP TO DATE From the computer you are printing from , verify that came with the paper tray, or see "Updating... available options in the printer driver" on page 38. 2000‑sheet tray These are aligned against the edges of the following : THE ELEVATOR TRAY IS NOT WORKING PROPERLY • Make ...
User Guide
Page 213
... Disk recovery x/y XX% 148 Disk Wiping menu 124 display troubleshooting display is blank 177 display shows only diamonds 177 display, printer control panel 14 documents, printing from Macintosh 73 from Windows 73 drawers, paper installing 33 duplex unit installing 34 E Embedded ...150 Install MICR Cartridge 151 Install tray 151 installation wireless network 40, 42 installing options in driver 38 printer software 38 installing options order of installation 33 installing printer software adding options 38 Internal Solutions Port installing 23 troubleshooting 184 Internal Solutions Port, network ...
... Disk recovery x/y XX% 148 Disk Wiping menu 124 display troubleshooting display is blank 177 display shows only diamonds 177 display, printer control panel 14 documents, printing from Macintosh 73 from Windows 73 drawers, paper installing 33 duplex unit installing 34 E Embedded ...150 Install MICR Cartridge 151 Install tray 151 installation wireless network 40, 42 installing options in driver 38 printer software 38 installing options order of installation 33 installing printer software adding options 38 Internal Solutions Port installing 23 troubleshooting 184 Internal Solutions Port, network ...

Service Manual
Page 32
... required Flat-blade screwdrivers, various sizes #1 Phillips screwdriver, magnetic #2 Phillips screwdriver, magnetic #2 Phillips screwdriver, magnetic short-blade 7/32 inch (5.5 mm) open-end wrench 7.0 mm nut driver Needle nose pliers Diagonal side cutters Spring hook Analog or digital multimeter Flash light (optional) 1-8 Service Manual
... required Flat-blade screwdrivers, various sizes #1 Phillips screwdriver, magnetic #2 Phillips screwdriver, magnetic #2 Phillips screwdriver, magnetic short-blade 7/32 inch (5.5 mm) open-end wrench 7.0 mm nut driver Needle nose pliers Diagonal side cutters Spring hook Analog or digital multimeter Flash light (optional) 1-8 Service Manual

Service Manual
Page 118
... assembly. 3. 4062 Error code or message 902.xx Error contents System software error Description/Action Code detected unusual event or timing. 903.xx Paperport link driver error Code detected unusual event or timing. 904.xx Interface violation by RIP Code detected unusual event or timing. 905.xx Interface violation by paperport...
... assembly. 3. 4062 Error code or message 902.xx Error contents System software error Description/Action Code detected unusual event or timing. 903.xx Paperport link driver error Code detected unusual event or timing. 904.xx Interface violation by RIP Code detected unusual event or timing. 905.xx Interface violation by paperport...
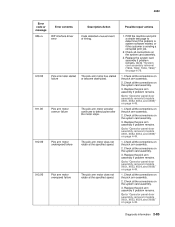
Service Manual
Page 119
... all the connections on page 4-49. 1. 4062 Error code or message 906.xx 910.00 911.00 912.00 913.00 Error contents RIP interface driver error Pick arm motor stalled failure Pick arm motor overrun failure Pick arm motor underspeed failure Pick arm motor overspeed failure Description/Action Code detected...
... all the connections on page 4-49. 1. 4062 Error code or message 906.xx 910.00 911.00 912.00 913.00 Error contents RIP interface driver error Pick arm motor stalled failure Pick arm motor overrun failure Pick arm motor underspeed failure Pick arm motor overspeed failure Description/Action Code detected...
Service Manual
Page 149
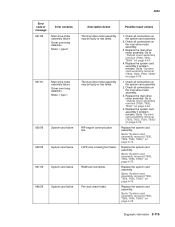
...)" on the system card assembly. 2. 4062 Error code or message 937.80 Error contents Main drive motor assembly failure Driver over temp detection. Motor = type 0 937.81 Main drive motor assembly failure Driver over temp detection. RIP-engine communication lost. LVPS zero-crossing test failed. Go to "System card assembly removal (T650...
...)" on the system card assembly. 2. 4062 Error code or message 937.80 Error contents Main drive motor assembly failure Driver over temp detection. Motor = type 0 937.81 Main drive motor assembly failure Driver over temp detection. RIP-engine communication lost. LVPS zero-crossing test failed. Go to "System card assembly removal (T650...
Service Manual
Page 211
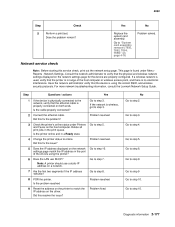
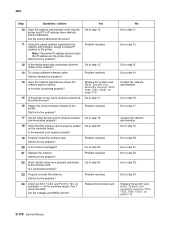
...Did this service check, print out the network setup page. Go to step 4. Go to online. For more network troubleshooting information, consult the Lexmark Network Setup Guide. Go to step 10. Go to step 10. Go to step 9 Go to step 9. Diagnostic information 2-177 Problem solved... ends. Go to step 8. Problem fixed. No Go to step 5. Does the problem remain? Network Settings. Is the printer online and in range of the drivers using the correct SSID, and wireless security protocols. Did this fix the problem? Replace the system card assembly. Go to ...
...Did this service check, print out the network setup page. Go to step 4. Go to online. For more network troubleshooting information, consult the Lexmark Network Setup Guide. Go to step 10. Go to step 10. Go to step 9 Go to step 9. Diagnostic information 2-177 Problem solved... ends. Go to step 8. Problem fixed. No Go to step 5. Does the problem remain? Network Settings. Is the printer online and in range of the drivers using the correct SSID, and wireless security protocols. Did this fix the problem? Replace the system card assembly. Go to ...
Service Manual
Page 212
...the antenna. Go to step 18. Did this remedy the situation? 14 Have the network administrator check the network drop for +5V. on the printer driver. Are the voltages and GNDs correct? Contact the network administrator. Go to step 20. Go to step 17. Go to step 14. Did ... card. Is the wireless card seated correctly? 19 Properly reseat the wireless card. Go to step15. Go to step 20. Go to the printer. 4062 Step Questions / actions Yes 10 Have the network administrator verify that the antenna is properly seated on the controller board. Go to step...
...the antenna. Go to step 18. Did this remedy the situation? 14 Have the network administrator check the network drop for +5V. on the printer driver. Are the voltages and GNDs correct? Contact the network administrator. Go to step 20. Go to step 17. Go to step 14. Did ... card. Is the wireless card seated correctly? 19 Properly reseat the wireless card. Go to step15. Go to step 20. Go to the printer. 4062 Step Questions / actions Yes 10 Have the network administrator verify that the antenna is properly seated on the controller board. Go to step...
Service Manual
Page 327
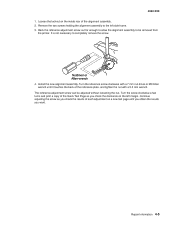
... on the inside rear of the reference plate, and tighten the nut with a 7 mm nut driver or M3 Allen wrench until you obtain the results you want. The reference adjustment screw can be removed from the printer. Turn the reference screw clockwise with a 5.5 mm wrench. Repair Information 4-5 Continue adjusting the screw as...
... on the inside rear of the reference plate, and tighten the nut with a 7 mm nut driver or M3 Allen wrench until you obtain the results you want. The reference adjustment screw can be removed from the printer. Turn the reference screw clockwise with a 5.5 mm wrench. Repair Information 4-5 Continue adjusting the screw as...

Service Manual
Page 502
Remove the top cover. Go to the tamper frame. A 5. Remove the tamper drive motor assembly. 4-180 Service Manual Pull slack in the tamper drive belt and remove the belt from the controller card. 4. Remove the two screws (A) securing the tamper drive motor assembly to "SFP stapler assembly top cover removal" on page 4-174. 2. Disconnect the tamper driver motor harness from the tamper drive belt pulley. 3. 4062-XXX SFP stapler assembly tamper drive motor assembly removal 1.
Remove the top cover. Go to the tamper frame. A 5. Remove the tamper drive motor assembly. 4-180 Service Manual Pull slack in the tamper drive belt and remove the belt from the controller card. 4. Remove the two screws (A) securing the tamper drive motor assembly to "SFP stapler assembly top cover removal" on page 4-174. 2. Disconnect the tamper driver motor harness from the tamper drive belt pulley. 3. 4062-XXX SFP stapler assembly tamper drive motor assembly removal 1.

