User Guide
Page 3
...the standard or optional 250‑sheet or 550‑sheet tray 52 Loading the 2000‑sheet tray...56 Loading the multipurpose feeder...59 Loading the envelope feeder...62 Linking and unlinking trays...63 Linking trays ...63 Unlinking trays ...64 Linking exit bins ...64 Changing a Custom Type name......envelopes...74 Tips on using labels ...75 Tips on using card stock...75 Printing confidential and other held jobs 76 Holding jobs in the printer ...76 Printing confidential and other held jobs ...76 Printing from a flash drive...78 Printing information pages...79 Printing a font sample list...
...the standard or optional 250‑sheet or 550‑sheet tray 52 Loading the 2000‑sheet tray...56 Loading the multipurpose feeder...59 Loading the envelope feeder...62 Linking and unlinking trays...63 Linking trays ...63 Unlinking trays ...64 Linking exit bins ...64 Changing a Custom Type name......envelopes...74 Tips on using labels ...75 Tips on using card stock...75 Printing confidential and other held jobs 76 Holding jobs in the printer ...76 Printing confidential and other held jobs ...76 Printing from a flash drive...78 Printing information pages...79 Printing a font sample list...

User Guide
Page 6
...pick rollers ...172 Ordering staple cartridges ...172 Ordering a transfer roller...172 Recycling Lexmark products...172 Moving the printer...172 Before moving the printer ...172 Moving the printer to another location...173 Shipping the printer ...173 Administrative support 174 Finding advanced networking and administrator information 174 Using the...print 179 Job takes longer than expected to print ...179 Job prints from the wrong tray or on the wrong paper 180 Incorrect characters print ...180 Tray linking does not work...180 Large jobs do not collate...180 Unexpected page breaks occur...181...
...pick rollers ...172 Ordering staple cartridges ...172 Ordering a transfer roller...172 Recycling Lexmark products...172 Moving the printer...172 Before moving the printer ...172 Moving the printer to another location...173 Shipping the printer ...173 Administrative support 174 Finding advanced networking and administrator information 174 Using the...print 179 Job takes longer than expected to print ...179 Job prints from the wrong tray or on the wrong paper 180 Incorrect characters print ...180 Tray linking does not work...180 Large jobs do not collate...180 Unexpected page breaks occur...181...
User Guide
Page 9
CAUTION-TIPPING HAZARD: Floor-mounted configurations require additional furniture for stability. If you purchased a multifunction printer (MFP) that scans, copies, and faxes, you are using a high-capacity input tray, a duplex unit and an input option, or more information, see www.lexmark.com/multifunctionprinters. Safety information 9 Refer service or repairs, other than one input option...
CAUTION-TIPPING HAZARD: Floor-mounted configurations require additional furniture for stability. If you purchased a multifunction printer (MFP) that scans, copies, and faxes, you are using a high-capacity input tray, a duplex unit and an input option, or more information, see www.lexmark.com/multifunctionprinters. Safety information 9 Refer service or repairs, other than one input option...
User Guide
Page 11
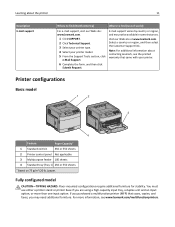
... than one input option. Visit our Web site at www.lexmark.com. You must use either a printer stand or printer base if you purchased a multifunction printer (MFP) that came with your printer model. 5 From the Support Tools section, click e-Mail ...site: www.lexmark.com. 1 Click SUPPORT. 2 Click Technical Support. 3 Select your printer type. 4 Select your printer. Printer configurations Basic model 1 2 3 4 Feature Paper Capacity* 1 Standard exit bin 350 or 550 sheets 2 Printer control panel Not applicable 3 Multipurpose feeder 100 sheets 4 Standard tray (Tray 1) 250 or...
... than one input option. Visit our Web site at www.lexmark.com. You must use either a printer stand or printer base if you purchased a multifunction printer (MFP) that came with your printer model. 5 From the Support Tools section, click e-Mail ...site: www.lexmark.com. 1 Click SUPPORT. 2 Click Technical Support. 3 Select your printer type. 4 Select your printer. Printer configurations Basic model 1 2 3 4 Feature Paper Capacity* 1 Standard exit bin 350 or 550 sheets 2 Printer control panel Not applicable 3 Multipurpose feeder 100 sheets 4 Standard tray (Tray 1) 250 or...

User Guide
Page 12
... 500 sheets 3 Envelope feeder 85 envelopes 4 Standard tray (Tray 1) 250 or 550 sheets 5 Duplex unit3 Not applicable 6 Optional tray (Tray 2) 250 or 550 sheets 7 Optional tray (Tray 3) 250 or 550 sheets 8 Optional 2000‑sheet tray (Tray 4) 2000 sheets 9 Caster base Not applicable 1 Based on 75 g/m2 (20 lb.) paper. 2 The printer supports up to three output expander units...
... 500 sheets 3 Envelope feeder 85 envelopes 4 Standard tray (Tray 1) 250 or 550 sheets 5 Duplex unit3 Not applicable 6 Optional tray (Tray 2) 250 or 550 sheets 7 Optional tray (Tray 3) 250 or 550 sheets 8 Optional 2000‑sheet tray (Tray 4) 2000 sheets 9 Caster base Not applicable 1 Based on 75 g/m2 (20 lb.) paper. 2 The printer supports up to three output expander units...
User Guide
Page 13
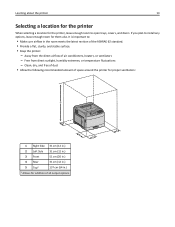
...from the direct airflow of air conditioners, heaters, or ventilators - It is important to open trays, covers, and doors. Clean, dry, and free of dust • Allow the following recommended amount of space around the printer for proper ventilation: 5 4 1 3 2 1 Right Side 31 cm (12 in.)... ASHRAE 62 standard. • Provide a flat, sturdy, and stable surface. • Keep the printer: - Learning about the printer 13 Selecting a location for the printer When selecting a location for the printer, leave enough room to : • Make sure airflow in .) 1 Allows for addition of all...
...from the direct airflow of air conditioners, heaters, or ventilators - It is important to open trays, covers, and doors. Clean, dry, and free of dust • Allow the following recommended amount of space around the printer for proper ventilation: 5 4 1 3 2 1 Right Side 31 cm (12 in.)... ASHRAE 62 standard. • Provide a flat, sturdy, and stable surface. • Keep the printer: - Learning about the printer 13 Selecting a location for the printer When selecting a location for the printer, leave enough room to : • Make sure airflow in .) 1 Allows for addition of all...
User Guide
Page 33
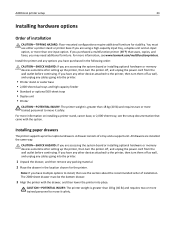
... memory devices sometime after setting up to install, then see the section about the recommended order of a tray and a support unit. For more information on installing a printer stand, caster base, or 2,000‑sheet tray, see www.lexmark.com/multifunctionprinters. If you have purchased in the following order: CAUTION-SHOCK HAZARD: If you have...
... memory devices sometime after setting up to install, then see the section about the recommended order of a tray and a support unit. For more information on installing a printer stand, caster base, or 2,000‑sheet tray, see www.lexmark.com/multifunctionprinters. If you have purchased in the following order: CAUTION-SHOCK HAZARD: If you have...

User Guide
Page 34
Installing an optional duplex unit (T650 only) The optional duplex unit for the T650 model attaches under the printer, below the standard tray and above any optional drawers. Additional printer setup 34 Removing an optional drawer Warning-Potential Damage: Lifting the printer from a drawer without pushing in the safety latches on both sides of the drawer until they click and stay recessed, and then lift the printer. To remove an optional drawer, push in the safety latches could damage the latches.
Installing an optional duplex unit (T650 only) The optional duplex unit for the T650 model attaches under the printer, below the standard tray and above any optional drawers. Additional printer setup 34 Removing an optional drawer Warning-Potential Damage: Lifting the printer from a drawer without pushing in the safety latches on both sides of the drawer until they click and stay recessed, and then lift the printer. To remove an optional drawer, push in the safety latches could damage the latches.
User Guide
Page 51
... sizes that lets you want is determined by the position of measurement 1 Make sure the printer is Plain Paper. the largest is 70 x 127 mm (2.8 x 5 in the tray for all trays except the multipurpose feeder. The Paper Size setting for the multipurpose feeder must be set manually... It also includes information about paper orientation, setting the Paper Size and Paper Type, and linking and unlinking trays. The factory default Paper Type setting is on and Ready appears. 2 From the printer control panel, press . 3 Press the arrow buttons until Paper Menu appears, and then press . 4...
... sizes that lets you want is determined by the position of measurement 1 Make sure the printer is Plain Paper. the largest is 70 x 127 mm (2.8 x 5 in the tray for all trays except the multipurpose feeder. The Paper Size setting for the multipurpose feeder must be set manually... It also includes information about paper orientation, setting the Paper Size and Paper Type, and linking and unlinking trays. The factory default Paper Type setting is on and Ready appears. 2 From the printer control panel, press . 3 Press the arrow buttons until Paper Menu appears, and then press . 4...
User Guide
Page 52
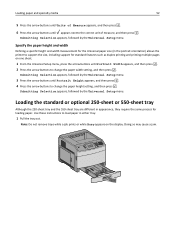
...on the display. Loading the standard or optional 250‑sheet or 550‑sheet tray Although the 250-sheet tray and the 550-sheet tray are different in either tray: 1 Pull the tray out. Submitting Selection appears, followed by the Universal Setup menu. 3 Press the arrow...the paper height and width Defining a specific height and width measurement for the Universal paper size (in the portrait orientation) allows the printer to support the size, including support for loading paper. Submitting Selection appears, followed by the Universal Setup menu. Submitting Selection appears,...
...on the display. Loading the standard or optional 250‑sheet or 550‑sheet tray Although the 250-sheet tray and the 550-sheet tray are different in either tray: 1 Pull the tray out. Submitting Selection appears, followed by the Universal Setup menu. 3 Press the arrow...the paper height and width Defining a specific height and width measurement for the Universal paper size (in the portrait orientation) allows the printer to support the size, including support for loading paper. Submitting Selection appears, followed by the Universal Setup menu. Submitting Selection appears,...
User Guide
Page 53
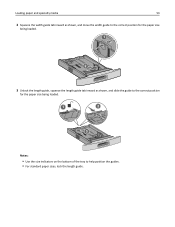
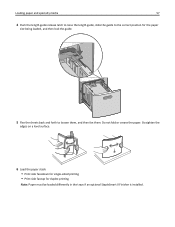
Loading paper and specialty media 53 2 Squeeze the width guide tab inward as shown, and move the width guide to the correct position for the paper size being loaded. 1 2 3 Unlock the length guide, squeeze the length guide tab inward as shown, and slide the guide to the correct position for the paper size being loaded. 1 2 3 Notes: • Use the size indicators on the bottom of the tray to help position the guides. • For standard paper sizes, lock the length guide.
Loading paper and specialty media 53 2 Squeeze the width guide tab inward as shown, and move the width guide to the correct position for the paper size being loaded. 1 2 3 Unlock the length guide, squeeze the length guide tab inward as shown, and slide the guide to the correct position for the paper size being loaded. 1 2 3 Notes: • Use the size indicators on the bottom of the tray to help position the guides. • For standard paper sizes, lock the length guide.
User Guide
Page 54
Do not overload the tray. Do not fold or crease the paper. Loading paper and specialty media 54 4 Flex the sheets back and forth to loosen them, and then fan them. Straighten the edges on the side of the tray which indicates the maximum height for duplex printing Note: Paper must... be loaded differently in the trays if an optional StapleSmartTM II Finisher is installed. LETTERHEAD LETTERHEAD 5 Load the paper stack: •...
Do not overload the tray. Do not fold or crease the paper. Loading paper and specialty media 54 4 Flex the sheets back and forth to loosen them, and then fan them. Straighten the edges on the side of the tray which indicates the maximum height for duplex printing Note: Paper must... be loaded differently in the trays if an optional StapleSmartTM II Finisher is installed. LETTERHEAD LETTERHEAD 5 Load the paper stack: •...
User Guide
Page 55
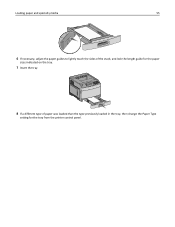
Loading paper and specialty media 55 6 If necessary, adjust the paper guides to lightly touch the sides of the stack, and lock the length guide for the paper sizes indicated on the tray. 7 Insert the tray. 8 If a different type of paper was loaded than the type previously loaded in the tray, then change the Paper Type setting for the tray from the printer control panel.
Loading paper and specialty media 55 6 If necessary, adjust the paper guides to lightly touch the sides of the stack, and lock the length guide for the paper sizes indicated on the tray. 7 Insert the tray. 8 If a different type of paper was loaded than the type previously loaded in the tray, then change the Paper Type setting for the tray from the printer control panel.
User Guide
Page 56
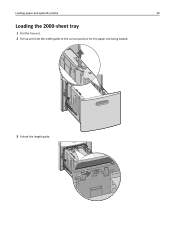
Loading paper and specialty media 56 Loading the 2000‑sheet tray 1 Pull the tray out. 2 Pull up and slide the width guide to the correct position for the paper size being loaded. 3 Unlock the length guide.
Loading paper and specialty media 56 Loading the 2000‑sheet tray 1 Pull the tray out. 2 Pull up and slide the width guide to the correct position for the paper size being loaded. 3 Unlock the length guide.
User Guide
Page 57
Straighten the edges on a level surface. 6 Load the paper stack: • Print side facedown for single‑sided printing • Print side faceup for the paper size being loaded, and then lock the guide. 5 Flex the sheets back and forth to loosen them, and then fan them. Loading paper and specialty media 57 4 Push the length guide release latch to raise the length guide, slide the guide to the correct position for duplex printing Note: Paper must be loaded differently in the trays if an optional StapleSmart II Finisher is installed. Do not fold or crease the paper.
Straighten the edges on a level surface. 6 Load the paper stack: • Print side facedown for single‑sided printing • Print side faceup for the paper size being loaded, and then lock the guide. 5 Flex the sheets back and forth to loosen them, and then fan them. Loading paper and specialty media 57 4 Push the length guide release latch to raise the length guide, slide the guide to the correct position for duplex printing Note: Paper must be loaded differently in the trays if an optional StapleSmart II Finisher is installed. Do not fold or crease the paper.
User Guide
Page 58
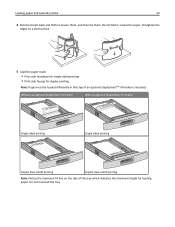
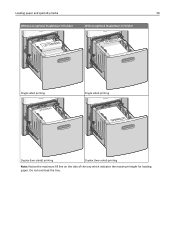
LETTERHEAD LETTERHEAD Loading paper and specialty media 58 Without an optional StapleSmart II Finisher With an optional StapleSmart II Finisher LETTERHEAD Single‑sided printing LETTERHEAD Single‑sided printing Duplex (two‑sided) printing Duplex (two‑sided) printing Note: Notice the maximum fill line on the side of the tray which indicates the maximum height for loading paper. Do not overload the tray.
LETTERHEAD LETTERHEAD Loading paper and specialty media 58 Without an optional StapleSmart II Finisher With an optional StapleSmart II Finisher LETTERHEAD Single‑sided printing LETTERHEAD Single‑sided printing Duplex (two‑sided) printing Duplex (two‑sided) printing Note: Notice the maximum fill line on the side of the tray which indicates the maximum height for loading paper. Do not overload the tray.
User Guide
Page 59
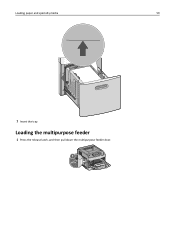
Loading paper and specialty media 59 7 Insert the tray. Loading the multipurpose feeder 1 Press the release latch, and then pull down the multipurpose feeder door. 2 1
Loading paper and specialty media 59 7 Insert the tray. Loading the multipurpose feeder 1 Press the release latch, and then pull down the multipurpose feeder door. 2 1
User Guide
Page 61
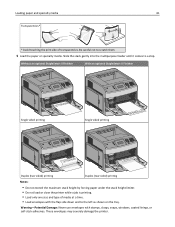
...Notes: • Do not exceed the maximum stack height by forcing paper under the stack height limiter. • Do not load or close the printer while a job is printing. • Load only one size and type of transparencies. Warning-Potential Damage: Never use envelopes with the flap side ...down and to a stop. Slide the stack gently into the multipurpose feeder until it comes to the left as shown on the tray. These envelopes may severely damage the printer. Be careful not to scratch them. 5 Load the paper or specialty media. Loading paper and specialty media 61 Transparencies* * ...
...Notes: • Do not exceed the maximum stack height by forcing paper under the stack height limiter. • Do not load or close the printer while a job is printing. • Load only one size and type of transparencies. Warning-Potential Damage: Never use envelopes with the flap side ...down and to a stop. Slide the stack gently into the multipurpose feeder until it comes to the left as shown on the tray. These envelopes may severely damage the printer. Be careful not to scratch them. 5 Load the paper or specialty media. Loading paper and specialty media 61 Transparencies* * ...
User Guide
Page 63
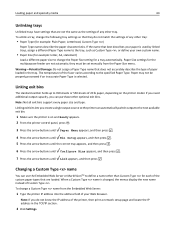
...Paper Type setting must be set for large print jobs or multiple copies. The printer automatically senses the Paper Size setting according to the position of the paper guides in order for any trays, the trays are automatically linked. Note: To link the multipurpose feeder, Configure MP must ... a level surface. 5 Load the stack of the paper stack. 7 Lower the envelope weight to touch the paper stack. 8 From the printer control panel, set to loosen them, and then fan them. Linking and unlinking trays Linking trays Tray linking is empty, paper feeds from the Paper Size/Type menu.
...Paper Type setting must be set for large print jobs or multiple copies. The printer automatically senses the Paper Size setting according to the position of the paper guides in order for any trays, the trays are automatically linked. Note: To link the multipurpose feeder, Configure MP must ... a level surface. 5 Load the stack of the paper stack. 7 Lower the envelope weight to touch the paper stack. 8 From the printer control panel, set to loosen them, and then fan them. Linking and unlinking trays Linking trays Tray linking is empty, paper feeds from the Paper Size/Type menu.
User Guide
Page 64
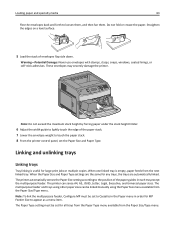
... Linking exit bins lets you create a single output source so the printer can automatically switch output to the next available exit bin. 1 Make sure the printer is used by linked trays, assign a different Paper Type name to the tray, such as the settings of 20 lb paper, depending on and Ready... appears. 2 From the printer control panel, press . 3 Press the arrow buttons until Paper Menu ...
... Linking exit bins lets you create a single output source so the printer can automatically switch output to the next available exit bin. 1 Make sure the printer is used by linked trays, assign a different Paper Type name to the tray, such as the settings of 20 lb paper, depending on and Ready... appears. 2 From the printer control panel, press . 3 Press the arrow buttons until Paper Menu ...


