User's Reference
Page 4
Contents Ordering a charge roll 84 Ordering a transfer roller 84 Ordering pick rollers 84 Ordering a label fuser cleaner 85 Ordering staple cartridges 85 Storing supplies ...85 Storing the print cartridge 86 Replacing the print cartridge 86 Removing the ... cartridge 86 Cleaning the printer 87 Installing the new print cartridge 88 Replacing the charge roll 90 Replacing the transfer roller 94 Replacing the pick rollers 98 Replacing the label fuser cleaner 101 Replacing the staple cartridge 104 Removing a used staple cartridge 105 Installing a new staple cartridge 106 Resetting ...
Contents Ordering a charge roll 84 Ordering a transfer roller 84 Ordering pick rollers 84 Ordering a label fuser cleaner 85 Ordering staple cartridges 85 Storing supplies ...85 Storing the print cartridge 86 Replacing the print cartridge 86 Removing the ... cartridge 86 Cleaning the printer 87 Installing the new print cartridge 88 Replacing the charge roll 90 Replacing the transfer roller 94 Replacing the pick rollers 98 Replacing the label fuser cleaner 101 Replacing the staple cartridge 104 Removing a used staple cartridge 105 Installing a new staple cartridge 106 Resetting ...
User's Reference
Page 87
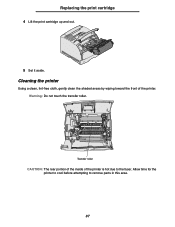
Allow time for the printer to cool before attempting to the fuser. Transfer roller CAUTION: The rear portion of the inside of the printer. Cleaning the printer Using a clean, lint-free cloth, gently clean the shaded areas by wiping toward the front of the printer is hot due to remove parts in this area. 87 Warning: Do not touch the transfer roller. Replacing the print cartridge 4 Lift the print cartridge up and out. 5 Set it aside.
Allow time for the printer to cool before attempting to the fuser. Transfer roller CAUTION: The rear portion of the inside of the printer. Cleaning the printer Using a clean, lint-free cloth, gently clean the shaded areas by wiping toward the front of the printer is hot due to remove parts in this area. 87 Warning: Do not touch the transfer roller. Replacing the print cartridge 4 Lift the print cartridge up and out. 5 Set it aside.

User's Reference
Page 283
...tray 49 multipurpose feeder 55, 61 transparencies input tray 49 multipurpose feeder 61 Local Printer Setup Utility 185 drivers CD 185 Help 186 Lexmark Web site 185 values 186 Finishing Settings 186 Paper Settings 186 Parallel Settings 186 PCL Emulation Settings 186 PostScript Settings 186 Quality Settings... a print cartridge 83 Prebate 83 regular 83 print cartridge installing a new one 88 storing 86 maintenance charge roll 90 label fuser cleaner 101 pick rollers 98 staple cartridge 104 transfer roll 94 maximum stack height 60 memory Print and Hold function 187 Menu button 208 menu settings page...
...tray 49 multipurpose feeder 55, 61 transparencies input tray 49 multipurpose feeder 61 Local Printer Setup Utility 185 drivers CD 185 Help 186 Lexmark Web site 185 values 186 Finishing Settings 186 Paper Settings 186 Parallel Settings 186 PCL Emulation Settings 186 PostScript Settings 186 Quality Settings... a print cartridge 83 Prebate 83 regular 83 print cartridge installing a new one 88 storing 86 maintenance charge roll 90 label fuser cleaner 101 pick rollers 98 staple cartridge 104 transfer roll 94 maximum stack height 60 memory Print and Hold function 187 Menu button 208 menu settings page...
User's Reference
Page 288
... 235 Quick Reference (Help Menu) 263 R recommended papers 30 Remove Held Jobs (Utilities Menu) 228 repeat print 188 replacing charge roll 90 label fuser cleaner 101 pick rollers 98 staple cartridge 104 transfer roll 94 reserve print 189 Reset Active Bin (Job Menu) 233 Reset Printer (Job Menu) 232 resetting printer 232...
... 235 Quick Reference (Help Menu) 263 R recommended papers 30 Remove Held Jobs (Utilities Menu) 228 repeat print 188 replacing charge roll 90 label fuser cleaner 101 pick rollers 98 staple cartridge 104 transfer roll 94 reserve print 189 Reset Active Bin (Job Menu) 233 Reset Printer (Job Menu) 232 resetting printer 232...


