
Setup Guide
Page 50
... administrative access to install printer drivers on our Lexmark Web site at www.lexmark.com. System drivers work well for local printing 45 If the CD auto launches, exit the CD. Drivers are also available in the Printers folder. Click Next. 2 Browse to the location of the necessary files and installs the printer driver. 4 Click Finish when the software is compatible with Windows XP. b Select the printer you may need to install the custom printer driver using the drivers...
... administrative access to install printer drivers on our Lexmark Web site at www.lexmark.com. System drivers work well for local printing 45 If the CD auto launches, exit the CD. Drivers are also available in the Printers folder. Click Next. 2 Browse to the location of the necessary files and installs the printer driver. 4 Click Finish when the software is compatible with Windows XP. b Select the printer you may need to install the custom printer driver using the drivers...
Setup Guide
Page 56
... and Linux platforms. Serial connections With serial printing, data is transferred one bit at a time. To do this, you must be set to 1) set to 7 or 8. - Maximum baud rate supported is not available. in each package gives detailed instructions for installing and using a parallel connection. All the printer driver packages support local printing using Lexmark printers in UNIX and Linux environments. Note the following restrictions: - Install drivers for a complete list of distance between your...
... and Linux platforms. Serial connections With serial printing, data is transferred one bit at a time. To do this, you must be set to 1) set to 7 or 8. - Maximum baud rate supported is not available. in each package gives detailed instructions for installing and using a parallel connection. All the printer driver packages support local printing using Lexmark printers in UNIX and Linux environments. Note the following restrictions: - Install drivers for a complete list of distance between your...

Setup Guide
Page 57
...: D:/Setup.exe. 2 Click Install Printer Software. 3 Click Agree if you accept the Printer Software License Agreement. 4 Select Local printer install, and then click Next. 5 Check the box next to the printer you are correct. b Press Menu until you installed a serial interface card) heading to the printer driver. Setting parameters in the communications port assigned to find the serial parameters. Keep this page for local printing 52 Flow Control recommended protocol setting is installed, you must set to...
...: D:/Setup.exe. 2 Click Install Printer Software. 3 Click Agree if you accept the Printer Software License Agreement. 4 Select Local printer install, and then click Next. 5 Check the box next to the printer you are correct. b Press Menu until you installed a serial interface card) heading to the printer driver. Setting parameters in the communications port assigned to find the serial parameters. Keep this page for local printing 52 Flow Control recommended protocol setting is installed, you must set to...
User's Reference
Page 4
... used print cartridge 86 Cleaning the printer 87 Installing the new print cartridge 88 Replacing the charge roll 90 Replacing the transfer roller 94 Replacing the pick rollers 98 Replacing the label fuser cleaner 101 Replacing the staple cartridge 104 Removing a used staple cartridge 105 Installing a new staple cartridge 106 Resetting the maintenance counter 108 Printer maintenance when printing on card stock 108 Printer maintenance when printing on labels 108 Chapter 5: Troubleshooting 109 Solving basic printer problems 109 Checking an unresponsive printer 109 Solving display...
... used print cartridge 86 Cleaning the printer 87 Installing the new print cartridge 88 Replacing the charge roll 90 Replacing the transfer roller 94 Replacing the pick rollers 98 Replacing the label fuser cleaner 101 Replacing the staple cartridge 104 Removing a used staple cartridge 105 Installing a new staple cartridge 106 Resetting the maintenance counter 108 Printer maintenance when printing on card stock 108 Printer maintenance when printing on labels 108 Chapter 5: Troubleshooting 109 Solving basic printer problems 109 Checking an unresponsive printer 109 Solving display...

User's Reference
Page 23
... the second line of the available printer settings you want to open the online Help for more information. Canceling a print job There are sending to the Setup Guide for more information about choosing and installing drivers. To print a job from a typical Windows application: 1 Open the file you are available from the printer operator panel. The message Canceling Job is selected in the printer driver window, open the Job Menu. Print settings selected from the driver override the default settings selected from the Lexmark Web site.You...
... the second line of the available printer settings you want to open the online Help for more information. Canceling a print job There are sending to the Setup Guide for more information about choosing and installing drivers. To print a job from a typical Windows application: 1 Open the file you are available from the printer operator panel. The message Canceling Job is selected in the printer driver window, open the Job Menu. Print settings selected from the driver override the default settings selected from the Lexmark Web site.You...
User's Reference
Page 82
... cancel the job. Multipage Print Duplex in the Finishing Menu Duplex printing is available when you should order a new print cartridge. Ordering a print cartridge When the 88 Toner Low message appears, you Duplex attach the optional duplex unit. The values range from 1 (lightest setting) to send a Verify Print job. It lets you can print a few hundred pages after the 88 Toner Low message comes on one side of a sheet. If the job is satisfactory before you print up to print the...
... cancel the job. Multipage Print Duplex in the Finishing Menu Duplex printing is available when you should order a new print cartridge. Ordering a print cartridge When the 88 Toner Low message appears, you Duplex attach the optional duplex unit. The values range from 1 (lightest setting) to send a Verify Print job. It lets you can print a few hundred pages after the 88 Toner Low message comes on one side of a sheet. If the job is satisfactory before you print up to print the...
User's Reference
Page 113
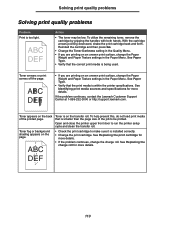
...; Check the print cartridge to run the printer setup cycle and clean the transfer roll. Toner is smaller than the page size of the printed page. To utilize the remaining toner, remove the cartridge by gripping the handles with both hands. See Identifying print media sources and specifications for more details. • If the problem continues, change the Paper Weight and Paper Texture settings in the Paper Menu. DEF 113 To help prevent this, do not load print media...
...; Check the print cartridge to run the printer setup cycle and clean the transfer roll. Toner is smaller than the page size of the printed page. To utilize the remaining toner, remove the cartridge by gripping the handles with both hands. See Identifying print media sources and specifications for more details. • If the problem continues, change the Paper Weight and Paper Texture settings in the Paper Menu. DEF 113 To help prevent this, do not load print media...

User's Reference
Page 184
... specifically, for different languages or specific applications, such as math symbols used to the Card Stock & Label Guide available on the keyboard (or more information, refer to read the OCR characters as Print Resolution, Toner Darkness, and Print Darkness. To support multiple applications and languages, your print media. Refer to the Technical Reference to help optimize the readability of OCR characters or bar codes on printer settings and print media...
... specifically, for different languages or specific applications, such as math symbols used to the Card Stock & Label Guide available on the keyboard (or more information, refer to read the OCR characters as Print Resolution, Toner Darkness, and Print Darkness. To support multiple applications and languages, your print media. Refer to the Technical Reference to help optimize the readability of OCR characters or bar codes on printer settings and print media...

User's Reference
Page 208
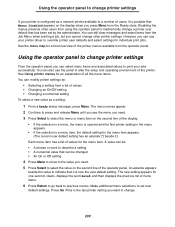
... button has a function. The printer must display Ready for jobs to enter your personal identification number (PIN) after loading print media and clearing paper jams. • Exit Power Saver. Using the operator panel buttons The numbers 1 through the menus. Each end of each button. If you have changed printer settings from the operator panel menus, press Go before sending a job to the Ready state. • Clear some operator panel messages. • Resume printing after you send a confidential print job from the Print and Hold jobs...
... button has a function. The printer must display Ready for jobs to enter your personal identification number (PIN) after loading print media and clearing paper jams. • Exit Power Saver. Using the operator panel buttons The numbers 1 through the menus. Each end of each button. If you have changed printer settings from the operator panel menus, press Go before sending a job to the Ready state. • Clear some operator panel messages. • Resume printing after you send a confidential print job from the Print and Hold jobs...
User's Reference
Page 209
...; Changing an On/Off setting • Changing a numerical setting To select a new value as a network printer available to previous menus. The menu names appear. 2 Continue to press and release Menu until you see the menu you can modify printer settings by the administrator. See the menu map for an explanation of all the menu items. You can use the panel to override printer user defaults and select settings for individual print jobs. Make additional menu...
...; Changing an On/Off setting • Changing a numerical setting To select a new value as a network printer available to previous menus. The menu names appear. 2 Continue to press and release Menu until you see the menu you can modify printer settings by the administrator. See the menu map for an explanation of all the menu items. You can use the panel to override printer user defaults and select settings for individual print jobs. Make additional menu...
User's Reference
Page 273
...: Clearing jams Clear the paper path. This error can do not replace the print cartridge, you may experience print quality problems. Tray Empty The specified tray is processing data through the specified USB port. Load paper in the optional duplex unit. Add paper to the tray to clear the message. Download the correct download emulator version from one printer to another. Understanding the printer messages Message What this message means What you can occur if you update printer firmware or move a firmware card from Lexmark's Web site. 2 Paper Jam 23x Duplex Jam...
...: Clearing jams Clear the paper path. This error can do not replace the print cartridge, you may experience print quality problems. Tray Empty The specified tray is processing data through the specified USB port. Load paper in the optional duplex unit. Add paper to the tray to clear the message. Download the correct download emulator version from one printer to another. Understanding the printer messages Message What this message means What you can occur if you update printer firmware or move a firmware card from Lexmark's Web site. 2 Paper Jam 23x Duplex Jam...
User's Reference
Page 278
... printing. • Install a different hard disk before you can do Too many optional output bins are installed on the printer. See also: Removing an optional flash memory card or optional firmware card Too many drawers with matching trays are installed on the printer. The printer detects a defective hard disk. • Press Go to clear the message and continue processing. See also: Setup Guide There is not enough memory on . Remove the additional drawers. Turn...
... printing. • Install a different hard disk before you can do Too many optional output bins are installed on the printer. See also: Removing an optional flash memory card or optional firmware card Too many drawers with matching trays are installed on the printer. The printer detects a defective hard disk. • Press Go to clear the message and continue processing. See also: Setup Guide There is not enough memory on . Remove the additional drawers. Turn...

User's Reference
Page 279
... check all cable connections. See also: Contacting service 279 Note: Disk operations will not be defective and require replacing. Turn the printer back on hand, order one now. • Shake the print cartridge to utilize the remaining toner. • Replace the print cartridge. • Press Go to maintain top performance and avoid print quality and paper feed problems. Replace the maintenance items and reset the printer maintenance counter, if necessary. See also: Resetting the maintenance counter The printer...
... check all cable connections. See also: Contacting service 279 Note: Disk operations will not be defective and require replacing. Turn the printer back on hand, order one now. • Shake the print cartridge to utilize the remaining toner. • Replace the print cartridge. • Press Go to maintain top performance and avoid print quality and paper feed problems. Replace the maintenance items and reset the printer maintenance counter, if necessary. See also: Resetting the maintenance counter The printer...
User's Reference
Page 288
... (Serial Menu) 259 PS SmartSwitch (USB Menu) 256 PS SmartSwitch, setting See also printer language 236 network port 253 parallel port 249 serial port 259 USB port 256 Q Quality Menu 234 PictureGrade 235 Print Resolution 234 Toner Darkness 235 Quick Reference (Help Menu) 263 R recommended papers 30 Remove Held Jobs (Utilities Menu) 228 repeat print 188 replacing charge roll 90 label fuser cleaner 101 pick rollers 98 staple cartridge 104 transfer roll 94 reserve print 189 Reset Active Bin (Job Menu) 233 Reset Printer (Job Menu) 232 resetting printer 232...
... (Serial Menu) 259 PS SmartSwitch (USB Menu) 256 PS SmartSwitch, setting See also printer language 236 network port 253 parallel port 249 serial port 259 USB port 256 Q Quality Menu 234 PictureGrade 235 Print Resolution 234 Toner Darkness 235 Quick Reference (Help Menu) 263 R recommended papers 30 Remove Held Jobs (Utilities Menu) 228 repeat print 188 replacing charge roll 90 label fuser cleaner 101 pick rollers 98 staple cartridge 104 transfer roll 94 reserve print 189 Reset Active Bin (Job Menu) 233 Reset Printer (Job Menu) 232 resetting printer 232...
User's Reference
Page 289
... offline 208 with Menu button 208 with Stop button 208 test printing Hex Trace mode 230 menus page 227 timeout print 237 wait 238 toner alarm 240 Toner Alarm (Setup Menu) 240 Toner Darkness (Quality Menu) 235 transfer roll replacing 94 transparencies guidelines 34 loading input tray 49 multipurpose feeder 61 tray linking 76 Tray Renumber (PCL Emul Menu) 245 troubleshooting basic printer problems 109 clearing operator panel error messages 208 display problems 110 network printing problems 119 option problems 115 optional 2000-sheet drawer 118 print quality 113 printer settings 207 printing...
... offline 208 with Menu button 208 with Stop button 208 test printing Hex Trace mode 230 menus page 227 timeout print 237 wait 238 toner alarm 240 Toner Alarm (Setup Menu) 240 Toner Darkness (Quality Menu) 235 transfer roll replacing 94 transparencies guidelines 34 loading input tray 49 multipurpose feeder 61 tray linking 76 Tray Renumber (PCL Emul Menu) 245 troubleshooting basic printer problems 109 clearing operator panel error messages 208 display problems 110 network printing problems 119 option problems 115 optional 2000-sheet drawer 118 print quality 113 printer settings 207 printing...

Service Manual
Page 38
... installed in slot 2, turn the power off , switch the DIMM in slots 1 or 2.) • 975 - If this does not fix the problem, replace the system board. 960 RAM Memory Error Indicates a DRAM Memory Error on page 3-3. 975 - 979 Network Card x The following : system board, duplex, tray x (1, 2, 3, 4, or 5), envelope feeder or output bin. 2-4 Service Manual Replace the interconnect board. 955 Code CRC Replace the system board. If this does not fix the problem, replace the system board. Note: Service errors...
... installed in slot 2, turn the power off , switch the DIMM in slots 1 or 2.) • 975 - If this does not fix the problem, replace the system board. 960 RAM Memory Error Indicates a DRAM Memory Error on page 3-3. 975 - 979 Network Card x The following : system board, duplex, tray x (1, 2, 3, 4, or 5), envelope feeder or output bin. 2-4 Service Manual Replace the interconnect board. 955 Code CRC Replace the system board. If this does not fix the problem, replace the system board. Note: Service errors...

Service Manual
Page 67
...again. The printer automatically clears the message once the option is advised to clear a paper jam. Check duplex option connection. If the error occurs again, the user is removed. If a print job is not installed. 4060-xxx Check device connection messages The messages in two ways. The messages in the following devices. User status message Check Env Feeder Connection Check Tray x Connection Check Duplex Connection Explanation Check envelope feeder connection. Check tray x, where x=1, 2, 3, 4, or 5. Insert Duplex Front Cover The duplex front access cover is active...
...again. The printer automatically clears the message once the option is advised to clear a paper jam. Check duplex option connection. If the error occurs again, the user is removed. If a print job is not installed. 4060-xxx Check device connection messages The messages in two ways. The messages in the following devices. User status message Check Env Feeder Connection Check Tray x Connection Check Duplex Connection Explanation Check envelope feeder connection. Check tray x, where x=1, 2, 3, 4, or 5. Insert Duplex Front Cover The duplex front access cover is active...

Service Manual
Page 69
...-sheet paper tray Paper jams at exit of copy. duplex option not installed. Go to "Print quality-light print" on page 2-84. Go to "Print quality-blank page." Go to "Paper feed service check" on page 2-83. Go to "Print quality-residual image" on page 2-76. Go to "Smart contact assembly service check" on page 2-83. Go to "Print quality-banding" on page 2-85. Paper feed problem with the high-capacity feeder. Diagnostic information 2-35 Printer sounds 5 beeps. Fuser solenoid fails to "Dead machine service check" on page...
...-sheet paper tray Paper jams at exit of copy. duplex option not installed. Go to "Print quality-light print" on page 2-84. Go to "Print quality-blank page." Go to "Paper feed service check" on page 2-83. Go to "Print quality-residual image" on page 2-76. Go to "Smart contact assembly service check" on page 2-83. Go to "Print quality-banding" on page 2-85. Paper feed problem with the high-capacity feeder. Diagnostic information 2-35 Printer sounds 5 beeps. Fuser solenoid fails to "Dead machine service check" on page...

Service Manual
Page 82
..., replace the duplex option assembly. If a problem is installed, or other object in the base machine, repair as necessary. If not damaged, check the cables are installed FRU 1 Autoconnect cables/ connections Action Check the top and bottom autoconnect connectors for correct operation of paper fails to the duplex system board at J9, J10, J11, and J12. See "Media specifications" on page 1-8. 231 Jam displays on the operator panel FRU 1 Fuser exit sensor 2 Duplex input...
..., replace the duplex option assembly. If a problem is installed, or other object in the base machine, repair as necessary. If not damaged, check the cables are installed FRU 1 Autoconnect cables/ connections Action Check the top and bottom autoconnect connectors for correct operation of paper fails to the duplex system board at J9, J10, J11, and J12. See "Media specifications" on page 1-8. 231 Jam displays on the operator panel FRU 1 Fuser exit sensor 2 Duplex input...

Service Manual
Page 112
.... If incorrect, replace the system board. Select the following menu settings as indicated. These error codes indicate a problem with the service checks. • Use Tray 1 to test for the installed software can return the printer to the original customer printer setup. • Print Resolution: Set to NORMAL. • Test the printer using plain paper (20 lb). 4060-xxx Printhead service check The printhead assembly does not contain any print quality problems do the following: • Install another print cartridge if available...
.... If incorrect, replace the system board. Select the following menu settings as indicated. These error codes indicate a problem with the service checks. • Use Tray 1 to test for the installed software can return the printer to the original customer printer setup. • Print Resolution: Set to NORMAL. • Test the printer using plain paper (20 lb). 4060-xxx Printhead service check The printhead assembly does not contain any print quality problems do the following: • Install another print cartridge if available...


