Service Manual
Page 64
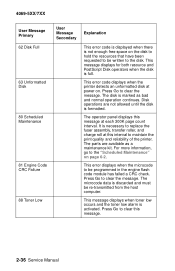
... has failed a CRC check. The parts are not allowed until the disk is formatted. This error displays when the microcode to replace the fuser assembly, transfer roller, and charge roll at each 300K page count interval. The microcode data is necessary to be re-transmitted from the host computer. The operator panel...
... has failed a CRC check. The parts are not allowed until the disk is formatted. This error displays when the microcode to replace the fuser assembly, transfer roller, and charge roll at each 300K page count interval. The microcode data is necessary to be re-transmitted from the host computer. The operator panel...

Service Manual
Page 140
... Print Blurred of material that might be caused by a problem in the main drive gearbox assembly, alignment assembly, any feed roller or in the transfer roll bearings or transfer roll. Check the high voltage contacts to the rolls. Check the gearbox assembly for binds or a contaminated shaft or bearings....foreign material that are stuck to ensure they are not bent, corroded or damaged. Replace as necessary. 2-112 Service Manual Check the transfer roll and charge roll for any pieces of fuzzy print is due to loose material moving around inside the printer and attaching to ...
... Print Blurred of material that might be caused by a problem in the main drive gearbox assembly, alignment assembly, any feed roller or in the transfer roll bearings or transfer roll. Check the high voltage contacts to the rolls. Check the gearbox assembly for binds or a contaminated shaft or bearings....foreign material that are stuck to ensure they are not bent, corroded or damaged. Replace as necessary. 2-112 Service Manual Check the transfer roll and charge roll for any pieces of fuzzy print is due to loose material moving around inside the printer and attaching to ...

Service Manual
Page 270
Upper Paper Deflector Assembly 1. Remove the upper deflector assembly. 4-60 Service Manual Unsnap the transfer roll assembly from the left and remove the transfer roller assembly from the printer. Gently release the upper deflector assembly latch from the two mounting posts. 2. 4069-5XX/7XX Transfer Roll Assembly 1. Open the multipurpose tray and remove the tray from its mounting on the right side frame and slide to the right. 3. Lift the transfer roller assembly toward the left pivot arm. 3. Open the upper front cover and remove the print cartridge. 2.
Upper Paper Deflector Assembly 1. Remove the upper deflector assembly. 4-60 Service Manual Unsnap the transfer roll assembly from the left and remove the transfer roller assembly from the printer. Gently release the upper deflector assembly latch from the two mounting posts. 2. 4069-5XX/7XX Transfer Roll Assembly 1. Open the multipurpose tray and remove the tray from its mounting on the right side frame and slide to the right. 3. Lift the transfer roller assembly toward the left pivot arm. 3. Open the upper front cover and remove the print cartridge. 2.

Service Manual
Page 310
It is necessary to replace the fuser assembly, transfer roller and charge roll at each 300K page count interval. Refer to clear the "80 Scheduled Maintenance" message. The parts are available as a maintenance kit with ...
It is necessary to replace the fuser assembly, transfer roller and charge roll at each 300K page count interval. Refer to clear the "80 Scheduled Maintenance" message. The parts are available as a maintenance kit with ...


