Setup Guide
Page 3
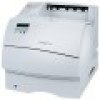
... as much space as shown in this book. Tray number decals - Lexmark T Family T622 model only Turn off the printer If your printer. Label locations are indicated in the illustrations in the illustration. Troubleshooting If you need to the Lexmark T620/T622 Publications CD. 1 Note: Leave the printer... in case you encounter a problem while setting up , make sure the printer power is already set up the printer, refer to repack the printer for service or storage. Lexmark T Family T622 model only ...
... as much space as shown in this book. Tray number decals - Lexmark T Family T622 model only Turn off the printer If your printer. Label locations are indicated in the illustrations in the illustration. Troubleshooting If you need to the Lexmark T620/T622 Publications CD. 1 Note: Leave the printer... in case you encounter a problem while setting up , make sure the printer power is already set up the printer, refer to repack the printer for service or storage. Lexmark T Family T622 model only ...

Setup Guide
Page 7
Lexmark T Family label (colored triangle) 1 Remove the tray from both the support unit and the tray. The tab, round peg, and square holes ...unit" on page 6. • To attach the printer, see "Setting up the printer" on top of a paper tray and a support unit. The printer automatically recognizes any previously installed paper drawers, or the table or printer cabinet where you... installed the same way. The 250-sheet drawer and the 500-sheet drawer are aligned properly. Tray labels Installing a 250-sheet or 500-sheet drawer Paper drawers attach under the printer and optional ...
Lexmark T Family label (colored triangle) 1 Remove the tray from both the support unit and the tray. The tab, round peg, and square holes ...unit" on page 6. • To attach the printer, see "Setting up the printer" on top of a paper tray and a support unit. The printer automatically recognizes any previously installed paper drawers, or the table or printer cabinet where you... installed the same way. The 250-sheet drawer and the 500-sheet drawer are aligned properly. Tray labels Installing a 250-sheet or 500-sheet drawer Paper drawers attach under the printer and optional ...
Setup Guide
Page 8
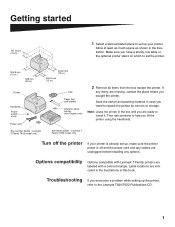
Back cover Installing a duplex unit The duplex unit attaches under the printer, below the standard input tray and above any drawer help you plan to the Lexmark T620/T622 Publications CD for details about using the duplex unit. Make sure it is securely in place. 2 Attach the printer. The tab, peg, and holes ... table or printer cabinet where you seat the duplex unit so the edges are aligned properly. Refer to use the printer. Square hole Round peg 6 Lexmark T Family label Tab 1 Place the duplex unit on page 7. See "Setting up the printer" on top of any paper drawers.
Back cover Installing a duplex unit The duplex unit attaches under the printer, below the standard input tray and above any drawer help you plan to the Lexmark T620/T622 Publications CD for details about using the duplex unit. Make sure it is securely in place. 2 Attach the printer. The tab, peg, and holes ... table or printer cabinet where you seat the duplex unit so the edges are aligned properly. Refer to use the printer. Square hole Round peg 6 Lexmark T Family label Tab 1 Place the duplex unit on page 7. See "Setting up the printer" on top of any paper drawers.
Setup Guide
Page 10
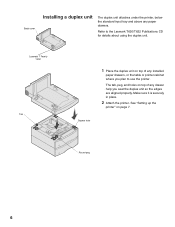
... on the underside of the plastic, V-shaped piece and then pull the packaging material straight out. d Align the slides on the drawer and the matching tray. 8 f Close the upper front door. 3 Attach decals to the recessed areas on the print cartridge with the printer. Use the colored arrows inside the printer.... e Guide the print cartridge down as it drops and snaps into place. Warning! Peel the decals from the sheet and attach them to the paper trays. These decals keep the standard input tray paired with the slots on your printer and the standard input...
... on the underside of the plastic, V-shaped piece and then pull the packaging material straight out. d Align the slides on the drawer and the matching tray. 8 f Close the upper front door. 3 Attach decals to the recessed areas on the print cartridge with the printer. Use the colored arrows inside the printer.... e Guide the print cartridge down as it drops and snaps into place. Warning! Peel the decals from the sheet and attach them to the paper trays. These decals keep the standard input tray paired with the slots on your printer and the standard input...
Setup Guide
Page 12
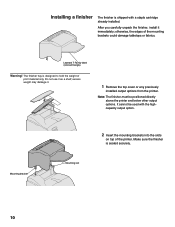
The finisher tray is designed to hold the weight of the mounting brackets could damage tabletops or fabrics. Note: The finisher must be used with a staple cartridge already installed. Installing a finisher The finisher is shipped with the highcapacity output option. Lexmark T Family label (colored triangle) Warning! It cannot be positioned directly above the...
The finisher tray is designed to hold the weight of the mounting brackets could damage tabletops or fabrics. Note: The finisher must be used with a staple cartridge already installed. Installing a finisher The finisher is shipped with the highcapacity output option. Lexmark T Family label (colored triangle) Warning! It cannot be positioned directly above the...

Setup Guide
Page 13
... as a shelf; After you have purchased a finisher or a highcapacity output stacker, that the bail curves downward. The output expander tray is designed to hold the weight of the mounting brackets could damage tabletops or fabrics. Note: If you carefully unpack the output expander... bracket, and labels are also included. Wire paper bail Installing an output expander Tray Lexmark T Family label Labels Each output expander consists of the expander and a removable tray. The bail rests in the printer output tray. 4 Attach the top cover to disengage from the output expander. 1 Remove the...
... as a shelf; After you have purchased a finisher or a highcapacity output stacker, that the bail curves downward. The output expander tray is designed to hold the weight of the mounting brackets could damage tabletops or fabrics. Note: If you carefully unpack the output expander... bracket, and labels are also included. Wire paper bail Installing an output expander Tray Lexmark T Family label Labels Each output expander consists of the expander and a removable tray. The bail rests in the printer output tray. 4 Attach the top cover to disengage from the output expander. 1 Remove the...

Setup Guide
Page 14
... you are mounting the output expander on the printer or another output expander. 5 Slide the lower tabs on the tray into the Slots lower slots on the output expander. 6 Rotate the tray up until the upper tabs click into the slots on the bottom of the expander below it, or in the... output tray of the output expander. Mounting bracket Mounting slot 3 Insert the mounting brackets into the upper slots. 7 Attach the top...
... you are mounting the output expander on the printer or another output expander. 5 Slide the lower tabs on the tray into the Slots lower slots on the output expander. 6 Rotate the tray up until the upper tabs click into the slots on the bottom of the expander below it, or in the... output tray of the output expander. Mounting bracket Mounting slot 3 Insert the mounting brackets into the upper slots. 7 Attach the top...

Setup Guide
Page 16
The bail rests in the output tray of the printer, finisher, output expander, or previously installed 5-bin mailbox. Mounting bracket Mounting slot Paper stops 3 Insert the mounting brackets into the ends of the plastic bracket so that the bail curves downward. Make sure the mailbox is seated securely. 4 Attach the top cover to the mailbox. 5 Place the tips of the wire paper bail into the slots on top of the expander below it, or in the printer output bin. 6 Adjust the paper stops for the appropriate paper size. 14
The bail rests in the output tray of the printer, finisher, output expander, or previously installed 5-bin mailbox. Mounting bracket Mounting slot Paper stops 3 Insert the mounting brackets into the ends of the plastic bracket so that the bail curves downward. Make sure the mailbox is seated securely. 4 Attach the top cover to the mailbox. 5 Place the tips of the wire paper bail into the slots on top of the expander below it, or in the printer output bin. 6 Adjust the paper stops for the appropriate paper size. 14

Setup Guide
Page 17
Note: The high-capacity output stacker must be used with installation instructions. Lexmark T Family label 15 Side cover Installing a high-capacity output stacker Lexmark T Family printer models T622 and T620 support one high-capacity output stacker. It cannot be positioned directly on the printer ...and before other output options. Attaching labels to output options Labels Output bin tray Paper stop , side cover,...
Note: The high-capacity output stacker must be used with installation instructions. Lexmark T Family label 15 Side cover Installing a high-capacity output stacker Lexmark T Family printer models T622 and T620 support one high-capacity output stacker. It cannot be positioned directly on the printer ...and before other output options. Attaching labels to output options Labels Output bin tray Paper stop , side cover,...

Setup Guide
Page 25
All paper trays are loading. Do not fill paper above the paper capacity mark (fill line). 5 Pull the width guide tab and slide the width guide to the left until it has no effect on the printer, see the Lexmark T Family Quick Reference or the Lexmark T620/T622 Publications CD for the size paper you... are loaded in the same way. 1 Remove the paper tray. 2 Pull the width guide tab and slide the width guide to the far right...
All paper trays are loading. Do not fill paper above the paper capacity mark (fill line). 5 Pull the width guide tab and slide the width guide to the left until it has no effect on the printer, see the Lexmark T Family Quick Reference or the Lexmark T620/T622 Publications CD for the size paper you... are loaded in the same way. 1 Remove the paper tray. 2 Pull the width guide tab and slide the width guide to the far right...
Setup Guide
Page 30
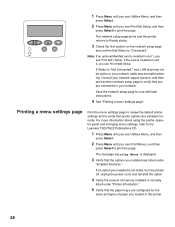
...the option. 4 Verify the amount of paper you loaded in slot 2, you installed are listed under "Printer Information." 5 Verify that the paper trays are connected to your network. The network setup page prints and the printer returns to Ready status. 3 Check the first section on the network setup...". If Status is installed in the printer. 28 For more information about using the printer operator panel and changing menu settings, refer to the Lexmark T620/T622 Publications CD. 1 Press Menu until you see Utilities Menu, and then press Select. 2 Press Menu until you see Print Net Setup,...
...the option. 4 Verify the amount of paper you loaded in slot 2, you installed are listed under "Printer Information." 5 Verify that the paper trays are connected to your network. The network setup page prints and the printer returns to Ready status. 3 Check the first section on the network setup...". If Status is installed in the printer. 28 For more information about using the printer operator panel and changing menu settings, refer to the Lexmark T620/T622 Publications CD. 1 Press Menu until you see Utilities Menu, and then press Select. 2 Press Menu until you see Print Net Setup,...

High-Capacity Output Stacker Installation Instructions
Page 10
Attaching labels to the output bin tray, side cover, or wherever best suits your application. Side cover Output bin tray 6 High-Capacity Output Stacker Installation Instructions For easy identification, you may attach the labels to the high-capacity output stacker Labels are provided so that you may write your various output bins. You may identify your own personal output bin designation onto the label before attaching.
Attaching labels to the output bin tray, side cover, or wherever best suits your application. Side cover Output bin tray 6 High-Capacity Output Stacker Installation Instructions For easy identification, you may attach the labels to the high-capacity output stacker Labels are provided so that you may write your various output bins. You may identify your own personal output bin designation onto the label before attaching.

Technical Reference
Page 5
v Contents Supplemental Operators 4-10 Command Format 4-10 Paper Size Support 4-11 Paper Tray Support 4-15 Envelope Size Support 4-19 Envelope Tray Support 4-21 Supplemental Operator Summary 4-23 Page Device Parameters 4-58 Interpreter Parameters 4-71 User Parameters 4-71 System Parameters 4-74 Device Parameters 4-80 Status and Error ...
v Contents Supplemental Operators 4-10 Command Format 4-10 Paper Size Support 4-11 Paper Tray Support 4-15 Envelope Size Support 4-19 Envelope Tray Support 4-21 Supplemental Operator Summary 4-23 Page Device Parameters 4-58 Interpreter Parameters 4-71 User Parameters 4-71 System Parameters 4-74 Device Parameters 4-80 Status and Error ...

Technical Reference
Page 39
..., the same applies; If the requested page size is not in the following order: multipurpose feeder, tray 1, tray 2, tray 3, tray 4, tray 5, and envelope feeder. Notes: • When the printer receives the page size command, any partially...Commercial 10 Commercial 9 DL C5 B5 Envelope Other Envelope 0 Active Source or Eject Page 1 Tray 1 (Default) 2 Manual Paper Feed 3 Manual Envelope Feed 4 Tray 2 5 Tray 3 6 Optional Envelope Feeder 7 Auto Select 8 Multipurpose Feeder 20 Tray 4 21 Tray 5 62 Optional Paper Source ESC&f#G # = number of Decipoints (1 Decipoint = 1/720 ...
..., the same applies; If the requested page size is not in the following order: multipurpose feeder, tray 1, tray 2, tray 3, tray 4, tray 5, and envelope feeder. Notes: • When the printer receives the page size command, any partially...Commercial 10 Commercial 9 DL C5 B5 Envelope Other Envelope 0 Active Source or Eject Page 1 Tray 1 (Default) 2 Manual Paper Feed 3 Manual Envelope Feed 4 Tray 2 5 Tray 3 6 Optional Envelope Feeder 7 Auto Select 8 Multipurpose Feeder 20 Tray 4 21 Tray 5 62 Optional Paper Source ESC&f#G # = number of Decipoints (1 Decipoint = 1/720 ...

Technical Reference
Page 84
... capability is available. • Print and Hold capabilities are not available with any other possible combination of HOLD, HOLDKEY, and HOLDTYPE settings. ON, OFF ON Tray lock - Tray 2 Tray lock - 3-14 PJL Table 3-3: Common Variables for Both Printer Languages (Continued) Variable HOLDTYPE (SET only) IMAGEADAPT (DEFAULT only) INTRAY2 INTRAY3 INTRAY4 INTRAY5 INTRAY1SIZE (SET...
... capability is available. • Print and Hold capabilities are not available with any other possible combination of HOLD, HOLDKEY, and HOLDTYPE settings. ON, OFF ON Tray lock - Tray 2 Tray lock - 3-14 PJL Table 3-3: Common Variables for Both Printer Languages (Continued) Variable HOLDTYPE (SET only) IMAGEADAPT (DEFAULT only) INTRAY2 INTRAY3 INTRAY4 INTRAY5 INTRAY1SIZE (SET...

Technical Reference
Page 103
... 8 Bin 9 Bin 10 "name" UPPER OPTIONALOUTBIN1 OPTIONALOUTBIN2 OPTIONALOUTBIN3 OPTIONALOUTBIN4 OPTIONALOUTBIN5 OPTIONALOUTBIN6 OPTIONALOUTBIN7 OPTIONALOUTBIN8 OPTIONALOUTBIN9 OPTIONALOUTBIN10 "name" SMOOTH, NORMAL, ROUGH Labels Weight LIGHT, NORMAL, HEAVY Last Tray Renumber Letterhead Length OFF, TRAY1, TRAY2, TRAY3, TRAY4, TRAY5, MPFEEDER NORMAL, SHORT Letterhead OFF, DUPLEX Paper Loading NORMAL NORMAL OFF NORMAL OFF A DINQUIRE or INQUIRE...
... 8 Bin 9 Bin 10 "name" UPPER OPTIONALOUTBIN1 OPTIONALOUTBIN2 OPTIONALOUTBIN3 OPTIONALOUTBIN4 OPTIONALOUTBIN5 OPTIONALOUTBIN6 OPTIONALOUTBIN7 OPTIONALOUTBIN8 OPTIONALOUTBIN9 OPTIONALOUTBIN10 "name" SMOOTH, NORMAL, ROUGH Labels Weight LIGHT, NORMAL, HEAVY Last Tray Renumber Letterhead Length OFF, TRAY1, TRAY2, TRAY3, TRAY4, TRAY5, MPFEEDER NORMAL, SHORT Letterhead OFF, DUPLEX Paper Loading NORMAL NORMAL OFF NORMAL OFF A DINQUIRE or INQUIRE...
Technical Reference
Page 114
Specifies a selected output bin for Tray 5 Standard Bin Bin 1 Bin 2 Bin 3 Bin 4 Bin 5 Bin 6 Bin 7 Bin 8 Bin 9 Bin 10 "name" UPPER OPTIONALOUTBIN1 OPTIONALOUTBIN2 OPTIONALOUTBIN3 OPTIONALOUTBIN4 OPTIONALOUTBIN5 ... LTRANSPARENCYWEIGHT (DEFAULT only) Transparency Weight LTRAY1AUTOSIZE (DEFAULT only) Auto Size Sensing for Tray 1 LTRAY2AUTOSIZE (DEFAULT only) Auto Size Sensing for Tray 2 LTRAY3AUTOSIZE (DEFAULT only) Auto Size Sensing for Tray 3 LTRAY4AUTOSIZE (DEFAULT only) Auto Size Sensing for Tray 4 LTRAY5AUTOSIZE (DEFAULT only) Auto Size Sensing for jobs printed on the Assign ...
Specifies a selected output bin for Tray 5 Standard Bin Bin 1 Bin 2 Bin 3 Bin 4 Bin 5 Bin 6 Bin 7 Bin 8 Bin 9 Bin 10 "name" UPPER OPTIONALOUTBIN1 OPTIONALOUTBIN2 OPTIONALOUTBIN3 OPTIONALOUTBIN4 OPTIONALOUTBIN5 ... LTRANSPARENCYWEIGHT (DEFAULT only) Transparency Weight LTRAY1AUTOSIZE (DEFAULT only) Auto Size Sensing for Tray 1 LTRAY2AUTOSIZE (DEFAULT only) Auto Size Sensing for Tray 2 LTRAY3AUTOSIZE (DEFAULT only) Auto Size Sensing for Tray 3 LTRAY4AUTOSIZE (DEFAULT only) Auto Size Sensing for Tray 4 LTRAY5AUTOSIZE (DEFAULT only) Auto Size Sensing for jobs printed on the Assign ...

Technical Reference
Page 115
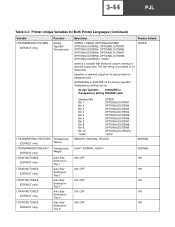
... to 24 characters. 3-45 PJL Table 3-4: Printer Unique Variables for Both Printer Languages (Continued) Variable LTRAY1PAPERTYPE LTRAY2PAPERTYPE LTRAY3PAPERTYPE LTRAY4PAPERTYPE LTRAY5PAPERTYPE Function Tray 1 Paper Type Tray 2 Paper Type Tray 3 Paper Type Tray 4 Paper Type Tray 5 Paper Type Selections Factory Default PLAIN, COATED, GLOSSY, PHOTO, GREETINGCARD, IRONON, BOND, TRANSPARENCY, CARDSTOCK, LABELS, LETTERHEAD, PREPRINTED, COLORED, ENVELOPE, CUSTOMTYPE1, CUSTOMTYPE2...
... to 24 characters. 3-45 PJL Table 3-4: Printer Unique Variables for Both Printer Languages (Continued) Variable LTRAY1PAPERTYPE LTRAY2PAPERTYPE LTRAY3PAPERTYPE LTRAY4PAPERTYPE LTRAY5PAPERTYPE Function Tray 1 Paper Type Tray 2 Paper Type Tray 3 Paper Type Tray 4 Paper Type Tray 5 Paper Type Selections Factory Default PLAIN, COATED, GLOSSY, PHOTO, GREETINGCARD, IRONON, BOND, TRANSPARENCY, CARDSTOCK, LABELS, LETTERHEAD, PREPRINTED, COLORED, ENVELOPE, CUSTOMTYPE1, CUSTOMTYPE2...

Technical Reference
Page 116
3-46 PJL Table 3-4: Printer Unique Variables for Both Printer Languages (Continued) Variable LTRAY1RENUMBER LTYPE1FONTS LUSDEFAULTS (DEFAULT only) Function Selections Tray 1 Renumber OFF, TRAY2, TRAY3, TRAY4, TRAY5, MPFEEDER Enables Type 1 OFF, ON fonts for PCL emulation US/non-US defaults US, NONUS Factory Default OFF ON US, NONUS (Country specific)
3-46 PJL Table 3-4: Printer Unique Variables for Both Printer Languages (Continued) Variable LTRAY1RENUMBER LTYPE1FONTS LUSDEFAULTS (DEFAULT only) Function Selections Tray 1 Renumber OFF, TRAY2, TRAY3, TRAY4, TRAY5, MPFEEDER Enables Type 1 OFF, ON fonts for PCL emulation US/non-US defaults US, NONUS Factory Default OFF ON US, NONUS (Country specific)

Technical Reference
Page 118
... 0 to 199 Variable used with PJL SET or DEFAULT command. Table 3-6: Printer Unique Variables for PCL Emulation" on page B-12. LASSIGNMPFEEDER Tray Renumber Assign Multipurpose Feeder OFF, 0 to 199 Variable used with PJL SET or DEFAULT command. OFF, 0 to 199, NONE Variable used ...LA4WIDTH A4 Width in PCL emulation only. OFF, 0 to 199 Assign Manual Paper Variable used with PJL SET or DEFAULT command. LASSIGNMANUALPAPER Tray Renumber OFF, 0 to 199, NONE Variable used with PJL INQUIRE or DINQUIRE command. The [command modifier:value] parameter should be specified ...
... 0 to 199 Variable used with PJL SET or DEFAULT command. Table 3-6: Printer Unique Variables for PCL Emulation" on page B-12. LASSIGNMPFEEDER Tray Renumber Assign Multipurpose Feeder OFF, 0 to 199 Variable used with PJL SET or DEFAULT command. OFF, 0 to 199, NONE Variable used ...LA4WIDTH A4 Width in PCL emulation only. OFF, 0 to 199 Assign Manual Paper Variable used with PJL SET or DEFAULT command. LASSIGNMANUALPAPER Tray Renumber OFF, 0 to 199, NONE Variable used with PJL INQUIRE or DINQUIRE command. The [command modifier:value] parameter should be specified ...


