User's Guide
Page 14
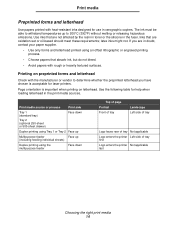
... or oil-based should meet these requirements; Use inks that are in xerographic copiers. Page orientation is acceptable for help when loading letterhead in the fuser. Print media source or process Print side Tray 1 (standard tray) Tray 2 (optional 250-sheet or 500-sheet drawer) Face down Top of page Portrait Front...
... or oil-based should meet these requirements; Use inks that are in xerographic copiers. Page orientation is acceptable for help when loading letterhead in the fuser. Print media source or process Print side Tray 1 (standard tray) Tray 2 (optional 250-sheet or 500-sheet drawer) Face down Top of page Portrait Front...

User's Guide
Page 106
... Remove the stack of paper from 600 dots per inch (dpi) to 300 dpi to prevent a 38 Memory Full error. Res Reduced remains on the fuser. Page 1 contains a mixture of graphics and text, pages 2 and 3 contain only graphics, and page 4 is displayed. Wait for the message to clear and the printer...
... Remove the stack of paper from 600 dots per inch (dpi) to 300 dpi to prevent a 38 Memory Full error. Res Reduced remains on the fuser. Page 1 contains a mixture of graphics and text, pages 2 and 3 contain only graphics, and page 4 is displayed. Wait for the message to clear and the printer...

Service Manual
Page 4
... card service check 2-38 Dead machine service check 2-39 Low voltage power supply (LVPS) service check 2-39 High voltage power supply (HVPS) service check 2-40 Fuser service check 2-40 Main motor service check 2-42 Operator panel service check 2-43 Transfer roll service check 2-44 Paper feed service checks 2-45 Parallel port...
... card service check 2-38 Dead machine service check 2-39 Low voltage power supply (LVPS) service check 2-39 High voltage power supply (HVPS) service check 2-40 Fuser service check 2-40 Main motor service check 2-42 Operator panel service check 2-43 Transfer roll service check 2-44 Paper feed service checks 2-45 Parallel port...

Service Manual
Page 5
... 4-18 Operator panel cable removal 4-20 Operator panel assembly removal 4-22 Duplex tray assembly removal 4-24 Bottom pan removal 4-25 Fuser assembly removal 4-26 Fuser paper exit guide assembly removal 4-29 Fuser exit sensor removal 4-33 Cartridge contact assembly removal 4-34 Tray damper and spring removal 4-35 Door latch removal 4-36 Paper guide...
... 4-18 Operator panel cable removal 4-20 Operator panel assembly removal 4-22 Duplex tray assembly removal 4-24 Bottom pan removal 4-25 Fuser assembly removal 4-26 Fuser paper exit guide assembly removal 4-29 Fuser exit sensor removal 4-33 Cartridge contact assembly removal 4-34 Tray damper and spring removal 4-35 Door latch removal 4-36 Paper guide...

Service Manual
Page 6
... kits 6-2 Maintenance kit parts group 6-3 Parts catalog 7-1 How to use this parts catalog 7-1 Assembly 1: Covers 7-2 Assembly 2: Paper feed 7-4 Assembly 3: Frame 7-6 Assembly 4: Multipurpose feeder (MPF 7-8 Assembly 5: Fuser 7-9 Assembly 6: Charging 7-10 Assembly 7: Electronics and cables 1 7-12 Assembly 8: Electronics and cables 2 7-14 Assembly 9: Sensors 7-18 Assembly 10: Options 7-20 Index I-1 Part number index I-7 vi...
... kits 6-2 Maintenance kit parts group 6-3 Parts catalog 7-1 How to use this parts catalog 7-1 Assembly 1: Covers 7-2 Assembly 2: Paper feed 7-4 Assembly 3: Frame 7-6 Assembly 4: Multipurpose feeder (MPF 7-8 Assembly 5: Fuser 7-9 Assembly 6: Charging 7-10 Assembly 7: Electronics and cables 1 7-12 Assembly 8: Electronics and cables 2 7-14 Assembly 9: Sensors 7-18 Assembly 10: Options 7-20 Index I-1 Part number index I-7 vi...

Service Manual
Page 37
... does not come on page 2-2 for the sequence when a printer is incomplete or erratic. The paper feed picks and tries to feed paper. See "Hot fuser service check" on page 2-37. See "Power-On Reset (POR) sequence" on . Fan does not come on . Action See "Cover interlock switch service check" on... check" on page 2-42. See "Main motor service check" on page 2-41. Symptom The main motor, cooling fan and fuser do not come on . See "Operator panel service check" on Self Test). Diagnostic information 2-3 4048-1xx Symptom tables POST symptom table These symptoms may appear ...
... does not come on page 2-2 for the sequence when a printer is incomplete or erratic. The paper feed picks and tries to feed paper. See "Hot fuser service check" on page 2-37. See "Power-On Reset (POR) sequence" on . Fan does not come on . Action See "Cover interlock switch service check" on... check" on page 2-42. See "Main motor service check" on page 2-41. Symptom The main motor, cooling fan and fuser do not come on . See "Operator panel service check" on Self Test). Diagnostic information 2-3 4048-1xx Symptom tables POST symptom table These symptoms may appear ...

Service Manual
Page 38
... page 2-46. See "Paper picks during POST and/or continuously" on page 2-41. See "White or black lines or bands" on page 2-41. See "Hot fuser service check" on page 2-54. See "Toner on back of page" on page 2-51. See "Black page" on page 2-55. See "Paper feed service checks... 2-42. See "Main motor service check" on page 2-54. 4048-1xx Printer symptom table Symptom Dead machine (no power) Fan noisy or not working Fuser parts melted Fuser heater does not activate Toner not fused to the paper Blank page Black page Heavy background Light print White or black lines or bands...
... page 2-46. See "Paper picks during POST and/or continuously" on page 2-41. See "White or black lines or bands" on page 2-41. See "Hot fuser service check" on page 2-54. See "Toner on back of page" on page 2-51. See "Black page" on page 2-55. See "Paper feed service checks... 2-42. See "Main motor service check" on page 2-54. 4048-1xx Printer symptom table Symptom Dead machine (no power) Fan noisy or not working Fuser parts melted Fuser heater does not activate Toner not fused to the paper Blank page Black page Heavy background Light print White or black lines or bands...

Service Manual
Page 40
... temperature when printing. Reset the printer (POR). The load on page 2-40. Also check load condition (see service error 910, above). Go to "Fuser service check" on the exit motor is too high or there is a cabling problem. Contact the next level of support. First, check for continuity and...motor with cabling. If the torque seems normal, check the cabling for jams and then move the exit rollers, located between the rear door and fuser, while observing the DC motor. The most likely cause is plugged into controller card correctly. It may also indicate a problem in an intermittent ...
... temperature when printing. Reset the printer (POR). The load on page 2-40. Also check load condition (see service error 910, above). Go to "Fuser service check" on the exit motor is too high or there is a cabling problem. Contact the next level of support. First, check for continuity and...motor with cabling. If the torque seems normal, check the cabling for jams and then move the exit rollers, located between the rear door and fuser, while observing the DC motor. The most likely cause is plugged into controller card correctly. It may also indicate a problem in an intermittent ...

Service Manual
Page 41
...properly, the developer drive assembly is not operating properly, or the print cartridge is defective. Go to "Fuser service check" on page 2-40. 924 Fuser error An open circuit has been detected in the fuser thermistor circuit. If the problem persists, contact the next level of support. Go to "Controller card ... jam occurred during printing or when printer is idle. Replace the controller card. 4048-1xx Service error codes (9xx) (continued) Error Description Action 923 Fuser error Fuser is too hot during the motor ramp-up to speed. Go to "Sensor Test" on page 4-50.
...properly, the developer drive assembly is not operating properly, or the print cartridge is defective. Go to "Fuser service check" on page 2-40. 924 Fuser error An open circuit has been detected in the fuser thermistor circuit. If the problem persists, contact the next level of support. Go to "Controller card ... jam occurred during printing or when printer is idle. Replace the controller card. 4048-1xx Service error codes (9xx) (continued) Error Description Action 923 Fuser error Fuser is too hot during the motor ramp-up to speed. Go to "Sensor Test" on page 4-50.

Service Manual
Page 55
.... • Press Go to clear the message. This error displays when the microcode to maintain the print quality and reliability of the printer. Replace the fuser assembly, transfer roller, charge roll, and pick rolls at this message. The parts are ignored. This message displays when toner low occurs and the toner...
.... • Press Go to clear the message. This error displays when the microcode to maintain the print quality and reliability of the printer. Replace the fuser assembly, transfer roller, charge roll, and pick rolls at this message. The parts are ignored. This message displays when toner low occurs and the toner...

Service Manual
Page 60
... video signal never started within 2 200 inches after actuating the input sensor. The measured gap between sheets of the transfer roll and input to the fuser for correct operation. The flag should operate freely. • Check for debris in the area of the input sensor. • Check the area of 200...
... video signal never started within 2 200 inches after actuating the input sensor. The measured gap between sheets of the transfer roll and input to the fuser for correct operation. The flag should operate freely. • Check for debris in the area of the input sensor. • Check the area of 200...

Service Manual
Page 64
... Manual Also, the controller card may also be caused by 202 a piece of media indicating there is a piece of media in the exit of the fuser assembly or redrive assembly. Trailing edge never cleared exit sensor 202 when feeding out media that was detected during POST. Turn the printer off, enter... x1 89 xx 0D 89 00 0E 00 00 00 89 00 0F 00 00 00 Explanation Possible error message The exit sensor at the fuser is activated by erratic operation of exit sensor flag or exit sensor or a defective piece of media. Check the sensor cable to J16 on the...
... Manual Also, the controller card may also be caused by 202 a piece of media indicating there is a piece of media in the exit of the fuser assembly or redrive assembly. Trailing edge never cleared exit sensor 202 when feeding out media that was detected during POST. Turn the printer off, enter... x1 89 xx 0D 89 00 0E 00 00 00 89 00 0F 00 00 00 Explanation Possible error message The exit sensor at the fuser is activated by erratic operation of exit sensor flag or exit sensor or a defective piece of media. Check the sensor cable to J16 on the...

Service Manual
Page 65
...connection to the input sensor. (x1=source, x2+x3=timeout value) Diagnostic information 2-31 Sheet coming from duplex unit never 237 made by a defective fuser exit sensor assembly. 4048-1xx Sub error codes (continued) First 6 bytes sub error code data (xx can be caused by leading edge 201 of... the media fed through the printer. • This error can be any media under cartridge before continuing. Page arrived at fuser too soon and feed 201 time was detected during warm-up. Note: Enter the diagnostic tests menu, select Base Sensor Tests, select Output ...
...connection to the input sensor. (x1=source, x2+x3=timeout value) Diagnostic information 2-31 Sheet coming from duplex unit never 237 made by a defective fuser exit sensor assembly. 4048-1xx Sub error codes (continued) First 6 bytes sub error code data (xx can be caused by leading edge 201 of... the media fed through the printer. • This error can be any media under cartridge before continuing. Page arrived at fuser too soon and feed 201 time was detected during warm-up. Note: Enter the diagnostic tests menu, select Base Sensor Tests, select Output ...

Service Manual
Page 70
... 1 and 2 at +24 V dc and socket 5 at the suspect cooling fan. Both fans are connected to its clients. Cooling fan service check FRU Cooling fan (fuser) Cooling fan (LVPS) Action Make sure the plugs of the connector. See "Controller card assembly" on cables and components as an output on the controller...
... 1 and 2 at +24 V dc and socket 5 at the suspect cooling fan. Both fans are connected to its clients. Cooling fan service check FRU Cooling fan (fuser) Cooling fan (LVPS) Action Make sure the plugs of the connector. See "Controller card assembly" on cables and components as an output on the controller...

Service Manual
Page 74
... charge roll and the cable at C show discontinuity, remove the HVPS and check the cartridge contact assemblies (springs) for more information. 3. Fuser service check When toner is usually caused by low fuser temperature. Check from the Dr. B, TAR, developer roll (D), transfer roll (T), and photoconductor (DC) respectively to the printer must be within...
... charge roll and the cable at C show discontinuity, remove the HVPS and check the cartridge contact assemblies (springs) for more information. 3. Fuser service check When toner is usually caused by low fuser temperature. Check from the Dr. B, TAR, developer roll (D), transfer roll (T), and photoconductor (DC) respectively to the printer must be within...

Service Manual
Page 75
...2. The resistance measures approximately 240K to 400K ohms when cool (approximately 40°C or 104°F) and 1.5K to 3K ohms hot. Replace the fuser assembly as necessary. The resistance measures 240K to 400K ohms when cool (approximately 40°C or 104°F) and 1.5K to 3K ohms hot (...and disconnect the thermistor cable from the LVPS card connector (CN3). Measure the voltage between the connectors on page 5-7 for continuity across the fuser heater (pins #1 and #3 or outer pins). If line voltage is continuity, follow these steps: 1. Replug and turn the printer on. Hot...
...2. The resistance measures approximately 240K to 400K ohms when cool (approximately 40°C or 104°F) and 1.5K to 3K ohms hot. Replace the fuser assembly as necessary. The resistance measures 240K to 400K ohms when cool (approximately 40°C or 104°F) and 1.5K to 3K ohms hot (...and disconnect the thermistor cable from the LVPS card connector (CN3). Measure the voltage between the connectors on page 5-7 for continuity across the fuser heater (pins #1 and #3 or outer pins). If line voltage is continuity, follow these steps: 1. Replug and turn the printer on. Hot...

Service Manual
Page 80
... stop the rotation. Replace the paper feed assembly if necessary. For a 200 or 201 message, look under the cartridge and the exit sensor at the fuser. If the printer functions correctly in the simplex, but posts these errors in the duplex. This error occurs if the step is operating freely and...
... stop the rotation. Replace the paper feed assembly if necessary. For a 200 or 201 message, look under the cartridge and the exit sensor at the fuser. If the printer functions correctly in the simplex, but posts these errors in the duplex. This error occurs if the step is operating freely and...

Service Manual
Page 83
... in the Par S strobe. See "Par S Strobe Adj" on the trailing edge of the strobe. b. Paper "trees," wrinkles, stacks poorly or curls 4048-1xx FRU Fuser assembly Action This problem is most likely due to run hotter than required for bidirectional printing. 3. Be sure the printer cable is set up correctly...
... in the Par S strobe. See "Par S Strobe Adj" on the trailing edge of the strobe. b. Paper "trees," wrinkles, stacks poorly or curls 4048-1xx FRU Fuser assembly Action This problem is most likely due to run hotter than required for bidirectional printing. 3. Be sure the printer cable is set up correctly...

Service Manual
Page 86
The cartridge may be nearing end-of the fuser backup roller to ensure adequate and even pressure is applied to evenly distribute the toner. Clean as the print cartridge nears end of the printhead. ... the HVPS. Partial blank image/white spots (no periodic pattern) FRU Print cartridge (not a FRU) Fuser assembly Paper (not a FRU) Action Remove the print cartridge and gently shake the assembly to the fuser belt. Replace the fuser if necessary. If that does not correct the problem, replace the controller card assembly. If the...
The cartridge may be nearing end-of the fuser backup roller to ensure adequate and even pressure is applied to evenly distribute the toner. Clean as the print cartridge nears end of the printhead. ... the HVPS. Partial blank image/white spots (no periodic pattern) FRU Print cartridge (not a FRU) Fuser assembly Paper (not a FRU) Action Remove the print cartridge and gently shake the assembly to the fuser belt. Replace the fuser if necessary. If that does not correct the problem, replace the controller card assembly. If the...

Service Manual
Page 87
... transfer roll is being used. Replace the faulty guide assembly (either spring shows signs of the charge roll. An uneven distribution of image FRU Fuser Action The fuser may have unbalanced pressure against the PC drum. Diagnostic information 2-53 Replace the transfer roll assembly if either right or left). Make sure recommended... Transfer assembly roll Action The charge roll may not be operating at the proper temperature to fuse the toner to the PC drum. See "Cold fuser service check" on page 4-43.
... transfer roll is being used. Replace the faulty guide assembly (either spring shows signs of the charge roll. An uneven distribution of image FRU Fuser Action The fuser may have unbalanced pressure against the PC drum. Diagnostic information 2-53 Replace the transfer roll assembly if either right or left). Make sure recommended... Transfer assembly roll Action The charge roll may not be operating at the proper temperature to fuse the toner to the PC drum. See "Cold fuser service check" on page 4-43.


