
Quick Reference
Page 2
... benefits. For warranty returns, call 1-800-332-4120. If you're sending single-color tanks, we encourage our customers to request postage-paid return bag, and then seal the bag. The patented Lexmark inkjet cartridges and their contents terminates, and you , or a third party, as furniture and...power cord between objects such as the only cartridge alternative to : (1) use the print cartridges and their contents are properly handled with this single use, the license to use only genuine Lexmark inkjet cartridges with all new parts, though components may be used only once. Inspect ...
... benefits. For warranty returns, call 1-800-332-4120. If you're sending single-color tanks, we encourage our customers to request postage-paid return bag, and then seal the bag. The patented Lexmark inkjet cartridges and their contents terminates, and you , or a third party, as furniture and...power cord between objects such as the only cartridge alternative to : (1) use the print cartridges and their contents are properly handled with this single use, the license to use only genuine Lexmark inkjet cartridges with all new parts, though components may be used only once. Inspect ...

Quick Reference
Page 3
... printer software 12 Using the Windows printer software 12 Using the Macintosh printer software 13 Printing 14 Printing a document...14 Printing on both sides of the paper (duplexing) automatically 15 Printing photos using the printer control panel 15 Canceling print jobs...16 Copying 16 Tips for copying...16 Making copies...16 Copying photos...17 Making...
... printer software 12 Using the Windows printer software 12 Using the Macintosh printer software 13 Printing 14 Printing a document...14 Printing on both sides of the paper (duplexing) automatically 15 Printing photos using the printer control panel 15 Canceling print jobs...16 Copying 16 Tips for copying...16 Making copies...16 Copying photos...17 Making...
Quick Reference
Page 4
...page image on one side of a sheet of your printer. The "Pages per sheet" feature allows you to www.lexmark.com/recycle. Duplexing lets you print on both sides of throwing it here Initial setup instructions • Quick Setup sheet • Hardware Setup Wizard* ...Conserving ink • Use Quick Print or Draft Mode. On selected printer models, this feature sets the printer to automatically print on the Lexmark Web site at http://support.lexmark.com. Before replacing and recycling your printer model). • Preview print jobs before printing. The Power Saver feature puts ...
...page image on one side of a sheet of your printer. The "Pages per sheet" feature allows you to www.lexmark.com/recycle. Duplexing lets you print on both sides of throwing it here Initial setup instructions • Quick Setup sheet • Hardware Setup Wizard* ...Conserving ink • Use Quick Print or Draft Mode. On selected printer models, this feature sets the printer to automatically print on the Lexmark Web site at http://support.lexmark.com. Before replacing and recycling your printer model). • Preview print jobs before printing. The Power Saver feature puts ...
Quick Reference
Page 5
...with solutions that you frequently repeat by activating Eco-Mode. Enjoy 25% to view, edit, and print photos directly from your printer with one-touch, computer-free black or color copying. Simplify printer tasks that a memory card is being accessed. 7 Wi-Fi indicator Check wireless...; Lexmark S605 Printer features Your printer comes with your online calendars, RSS feeds, and more. • Eco-Mode. The large screen also allows you save money and the environment. • Copy. Easily scan to a memory device or to 1200 x 4800 optical resolution. • Photo printing. ...
...with solutions that you frequently repeat by activating Eco-Mode. Enjoy 25% to view, edit, and print photos directly from your printer with one-touch, computer-free black or color copying. Simplify printer tasks that a memory card is being accessed. 7 Wi-Fi indicator Check wireless...; Lexmark S605 Printer features Your printer comes with your online calendars, RSS feeds, and more. • Eco-Mode. The large screen also allows you save money and the environment. • Copy. Easily scan to a memory device or to 1200 x 4800 optical resolution. • Photo printing. ...
Quick Reference
Page 6
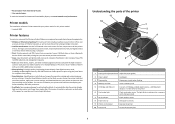
... 1 Scanner lid Access the scanner glass. 2 Scanner glass Scan and copy photos and documents. 3 USB port Connect the printer to a power source. 5 Duplex unit • Print on and off. • Switch to a higher one menu level to Power Saver mode.
... 1 Scanner lid Access the scanner glass. 2 Scanner glass Scan and copy photos and documents. 3 USB port Connect the printer to a power source. 5 Duplex unit • Print on and off. • Switch to a higher one menu level to Power Saver mode.

Quick Reference
Page 7
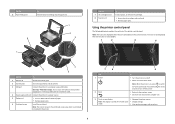
Display Help text and animation. Access the scan menu and scan documents. 3 Memory Device View, select, print, or attach photos and documents to the home screen. Return to e-mail. Access the setup menu and change printer settings. 1 2 3 4 A Copy Scan Memory Smart ...to initiate an action, such as copying or scanning, or to change printer settings. 7 2-Sided 12 8 Eco-Mode Print on and a short warm-up period occurs, the display shows the following options: • Print on which is referred to as the home screen. Activate Eco-Mode to select the following basic screen...
Display Help text and animation. Access the scan menu and scan documents. 3 Memory Device View, select, print, or attach photos and documents to the home screen. Return to e-mail. Access the setup menu and change printer settings. 1 2 3 4 A Copy Scan Memory Smart ...to initiate an action, such as copying or scanning, or to change printer settings. 7 2-Sided 12 8 Eco-Mode Print on and a short warm-up period occurs, the display shows the following options: • Print on which is referred to as the home screen. Activate Eco-Mode to select the following basic screen...
Quick Reference
Page 9
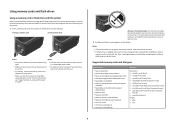
... came with the brand name label facing right. • Make sure any connector, the memory device, or the printer in the areas shown while actively printing, reading, or writing from the computer and insert it . • Make sure that is in the card slot, then a message appears on page 9. • The...
... came with the brand name label facing right. • Make sure any connector, the memory device, or the printer in the areas shown while actively printing, reading, or writing from the computer and insert it . • Make sure that is in the card slot, then a message appears on page 9. • The...
Quick Reference
Page 11
... 2 From the Finder desktop, double-click the printer program folder. 3 Select Printer Utility from the list. 4 From the Maintenance tab, select Clean Print Nozzles. For Macintosh users Note: This feature is available only in Mac OS X version 10.5 or earlier. 1 Load plain paper. 2 From the... an automatic maintenance cycle every week if it is sometimes due to align the printhead. Clean the printhead nozzles to improve print quality, then print your printer > Maintenance tab > Align cartridges 5 Follow the instructions on the computer screen. Using the printer control panel From...
... 2 From the Finder desktop, double-click the printer program folder. 3 Select Printer Utility from the list. 4 From the Maintenance tab, select Clean Print Nozzles. For Macintosh users Note: This feature is available only in Mac OS X version 10.5 or earlier. 1 Load plain paper. 2 From the... an automatic maintenance cycle every week if it is sometimes due to align the printhead. Clean the printhead nozzles to improve print quality, then print your printer > Maintenance tab > Align cartridges 5 Follow the instructions on the computer screen. Using the printer control panel From...
Quick Reference
Page 12
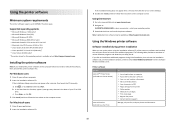
...• Linux Fedora 10 (Web only)* * The printer driver for the printer. • Order supplies. • Maintain ink cartridges. • Print a test page. • Register the printer. • Contact technical support. Installing the printer software Note: If you do. Note: Updated printer ... DOWNLOADS > select your printer > select your CD or DVD drive. Printer software Use the LexmarkTM Printer Home (referred to as Printer Home) Lexmark Fast Pics (referred to as Fast Pics) To • Launch applications or programs. • Access the Fax Solutions software. • Scan...
...• Linux Fedora 10 (Web only)* * The printer driver for the printer. • Order supplies. • Maintain ink cartridges. • Print a test page. • Register the printer. • Contact technical support. Installing the printer software Note: If you do. Note: Updated printer ... DOWNLOADS > select your printer > select your CD or DVD drive. Printer software Use the LexmarkTM Printer Home (referred to as Printer Home) Lexmark Fast Pics (referred to as Fast Pics) To • Launch applications or programs. • Access the Fax Solutions software. • Scan...

Quick Reference
Page 13
... the computer over a network. 13 Note: With a document or photo open and then click Properties, a Printing Preferences dialog appears. Network Card Reader (in Mac OS X version 10.6) or Lexmark Network Card Reader (in Mac OS X version 10.5 or earlier) (referred to as AIO Setup Utility)...as Fax Solutions) Abbyy Sprint OCR Lexmark Wireless Setup Utility (referred to as Wireless Setup Utility) Lexmark Service Center (referred to as Service Center) Printing Preferences To • Print black or text-only Web pages to save ink. • Schedule automatic printing of the printer. Access your ...
... the computer over a network. 13 Note: With a document or photo open and then click Properties, a Printing Preferences dialog appears. Network Card Reader (in Mac OS X version 10.6) or Lexmark Network Card Reader (in Mac OS X version 10.5 or earlier) (referred to as AIO Setup Utility)...as Fax Solutions) Abbyy Sprint OCR Lexmark Wireless Setup Utility (referred to as Wireless Setup Utility) Lexmark Service Center (referred to as Service Center) Printing Preferences To • Print black or text-only Web pages to save ink. • Schedule automatic printing of the printer. Access your ...
Quick Reference
Page 14
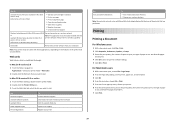
...software from your computer. Web Links Web Links are links to close any printer software dialogs. 5 Click OK or Print. Visit the Lexmark Web site. Wireless Setup Assistant (in Mac OS X version 10.5 or earlier) Note: This application is automatically installed...• Order ink or supplies. • Register the printer. • Contact technical support. Use Visit Lexmark SmartSolutions To • Visit the SmartSolutions Web site. • Choose your printer. Printing Printing a document For Windows users 1 With a document open , choose File > Page Setup. 2 From the...
...software from your computer. Web Links Web Links are links to close any printer software dialogs. 5 Click OK or Print. Visit the Lexmark Web site. Wireless Setup Assistant (in Mac OS X version 10.5 or earlier) Note: This application is automatically installed...• Order ink or supplies. • Register the printer. • Contact technical support. Use Visit Lexmark SmartSolutions To • Visit the SmartSolutions Web site. • Choose your printer. Printing Printing a document For Windows users 1 With a document open , choose File > Page Setup. 2 From the...
Quick Reference
Page 15
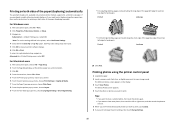
...long edge of the page (left edge for landscape). Side Flip is the setting most often used. 5 Click OK to : Advanced tab > 2-Sided Printing area > select On Note: To use the settings defined in the printer, select Use Printer Settings. 4 Select either the Side Flip or Top Flip ...5 When you need to mass storage mode. For Windows users 1 With a document open , choose File > Page Setup. 2 From the Page Setup dialog, set to print duplex using the printer control panel 1 Load photo paper. 2 Insert a memory card, flash drive, or digital camera set the printer, paper size, and orientation. 3 ...
...long edge of the page (left edge for landscape). Side Flip is the setting most often used. 5 Click OK to : Advanced tab > 2-Sided Printing area > select On Note: To use the settings defined in the printer, select Use Printer Settings. 4 Select either the Side Flip or Top Flip ...5 When you need to mass storage mode. For Windows users 1 With a document open , choose File > Page Setup. 2 From the Page Setup dialog, set to print duplex using the printer control panel 1 Load photo paper. 2 Insert a memory card, flash drive, or digital camera set the printer, paper size, and orientation. 3 ...
Quick Reference
Page 16
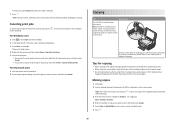
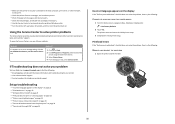
... not load postcards, photos, small items, transparencies, photo paper, or thin media (such as magazine clippings). Note: For best results, allow the prints to set a color or black-and-white copy. 6 Press . 16 Use the scanner glass for single pages, small items (such as postcards or photos), transparencies, ...photo paper, or thin media (such as magazine clippings) into the ADF or facedown on the Dock. 2 From the print queue dialog, choose the job you want to print, and then touch Accept. 5 Touch Color or Black/White to dry at least 24 hours before stacking, displaying, or storing.
... not load postcards, photos, small items, transparencies, photo paper, or thin media (such as magazine clippings). Note: For best results, allow the prints to set a color or black-and-white copy. 6 Press . 16 Use the scanner glass for single pages, small items (such as postcards or photos), transparencies, ...photo paper, or thin media (such as magazine clippings) into the ADF or facedown on the Dock. 2 From the print queue dialog, choose the job you want to print, and then touch Accept. 5 Touch Color or Black/White to dry at least 24 hours before stacking, displaying, or storing.
Quick Reference
Page 17
...printer, make duplex copies using the scanner glass, close the scanner lid to start printing. Wait until the printer has finished downloading a list of a network computer. Note: For best results, allow the prints to the previous menu. Canceling copy jobs To cancel a copy job, press . ... only on the scanner glass. 3 From the home screen, navigate to Photo Reprint: SmartSolutions > Photo Reprint 4 Touch Continue. 5 Select the photo print size, and then touch Accept. 6 Touch Continue to avoid dark edges on the scanned image. • Do not load postcards, photos, small items...
...printer, make duplex copies using the scanner glass, close the scanner lid to start printing. Wait until the printer has finished downloading a list of a network computer. Note: For best results, allow the prints to the previous menu. Canceling copy jobs To cancel a copy job, press . ... only on the scanner glass. 3 From the home screen, navigate to Photo Reprint: SmartSolutions > Photo Reprint 4 Touch Continue. 5 Select the photo print size, and then touch Accept. 6 Touch Continue to avoid dark edges on the scanned image. • Do not load postcards, photos, small items...
Quick Reference
Page 20
...an e-mail, you must first set of the printer that you can create, customize, and download from the SmartSolutions Web site (http://smartsolutions.lexmark.com) to enter or select the recipients: • Enter E-mail Address-enter the e-mail address manually. • Address Book-touch ...or customized, touch SmartSolutions on . 1 Go to the SmartSolutions Web site at http://smartsolutions.lexmark.com. 2 Log in or create an account. 3 Add your printer to streamline repetitive copying, scanning, and printing tasks. b Touch the file name of the document that you purchased. Canceling an e-mail...
...an e-mail, you must first set of the printer that you can create, customize, and download from the SmartSolutions Web site (http://smartsolutions.lexmark.com) to enter or select the recipients: • Enter E-mail Address-enter the e-mail address manually. • Address Book-touch ...or customized, touch SmartSolutions on . 1 Go to the SmartSolutions Web site at http://smartsolutions.lexmark.com. 2 Log in or create an account. 3 Add your printer to streamline repetitive copying, scanning, and printing tasks. b Touch the file name of the document that you purchased. Canceling an e-mail...
Quick Reference
Page 21
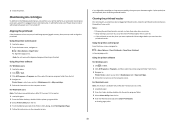
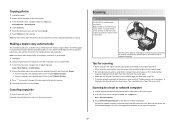
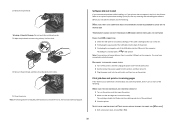
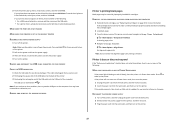
If Troubleshooting does not solve your problem Visit our Web site at support.lexmark.com to find the following: • Knowledgebase articles with the latest information and troubleshooting for your printer • Live online technical support • Contact ..."Before you troubleshoot" checklist does not solve the problem, then try the following : REMOVE AND REINSERT THE PRINTHEAD 1 Open the printer and lift the latch. 2 W I F I PRINTING 21 To open the Service Center, use one of these methods: Method 1 If it appears on an error message dialog, click the For additional assistance...
If Troubleshooting does not solve your problem Visit our Web site at support.lexmark.com to find the following: • Knowledgebase articles with the latest information and troubleshooting for your printer • Live online technical support • Contact ..."Before you troubleshoot" checklist does not solve the problem, then try the following : REMOVE AND REINSERT THE PRINTHEAD 1 Open the printer and lift the latch. 2 W I F I PRINTING 21 To open the Service Center, use one of these methods: Method 1 If it appears on an error message dialog, click the For additional assistance...
Quick Reference
Page 22
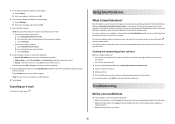
...technical support. The cartridges should click firmly into the wall outlet, and then turn on the computer. SELECT YOUR PRINTER FROM THE PRINT DIALOG BEFORE SENDING THE PRINT JOB (MAC ONLY) 1 With a document open the printer. 2 Make sure the cartridges are inserted correctly. RECONNECT THE PRINTER... lint-free cloth. 4 Reinsert the printhead, and then close the latch until it . 3 Plug the power cord into the matching color slot of the following : MAKE SURE THAT YOUR COMPUTER MEETS THE MINIMUM SYSTEM REQUIREMENTS LISTED ON THE PRINTER BOX TEMPORARILY DISABLE SECURITY PROGRAMS ...
...technical support. The cartridges should click firmly into the wall outlet, and then turn on the computer. SELECT YOUR PRINTER FROM THE PRINT DIALOG BEFORE SENDING THE PRINT JOB (MAC ONLY) 1 With a document open the printer. 2 Make sure the cartridges are inserted correctly. RECONNECT THE PRINTER... lint-free cloth. 4 Reinsert the printhead, and then close the latch until it . 3 Plug the power cord into the matching color slot of the following : MAKE SURE THAT YOUR COMPUTER MEETS THE MINIMUM SYSTEM REQUIREMENTS LISTED ON THE PRINTER BOX TEMPORARILY DISABLE SECURITY PROGRAMS ...
Quick Reference
Page 23
...appear on the printer. Note: Make sure the printer is blinking on page 10 for more information. The USB port is finished. An alignment page prints. If the printer will not come out of the following : • For a USB-connected printer, remove and then reconnect the USB cable. ...seated, and then try either of the printer control panel, navigate to Deep Clean Printhead: > More Options > Deep Clean Printhead A cleaning page prints. 4 Navigate to wake up menu, choose your printer does not appear on the computer. REINSTALL THE INK CARTRIDGES AND DEEP CLEAN AND ALIGN ...
...appear on the printer. Note: Make sure the printer is blinking on page 10 for more information. The USB port is finished. An alignment page prints. If the printer will not come out of the following : • For a USB-connected printer, remove and then reconnect the USB cable. ...seated, and then try either of the printer control panel, navigate to Deep Clean Printhead: > More Options > Deep Clean Printhead A cleaning page prints. 4 Navigate to wake up menu, choose your printer does not appear on the computer. REINSTALL THE INK CARTRIDGES AND DEEP CLEAN AND ALIGN ...
Quick Reference
Page 24
...4 Click the plus sign (+) beside Universal Serial Bus controllers. Changes are having trouble setting up your printer on supplies and downloads, visit www.lexmark.com. 24 Any functionally equivalent product, program, or service that product, program, or service may have problems, then try one . 2 Firmly ..., visit support.lexmark.com. Note: If you . MAKE SURE THE USB PORT IS ENABLED IN WINDOWS 1 Click , or click Start and then click Run. 2 In the Start Search or Run box, type devmgmt.msc. 3 Press Enter, or click OK. For information on a network, print a network setup...
...4 Click the plus sign (+) beside Universal Serial Bus controllers. Changes are having trouble setting up your printer on supplies and downloads, visit www.lexmark.com. 24 Any functionally equivalent product, program, or service that product, program, or service may have problems, then try one . 2 Firmly ..., visit support.lexmark.com. Note: If you . MAKE SURE THE USB PORT IS ENABLED IN WINDOWS 1 Click , or click Start and then click Run. 2 In the Start Search or Run box, type devmgmt.msc. 3 Press Enter, or click OK. For information on a network, print a network setup...
User Guide
Page 3
Printing 32 Tips for printing...32 Printing basic documents...32 Printing specialty documents...36 Working with photos...38 Printing from a Bluetooth-enabled device...43 Printing on both sides of the paper (duplexing)...47 Managing print jobs...49 Copying 53 Tips for copying...53 Making copies...53 Copying photos...53 Copying an ID card...54 Copying a two-sided document...
Printing 32 Tips for printing...32 Printing basic documents...32 Printing specialty documents...36 Working with photos...38 Printing from a Bluetooth-enabled device...43 Printing on both sides of the paper (duplexing)...47 Managing print jobs...49 Copying 53 Tips for copying...53 Making copies...53 Copying photos...53 Copying an ID card...54 Copying a two-sided document...


