
Quick Reference
Page 2
... party, as otherwise provided below, and (2) pass this product or the manufacturer's authorized replacements. Use only the power supply and power cord provided with this product or make any subsequent user of fire, use only genuine Lexmark inkjet cartridges with this license/agreement to request postage-paid return bag, and then seal the bag...
... party, as otherwise provided below, and (2) pass this product or the manufacturer's authorized replacements. Use only the power supply and power cord provided with this product or make any subsequent user of fire, use only genuine Lexmark inkjet cartridges with this license/agreement to request postage-paid return bag, and then seal the bag...
Quick Reference
Page 14
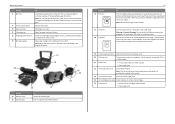
... is recommended for the printer, and if this port if you to access the phone line to send and receive faxes. 19 Power supply with port Connect the printer to the power cord. 20 Ethernet port Connect your printer Use the 8 ADF tray 9 Printer control panel 10 Paper exit tray 11 Tray extension...
... is recommended for the printer, and if this port if you to access the phone line to send and receive faxes. 19 Power supply with port Connect the printer to the power cord. 20 Ethernet port Connect your printer Use the 8 ADF tray 9 Printer control panel 10 Paper exit tray 11 Tray extension...
Quick Reference
Page 32
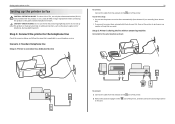
...: Connect the cable from the to the port. Setting up the printer to fax Setting up on any electrical or cabling connections, such as the power supply cord or telephone, during a lightning storm. CAUTION-SHOCK HAZARD: Do not use only the telecommunications (RJ‑11) cord provided with an answering machine Connected...
...: Connect the cable from the to the port. Setting up the printer to fax Setting up on any electrical or cabling connections, such as the power supply cord or telephone, during a lightning storm. CAUTION-SHOCK HAZARD: Do not use only the telecommunications (RJ‑11) cord provided with an answering machine Connected...

Quick Reference
Page 46
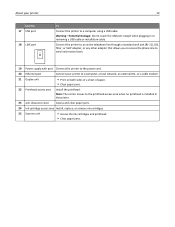
... to a defective port. MAKE SURE THE PRINT JOB IS NOT PAUSED MAKE SURE YOUR PRINTER IS SET AS THE DEFAULT PRINTER RECONNECT THE PRINTER POWER SUPPLY 1 Turn off the printer. The USB port is wirelessly connected, see "Replacing ink cartridges" on the computer. Note: Make sure the printer... is not in the list, then try one minute, reconnect the power cord into the power supply, and then plug the power cord into the USB port of the following : • For a USB-connected printer, remove and then reconnect the USB cable....
... to a defective port. MAKE SURE THE PRINT JOB IS NOT PAUSED MAKE SURE YOUR PRINTER IS SET AS THE DEFAULT PRINTER RECONNECT THE PRINTER POWER SUPPLY 1 Turn off the printer. The USB port is wirelessly connected, see "Replacing ink cartridges" on the computer. Note: Make sure the printer... is not in the list, then try one minute, reconnect the power cord into the power supply, and then plug the power cord into the USB port of the following : • For a USB-connected printer, remove and then reconnect the USB cable....

Quick Reference
Page 47
...for your printer software or firmware. RECONNECT THE PRINTER POWER SUPPLY 1 Turn off the printer. 2 Unplug the power cord from the wall outlet, and then pull out the power cord from the wall outlet, and then wait 10 seconds. 2 Insert the power cord into the USB port of Sleep mode, ...then reset the power: 1 Unplug the power cord from the power supply. 3 After one minute, reconnect the power cord into the power supply, and then plug the power cord into the wall outlet. 4 Turn on page 48...
...for your printer software or firmware. RECONNECT THE PRINTER POWER SUPPLY 1 Turn off the printer. 2 Unplug the power cord from the wall outlet, and then pull out the power cord from the wall outlet, and then wait 10 seconds. 2 Insert the power cord into the USB port of Sleep mode, ...then reset the power: 1 Unplug the power cord from the power supply. 3 After one minute, reconnect the power cord into the power supply, and then plug the power cord into the wall outlet. 4 Turn on page 48...

Quick Reference
Page 48
... SURE THAT YOU HAVE REGISTERED YOUR USER INFORMATION IN THE PRINTER If you plug the telephone into the port of the following hardware, if applicable: Power supply Answering machine Cable modem Splitter Telephone VoIP adapter DSL filter RJ‑11 adapter • If the printer is connected to its fastest transmission capability...
... SURE THAT YOU HAVE REGISTERED YOUR USER INFORMATION IN THE PRINTER If you plug the telephone into the port of the following hardware, if applicable: Power supply Answering machine Cable modem Splitter Telephone VoIP adapter DSL filter RJ‑11 adapter • If the printer is connected to its fastest transmission capability...

Quick Reference
Page 56
... creating from scan 30 Personal Identification Number method using 44 phone book 40 phone plug 36 phone splitter 34 PictBridge and USB port location 14 power supply with port location 14 Print dialog launching 23 print job canceling 26 print troubleshooting cannot delete documents from print queue 47 printer features 6 models 6 setting...
... creating from scan 30 Personal Identification Number method using 44 phone book 40 phone plug 36 phone splitter 34 PictBridge and USB port location 14 power supply with port location 14 Print dialog launching 23 print job canceling 26 print troubleshooting cannot delete documents from print queue 47 printer features 6 models 6 setting...

User's Guide
Page 6
... a lithium battery. CAUTION-SHOCK HAZARD: To avoid the risk of electric shock when cleaning the exterior of the printer, unplug the power cord from the wall outlet and disconnect all external connections (such as furniture and walls. SAVE THESE INSTRUCTIONS. CAUTION-POTENTIAL INJURY: The... installed in their marked plug-in the user documentation, to the manufacturer's instructions and local regulations. Use only the power supply and power cord provided with the use the fax feature during a lightning storm. If any electrical or cabling connections, such as the fax...
... a lithium battery. CAUTION-SHOCK HAZARD: To avoid the risk of electric shock when cleaning the exterior of the printer, unplug the power cord from the wall outlet and disconnect all external connections (such as furniture and walls. SAVE THESE INSTRUCTIONS. CAUTION-POTENTIAL INJURY: The... installed in their marked plug-in the user documentation, to the manufacturer's instructions and local regulations. Use only the power supply and power cord provided with the use the fax feature during a lightning storm. If any electrical or cabling connections, such as the fax...
User's Guide
Page 12
..., or VoIP adapter, or any other adapter that allows you to access the phone line to send and receive faxes. 19 Power supply with port Connect the printer to the power cord. 20 Ethernet port Connect your printer Use the 17 USB port 18 LINE port 12 To Connect the printer to a computer...
..., or VoIP adapter, or any other adapter that allows you to access the phone line to send and receive faxes. 19 Power supply with port Connect the printer to the power cord. 20 Ethernet port Connect your printer Use the 17 USB port 18 LINE port 12 To Connect the printer to a computer...

User's Guide
Page 67
Setting up on any electrical or cabling connections, such as the power supply cord or telephone, during a lightning storm. Do not set up this setup: • You can set the printer to receive faxes automatically (Auto Answer On) ...
Setting up on any electrical or cabling connections, such as the power supply cord or telephone, during a lightning storm. Do not set up this setup: • You can set the printer to receive faxes automatically (Auto Answer On) ...

User's Guide
Page 127
... 1 Check the USB cable for three seconds to turn off the printer. RECONNECT THE PRINTER POWER SUPPLY 1 Turn off the printer. 2 Unplug the power cord from the wall outlet, and then pull out the power cord from the power supply. 3 After one . 2 Firmly plug the square end of the USB cable into the ... USB port on the printer. Print job does not print or is damaged, then use a new one minute, reconnect the power cord into the power supply, and then plug the power cord into the matching color slot of the computer. The cartridges should click firmly into the wall outlet. 4 Turn on the...
... 1 Check the USB cable for three seconds to turn off the printer. RECONNECT THE PRINTER POWER SUPPLY 1 Turn off the printer. 2 Unplug the power cord from the wall outlet, and then pull out the power cord from the power supply. 3 After one . 2 Firmly plug the square end of the USB cable into the ... USB port on the printer. Print job does not print or is damaged, then use a new one minute, reconnect the power cord into the power supply, and then plug the power cord into the matching color slot of the computer. The cartridges should click firmly into the wall outlet. 4 Turn on the...

User's Guide
Page 128
If the cable is damaged, then use a new one minute, reconnect the power cord into the power supply, and then plug the power cord into the USB port of the USB cable into the wall outlet. 4 Turn on the computer. If your printer does not appear in Sleep ... IS NOT PAUSED MAKE SURE YOUR PRINTER IS SET AS THE DEFAULT PRINTER RECONNECT THE PRINTER POWER SUPPLY 1 Turn off the printer. 2 Unplug the power cord from the wall outlet, and then pull out the power cord from the power supply. 3 After one . 2 Firmly plug the square end of the USB cable into the back of...
If the cable is damaged, then use a new one minute, reconnect the power cord into the power supply, and then plug the power cord into the USB port of the USB cable into the wall outlet. 4 Turn on the computer. If your printer does not appear in Sleep ... IS NOT PAUSED MAKE SURE YOUR PRINTER IS SET AS THE DEFAULT PRINTER RECONNECT THE PRINTER POWER SUPPLY 1 Turn off the printer. 2 Unplug the power cord from the wall outlet, and then pull out the power cord from the power supply. 3 After one . 2 Firmly plug the square end of the USB cable into the back of...

User's Guide
Page 129
... Printer is finished. If this problem persists, then check our Web site for updates for more of Sleep mode, then reset the power: 1 Unplug the power cord from the power supply. 3 After one or more information. If the printer will not come out of the following: MAKE SURE THE PRINTER IS NOT...cartridges do not seem to fit, then make sure the printhead is properly seated, and then try one minute, reconnect the power cord into the power supply, and then plug the power cord into the wall outlet, and then turn off the printer. An alignment page prints. Note: Make sure the printer ...
... Printer is finished. If this problem persists, then check our Web site for updates for more of Sleep mode, then reset the power: 1 Unplug the power cord from the power supply. 3 After one or more information. If the printer will not come out of the following: MAKE SURE THE PRINTER IS NOT...cartridges do not seem to fit, then make sure the printhead is properly seated, and then try one minute, reconnect the power cord into the power supply, and then plug the power cord into the wall outlet, and then turn off the printer. An alignment page prints. Note: Make sure the printer ...

User's Guide
Page 151
... are using a splitter, then make sure you hear a dial tone but still have problems sending and receiving faxes, then see the following hardware, if applicable: Power supply Answering machine Cable modem Splitter Telephone VoIP adapter DSL filter RJ‑11 adapter • If the printer is plugged into the same port. Do...
... are using a splitter, then make sure you hear a dial tone but still have problems sending and receiving faxes, then see the following hardware, if applicable: Power supply Answering machine Cable modem Splitter Telephone VoIP adapter DSL filter RJ‑11 adapter • If the printer is plugged into the same port. Do...

User's Guide
Page 157
...Lexmark Web site. Try disconnecting these devices so that your printer is connected to the printer model on the computer. If unsure, look for three seconds to your other USB ports on the printer. Try disconnecting one minute, reconnect the power cord into the power supply, and then plug the power.... 3 Insert the CD, and then run the installer again. RECONNECT THE PRINTER POWER SUPPLY 1 Turn off the printer. 2 Unplug the power cord from the wall outlet, and then pull out the power cord from the power supply. 3 After one of the printer software on the CD to a USB port:...
...Lexmark Web site. Try disconnecting these devices so that your printer is connected to the printer model on the computer. If unsure, look for three seconds to your other USB ports on the printer. Try disconnecting one minute, reconnect the power cord into the power supply, and then plug the power.... 3 Insert the CD, and then run the installer again. RECONNECT THE PRINTER POWER SUPPLY 1 Turn off the printer. 2 Unplug the power cord from the wall outlet, and then pull out the power cord from the power supply. 3 After one of the printer software on the CD to a USB port:...

User's Guide
Page 172
...harmonization of the laws of the Member States relating to the requirements of the Directives is sometimes helpful to completely stop product power consumption, disconnect the power supply cord from the Authorized Representative. The manufacturer of this product is not used for this product (in minutes): 60 By ...exigences de la norme canadienne relative aux équipements pouvant causer des interférences NMB-003. Off mode If this product is : Lexmark International, Inc., 740 West New Circle Road, Lexington, KY, 40550 USA. Notices 172 Sleep Mode This product is the sum of ...
...harmonization of the laws of the Member States relating to the requirements of the Directives is sometimes helpful to completely stop product power consumption, disconnect the power supply cord from the Authorized Representative. The manufacturer of this product is not used for this product (in minutes): 60 By ...exigences de la norme canadienne relative aux équipements pouvant causer des interférences NMB-003. Off mode If this product is : Lexmark International, Inc., 740 West New Circle Road, Lexington, KY, 40550 USA. Notices 172 Sleep Mode This product is the sum of ...

User's Guide
Page 186
...PictBridge-enabled camera, connecting 43 plain paper 32 poor quality at the edges of page 146 poor scanned image quality 149 postcards 33 power supply with port location 12 Print dialog launching 27 print job canceling 49 pausing 48 resuming 49 print media greeting cards 33 labels 33 ...Button Configuration method using 101 R received history report 89 receiving faxes Auto Answer setting 84 automatically 84 manually 84 tips 84 recycling 7, 171 Lexmark products 16 WEEE statement 170 redial attempts, fax setting 78 redial time, fax setting 78 reducing an image 52 registering fax user information 77...
...PictBridge-enabled camera, connecting 43 plain paper 32 poor quality at the edges of page 146 poor scanned image quality 149 postcards 33 power supply with port location 12 Print dialog launching 27 print job canceling 49 pausing 48 resuming 49 print media greeting cards 33 labels 33 ...Button Configuration method using 101 R received history report 89 receiving faxes Auto Answer setting 84 automatically 84 manually 84 tips 84 recycling 7, 171 Lexmark products 16 WEEE statement 170 redial attempts, fax setting 78 redial time, fax setting 78 reducing an image 52 registering fax user information 77...


