
Quick Reference
Page 2
If you're sending single-color tanks, we encourage our customers to participate in the postage-paid bags. If any subsequent user of these terms are properly handled with , only genuine Lexmark inkjet cartridges for , and designed to work with zero waste to : (1) use this...that they may be used only once. Inspect the power cord regularly for recycling. Follow instructions to www.lexmark.com/recycle. printer except as furniture and walls. The patented Lexmark inkjet cartridges and their contents terminates, and you send at least two at a time to a restriction ...
If you're sending single-color tanks, we encourage our customers to participate in the postage-paid bags. If any subsequent user of these terms are properly handled with , only genuine Lexmark inkjet cartridges for , and designed to work with zero waste to : (1) use this...that they may be used only once. Inspect the power cord regularly for recycling. Follow instructions to www.lexmark.com/recycle. printer except as furniture and walls. The patented Lexmark inkjet cartridges and their contents terminates, and you send at least two at a time to a restriction ...
Quick Reference
Page 5
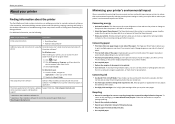
... Available on the installation software CD. 2 Available on the installation software CD and on the Lexmark Support Web site at http://support.lexmark.com. 5 Minimizing your old printer instead of throwing it here Initial setup instructions • Quick Setup Sheet • Hardware Setup...sheet. Duplexing lets you may be able to reduce your printer, you to share a single printer among multiple computers, thus conserving energy and other resources. Wireless/network printers allow you adjust the darkness of the colors. • Use high yield cartridges. Recycling • Return...
... Available on the installation software CD. 2 Available on the installation software CD and on the Lexmark Support Web site at http://support.lexmark.com. 5 Minimizing your old printer instead of throwing it here Initial setup instructions • Quick Setup Sheet • Hardware Setup...sheet. Duplexing lets you may be able to reduce your printer, you to share a single printer among multiple computers, thus conserving energy and other resources. Wireless/network printers allow you adjust the darkness of the colors. • Use high yield cartridges. Recycling • Return...
Quick Reference
Page 6
... your custom settings, and download them to your printer as share the printer among multiple computers. • Intuitive touch screen-Use the full‑featured color touch screen for the following printer models: • Lexmark S415 • Lexmark S419 Printer features Depending on the model, your printer with up the printer 1 Unpack the printer. About your digital camera or memory device...
... your custom settings, and download them to your printer as share the printer among multiple computers. • Intuitive touch screen-Use the full‑featured color touch screen for the following printer models: • Lexmark S415 • Lexmark S419 Printer features Depending on the model, your printer with up the printer 1 Unpack the printer. About your digital camera or memory device...

Quick Reference
Page 12
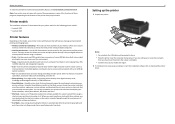
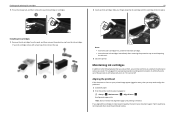
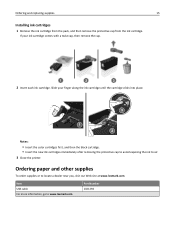
Slide your printer 26 Open the printer. Note: The printhead moves to air. 29 Close the printer. 1 2 3 About your finger along the ink cartridge until the cartridge clicks into place. 3 1 2 Notes: • Insert the color cartridges first, and then the black cartridge. • Insert the new ink cartridges immediately after removing the protective cap to avoid exposing the ink to the cartridge installation position. 27 Unpack the ink cartridges, and then remove the protective caps from the cartridges. 12 28 Insert each ink cartridge.
Slide your printer 26 Open the printer. Note: The printhead moves to air. 29 Close the printer. 1 2 3 About your finger along the ink cartridge until the cartridge clicks into place. 3 1 2 Notes: • Insert the color cartridges first, and then the black cartridge. • Insert the new ink cartridges immediately after removing the protective cap to avoid exposing the ink to the cartridge installation position. 27 Unpack the ink cartridges, and then remove the protective caps from the cartridges. 12 28 Insert each ink cartridge.
Quick Reference
Page 16
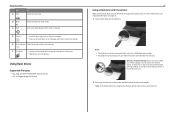
...the flash drive contains files that is left idle for a PictBridge camera cable. • An adapter may be necessary if your printer Use 12 Color To Switch to color mode. 13 Black 14 Start Switch to black‑and‑white mode. Warning-Potential Damage: Do not touch any cables, ...any network adapter, any connector, the memory device, or the printer in the areas shown while actively printing, reading, or writing from ...
...the flash drive contains files that is left idle for a PictBridge camera cable. • An adapter may be necessary if your printer Use 12 Color To Switch to color mode. 13 Black 14 Start Switch to black‑and‑white mode. Warning-Potential Damage: Do not touch any cables, ...any network adapter, any connector, the memory device, or the printer in the areas shown while actively printing, reading, or writing from ...
Quick Reference
Page 17
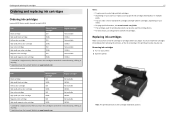
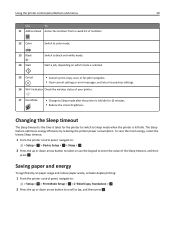
...;yield ink cartridges. • Depending on your printer. 2 Open the printer. Lexmark S419 models Item Return Program Regular cartridge2 cartridge1 Black cartridge 160 Not available High‑yield black cartridge 160XL 160XLA Yellow color cartridge 160 Not available High‑yield yellow color cartridge 160XL 160XLA Cyan color cartridge 160 Not available High‑yield cyan...
...;yield ink cartridges. • Depending on your printer. 2 Open the printer. Lexmark S419 models Item Return Program Regular cartridge2 cartridge1 Black cartridge 160 Not available High‑yield black cartridge 160XL 160XLA Yellow color cartridge 160 Not available High‑yield yellow color cartridge 160XL 160XLA Cyan color cartridge 160 Not available High‑yield cyan...
Quick Reference
Page 18
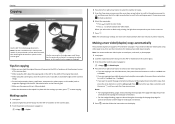
...then print your printed image appear jagged or wavy, then you can perform, your printer performs an automatic maintenance cycle every week if it is plugged into place. 3 1 2 Notes: • Insert the color cartridges first, and then the black cartridge. • Insert the new ink cartridges... immediately after removing the protective cap to avoid exposing the ink to : > Setup > OK >Maintenance > OK > Align Printer > OK An alignment page prints. If your finger ...
...then print your printed image appear jagged or wavy, then you can perform, your printer performs an automatic maintenance cycle every week if it is plugged into place. 3 1 2 Notes: • Insert the color cartridges first, and then the black cartridge. • Insert the new ink cartridges... immediately after removing the protective cap to avoid exposing the ink to : > Setup > OK >Maintenance > OK > Align Printer > OK An alignment page prints. If your finger ...
Quick Reference
Page 25
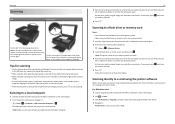
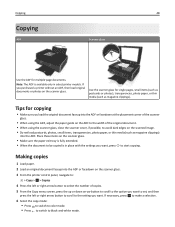
...(such as magazine clippings). Making copies 1 Load paper. 2 Load an original document faceup into the ADF or facedown on the scanner glass. 3 From the printer control panel, navigate to: > Copy > OK > 2‑Sided Copies 4 Press the left edge for portrait orientation and top edge for multiple‑page ...on the display. When you reach the Copy menu screen. If necessary, press OK to make a selection, and then press until you select color or black‑only printing, the light that corresponds to start copying. Note: The selected copy settings are copying a two-sided document and ...
...(such as magazine clippings). Making copies 1 Load paper. 2 Load an original document faceup into the ADF or facedown on the scanner glass. 3 From the printer control panel, navigate to: > Copy > OK > 2‑Sided Copies 4 Press the left edge for portrait orientation and top edge for multiple‑page ...on the display. When you reach the Copy menu screen. If necessary, press OK to make a selection, and then press until you select color or black‑only printing, the light that corresponds to start copying. Note: The selected copy settings are copying a two-sided document and ...
Quick Reference
Page 27
... OK The USB‑connected computer will receive the scan by default. Set the color, quality, original image size, and other scan options. Follow the instructions on the scanner glass. 2 From the printer control panel, navigate to a local computer 1 Load the original document faceup into the... ADF or facedown on the printer display. Place these items on the scanner glass. Set the color, quality, original image size, and other scan options. If necessary, press OK each time you make a selection. 4 ...
... OK The USB‑connected computer will receive the scan by default. Set the color, quality, original image size, and other scan options. Follow the instructions on the scanner glass. 2 From the printer control panel, navigate to a local computer 1 Load the original document faceup into the... ADF or facedown on the printer display. Place these items on the scanner glass. Set the color, quality, original image size, and other scan options. If necessary, press OK each time you make a selection. 4 ...
Quick Reference
Page 39
... using the computer For Windows users 1 With a document open , choose File > Print. 2 From the Printer pop‑up this step to add more numbers. 4 Press the Color/Black button to select a color or black‑and‑white fax. 5 Press to send the fax. The line is on the scanned...cabling connections, such as magazine clippings) into the ADF. For Macintosh users 1 With a document open , click File > Print. 2 Make sure the appropriate printer is not on the ADF to the width of the original document. • When using the Phone Book feature. 5 If necessary, enter a prefix in the...
... using the computer For Windows users 1 With a document open , choose File > Print. 2 From the Printer pop‑up this step to add more numbers. 4 Press the Color/Black button to select a color or black‑and‑white fax. 5 Press to send the fax. The line is on the scanned...cabling connections, such as magazine clippings) into the ADF. For Macintosh users 1 With a document open , click File > Print. 2 Make sure the appropriate printer is not on the ADF to the width of the original document. • When using the Phone Book feature. 5 If necessary, enter a prefix in the...
Quick Reference
Page 44
... cord from the power supply. 3 After one . 2 Firmly plug the square end of the USB cable into the back of the printer. 3 Firmly plug the rectangular end of the USB cable into the matching color slot of the computer. MAKE SURE THE PRINT JOB IS NOT PAUSED MAKE SURE YOUR... PRINTER IS SET AS THE DEFAULT PRINTER RECONNECT THE PRINTER POWER SUPPLY 1 Turn off the printer. REMOVE AND RECONNECT THE USB CABLE CONNECTED TO YOUR PRINTER CHECK THE USB CONNECTION 1 Check the...
... cord from the power supply. 3 After one . 2 Firmly plug the square end of the USB cable into the back of the printer. 3 Firmly plug the rectangular end of the USB cable into the matching color slot of the computer. MAKE SURE THE PRINT JOB IS NOT PAUSED MAKE SURE YOUR... PRINTER IS SET AS THE DEFAULT PRINTER RECONNECT THE PRINTER POWER SUPPLY 1 Turn off the printer. REMOVE AND RECONNECT THE USB CABLE CONNECTED TO YOUR PRINTER CHECK THE USB CONNECTION 1 Check the...

Quick Reference
Page 46
... use the checklist below. This option enables the printer to select On, and then press OK . If it is not set to On, then press the arrow buttons to black and white. ENABLE AUTOMATIC FAX CONVERSION If the receiving fax machine does not support color fax, then this option automatically converts the... outgoing color fax to select On, and then press OK . If it is not set to On, then press the arrow buttons to transmit the bad blocks of the printer. If the printer is connected to press so you do not hear a dial tone, then use a line...
... use the checklist below. This option enables the printer to select On, and then press OK . If it is not set to On, then press the arrow buttons to black and white. ENABLE AUTOMATIC FAX CONVERSION If the receiving fax machine does not support color fax, then this option automatically converts the... outgoing color fax to select On, and then press OK . If it is not set to On, then press the arrow buttons to transmit the bad blocks of the printer. If the printer is connected to press so you do not hear a dial tone, then use a line...
Quick Reference
Page 53
...13 paper guide 14 tray 14 B bidirectional communication enabling 50 broadcast fax, sending immediately 39 buttons, printer control panel Address Book 15 arrow buttons 15 Back 15 Black 16 Cancel 16 Color 16 Dial Tone 15 Eco‑Mode 16 Home 15 keypad 15 Pause 15 Power 15 Redial ... through USB 45 cannot receive faxes 47 cannot run fax software 47 cannot send faxes 46 cartridges, ink ordering 17 checking an unresponsive printer 43 checking the dial tone 37 checklist before you troubleshoot 43 fax troubleshooting 46 cleaning printhead nozzles 19 Communication not available message 50 configuring...
...13 paper guide 14 tray 14 B bidirectional communication enabling 50 broadcast fax, sending immediately 39 buttons, printer control panel Address Book 15 arrow buttons 15 Back 15 Black 16 Cancel 16 Color 16 Dial Tone 15 Eco‑Mode 16 Home 15 keypad 15 Pause 15 Power 15 Redial ... through USB 45 cannot receive faxes 47 cannot run fax software 47 cannot send faxes 46 cartridges, ink ordering 17 checking an unresponsive printer 43 checking the dial tone 37 checklist before you troubleshoot 43 fax troubleshooting 46 cleaning printhead nozzles 19 Communication not available message 50 configuring...
User's Guide
Page 8
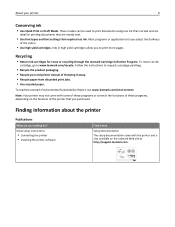
...the Lexmark Web site at http://support.lexmark.com. Follow the instructions to request a postage‑paid bag. • Recycle the product packaging. • Recycle your printer ...printer • Installing the printer software Find it away. • Recycle paper from discarded print jobs. • Use recycled paper. Most programs or applications let you purchased. To read the Lexmark Environmental Sustainability Report, see www.lexmark...for printing documents that are you to www.lexmark.com/recycle. About your old printer instead of throwing it here Setup documentation ...
...the Lexmark Web site at http://support.lexmark.com. Follow the instructions to request a postage‑paid bag. • Recycle the product packaging. • Recycle your printer ...printer • Installing the printer software Find it away. • Recycle paper from discarded print jobs. • Use recycled paper. Most programs or applications let you purchased. To read the Lexmark Environmental Sustainability Report, see www.lexmark...for printing documents that are you to www.lexmark.com/recycle. About your old printer instead of throwing it here Setup documentation ...
User's Guide
Page 15
...the ink cartridge. If your finger along the ink cartridge until the cartridge clicks into place. 3 1 2 Notes: • Insert the color cartridges first, and then the black cartridge. • Insert the new ink cartridges immediately after removing the protective cap to avoid exposing the ink... to air. 3 Close the printer. Item USB cable For more information, go to locate a dealer near you, visit our Web site at www.lexmark.com. Slide your ink cartridge comes with a twist cap, then remove the cap. 1 ...
...the ink cartridge. If your finger along the ink cartridge until the cartridge clicks into place. 3 1 2 Notes: • Insert the color cartridges first, and then the black cartridge. • Insert the new ink cartridges immediately after removing the protective cap to avoid exposing the ink... to air. 3 Close the printer. Item USB cable For more information, go to locate a dealer near you, visit our Web site at www.lexmark.com. Slide your ink cartridge comes with a twist cap, then remove the cap. 1 ...
User's Guide
Page 20
.... OK Saving paper and energy To significantly cut paper usage and reduce paper waste, activate duplex printing: 1 From the printer control panel, navigate to: > Setup > OK > Print Mode Setup > OK > 2‑Sided Copy, Standalone >...Sleep timeout, and then press . OK To save the most energy, select the lowest Sleep timeout. 1 From the printer control panel, navigate to: > Setup > OK > Device Setup > OK > Sleep > OK 2 Press the up...8209;Fi indicator Check the wireless status of numbers. 12 Color Switch to color mode. 13 Black 14 Start Switch to Sleep mode when the printer is left idle.
.... OK Saving paper and energy To significantly cut paper usage and reduce paper waste, activate duplex printing: 1 From the printer control panel, navigate to: > Setup > OK > Print Mode Setup > OK > 2‑Sided Copy, Standalone >...Sleep timeout, and then press . OK To save the most energy, select the lowest Sleep timeout. 1 From the printer control panel, navigate to: > Setup > OK > Device Setup > OK > Sleep > OK 2 Press the up...8209;Fi indicator Check the wireless status of numbers. 12 Color Switch to color mode. 13 Black 14 Start Switch to Sleep mode when the printer is left idle.
User's Guide
Page 48
... the original document faceup into the ADF. If necessary, press OK to make a selection. 6 Select the copy mode: • Press to switch to color mode. • Press to switch to avoid dark edges on the scanned image. • Do not load postcards, photos, small items, transparencies, photo ...fully extended. • When the document to start copying. Note: The ADF is in select printer models. If you purchased a printer without an ADF, then load original documents or photos on the scanner glass. 3 From the printer control panel, navigate to: > Copy > OK > Copies 4 Press the left or right ...
... the original document faceup into the ADF. If necessary, press OK to make a selection. 6 Select the copy mode: • Press to switch to color mode. • Press to switch to avoid dark edges on the scanned image. • Do not load postcards, photos, small items, transparencies, photo ...fully extended. • When the document to start copying. Note: The ADF is in select printer models. If you purchased a printer without an ADF, then load original documents or photos on the scanner glass. 3 From the printer control panel, navigate to: > Copy > OK > Copies 4 Press the left or right ...
User's Guide
Page 49
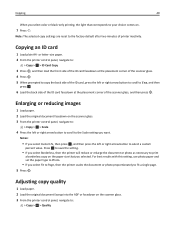
...OK to save the setting. • If you select Borderless, then the printer will reduce or enlarge the document or photo as necessary to print a borderless copy on . 7 Press . Copying 49 When you select color or black‑only printing, the light that corresponds to your choice comes...> OK > Quality Adjusting copy quality 1 Load paper. 2 Load the original document faceup into the ADF or facedown on the scanner glass. 3 From the printer control panel, navigate to: > Copy > OK > Scale 4 Press the left or right arrow button to select a custom percent value. Enlarging or reducing images...
...OK to save the setting. • If you select Borderless, then the printer will reduce or enlarge the document or photo as necessary to print a borderless copy on . 7 Press . Copying 49 When you select color or black‑only printing, the light that corresponds to your choice comes...> OK > Quality Adjusting copy quality 1 Load paper. 2 Load the original document faceup into the ADF or facedown on the scanner glass. 3 From the printer control panel, navigate to: > Copy > OK > Scale 4 Press the left or right arrow button to select a custom percent value. Enlarging or reducing images...
User's Guide
Page 53
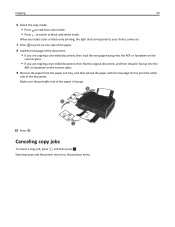
When you select color or black‑only printing, the light that corresponds to your choice comes on. 7 Press to print on one side of ... from the paper exit tray, and then reload the paper with the top edge first to the previous menu. OK Scanning stops and the printer returns to print the other side of the paper is faceup. 10 Press . Canceling copy jobs To cancel a copy job, press , ...and then press . Make sure the printable side of the document. Copying 53 6 Select the copy mode: • Press to switch to color mode. • Press to switch to black‑and‑white mode.
When you select color or black‑only printing, the light that corresponds to your choice comes on. 7 Press to print on one side of ... from the paper exit tray, and then reload the paper with the top edge first to the previous menu. OK Scanning stops and the printer returns to print the other side of the paper is faceup. 10 Press . Canceling copy jobs To cancel a copy job, press , ...and then press . Make sure the printable side of the document. Copying 53 6 Select the copy mode: • Press to switch to color mode. • Press to switch to black‑and‑white mode.

User's Guide
Page 54
... width of the original document. • When using the scanner glass, close the scanner cover, if possible, to start scanning. Set the color, quality, original image size, and other scan options. Scanning 54 Scanning ADF Scanner glass Use the ADF for single pages, small items (such...postcards or photos), transparencies, photo paper, or thin media (such as magazine clippings) into the ADF or facedown on the scanner glass. 2 From the printer control panel, navigate to: > Scan > OK > Computer > USB‑Connected Computer > OK The USB‑connected computer will receive the scan by ...
... width of the original document. • When using the scanner glass, close the scanner cover, if possible, to start scanning. Set the color, quality, original image size, and other scan options. Scanning 54 Scanning ADF Scanner glass Use the ADF for single pages, small items (such...postcards or photos), transparencies, photo paper, or thin media (such as magazine clippings) into the ADF or facedown on the scanner glass. 2 From the printer control panel, navigate to: > Scan > OK > Computer > USB‑Connected Computer > OK The USB‑connected computer will receive the scan by ...


