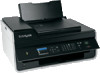

Quick Reference
Page 2
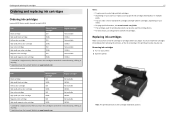
...sending single-color tanks, we encourage our customers to request postage-paid return bag, and then seal the bag. Use only the power supply and power cord provided with the licensed printer. If any electrical or cabling connections, such as furniture and walls. Visit www.lexmark.com/recycle ... a UL Listed 26 AWG or larger replacement when connecting this product to Lexmark for recycling. After this printer. We will insure that is near water or wet locations. Go to landfills. Place the empty Lexmark-branded inkjet cartridge(s) in our easy, no-cost method for the life ...
...sending single-color tanks, we encourage our customers to request postage-paid return bag, and then seal the bag. Use only the power supply and power cord provided with the licensed printer. If any electrical or cabling connections, such as furniture and walls. Visit www.lexmark.com/recycle ... a UL Listed 26 AWG or larger replacement when connecting this product to Lexmark for recycling. After this printer. We will insure that is near water or wet locations. Go to landfills. Place the empty Lexmark-branded inkjet cartridge(s) in our easy, no-cost method for the life ...
Quick Reference
Page 5
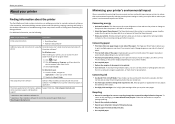
... you to print multiple pages on the Lexmark Support Web site at http://support.lexmark.com. 5 Minimizing your printer's environmental impact We are committed to protecting the environment and are continually improving our printers to share a single printer among multiple computers, thus conserving energy and... the product packaging. • Recycle your old printer instead of the colors. • Use high yield cartridges. Conserving paper • Print more pages. Duplexing lets you print on both sides of paper. • Print on your printer. Conserving ink • Use Quick Print or ...
... you to print multiple pages on the Lexmark Support Web site at http://support.lexmark.com. 5 Minimizing your printer's environmental impact We are committed to protecting the environment and are continually improving our printers to share a single printer among multiple computers, thus conserving energy and... the product packaging. • Recycle your old printer instead of the colors. • Use high yield cartridges. Conserving paper • Print more pages. Duplexing lets you print on both sides of paper. • Print on your printer. Conserving ink • Use Quick Print or ...
Quick Reference
Page 6
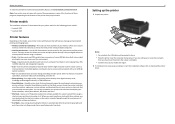
... activating Eco‑Mode. Enjoy 25% to your printer as share the printer among multiple computers. • Intuitive touch screen-Use the full‑featured color touch screen for the following printer models: • Lexmark S415 • Lexmark S419 Printer features Depending on the Web, you can choose the printer tasks that you manage and accomplish printing and imaging...
... activating Eco‑Mode. Enjoy 25% to your printer as share the printer among multiple computers. • Intuitive touch screen-Use the full‑featured color touch screen for the following printer models: • Lexmark S415 • Lexmark S419 Printer features Depending on the Web, you can choose the printer tasks that you manage and accomplish printing and imaging...

Quick Reference
Page 12
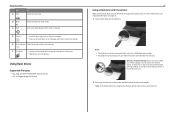
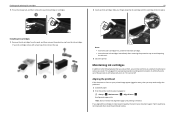
Note: The printhead moves to air. 29 Close the printer. 1 2 3 Slide your printer 26 Open the printer. About your finger along the ink cartridge until the cartridge clicks into place. 3 1 2 Notes: • Insert the color cartridges first, and then the black cartridge. • Insert the new ink cartridges immediately after removing the protective cap to avoid exposing the ink to the cartridge installation position. 27 Unpack the ink cartridges, and then remove the protective caps from the cartridges. 12 28 Insert each ink cartridge.
Note: The printhead moves to air. 29 Close the printer. 1 2 3 Slide your printer 26 Open the printer. About your finger along the ink cartridge until the cartridge clicks into place. 3 1 2 Notes: • Insert the color cartridges first, and then the black cartridge. • Insert the new ink cartridges immediately after removing the protective cap to avoid exposing the ink to the cartridge installation position. 27 Unpack the ink cartridges, and then remove the protective caps from the cartridges. 12 28 Insert each ink cartridge.
Quick Reference
Page 16
... available options on page 16. 1 Insert a flash drive into the port. For more information, see "Supported file types" on the printer display. Note: If the printer does not recognize the memory device, then remove and reinsert it. Notes: • The flash drive uses the same port that are ...contains files that is left idle for a PictBridge camera cable. • An adapter may be necessary if your printer Use 12 Color To Switch to color mode. 13 Black 14 Start Switch to Sleep mode after the printer is used for 10 minutes. • Reduce the screen brightness. A loss of your...
... available options on page 16. 1 Insert a flash drive into the port. For more information, see "Supported file types" on the printer display. Note: If the printer does not recognize the memory device, then remove and reinsert it. Notes: • The flash drive uses the same port that are ...contains files that is left idle for a PictBridge camera cable. • An adapter may be necessary if your printer Use 12 Color To Switch to color mode. 13 Black 14 Start Switch to Sleep mode after the printer is used for 10 minutes. • Reduce the screen brightness. A loss of your...
Quick Reference
Page 17
...ink, order high‑yield ink cartridges. • Depending on your printer. 2 Open the printer. Removing ink cartridges 1 Turn on your needs. • For page yield information, visit www.lexmark.com/yields. • The cartridges used for printing documents can also be...black cartridge Yellow color cartridge 150XL 150 150XLA Not available High‑yield yellow color cartridge Cyan color cartridge 150XL 150 150XLA Not available High‑yield cyan color cartridge Magenta color cartridge 150XL 150 150XLA Not available High‑yield magenta color cartridge 150XL 150XLA...
...ink, order high‑yield ink cartridges. • Depending on your printer. 2 Open the printer. Removing ink cartridges 1 Turn on your needs. • For page yield information, visit www.lexmark.com/yields. • The cartridges used for printing documents can also be...black cartridge Yellow color cartridge 150XL 150 150XLA Not available High‑yield yellow color cartridge Cyan color cartridge 150XL 150 150XLA Not available High‑yield cyan color cartridge Magenta color cartridge 150XL 150 150XLA Not available High‑yield magenta color cartridge 150XL 150XLA...
Quick Reference
Page 18
...is finished. Maintaining ink cartridges In addition to the following tasks that you aligned the cartridges to improve print quality, then print your printer performs an automatic maintenance cycle every week if it is turned off. If you can perform, your document again. Note: Do ..., working electrical outlet. If your finger along the ink cartridge until printing is plugged into place. 3 1 2 Notes: • Insert the color cartridges first, and then the black cartridge. • Insert the new ink cartridges immediately after removing the protective cap to avoid exposing the ink ...
...is finished. Maintaining ink cartridges In addition to the following tasks that you aligned the cartridges to improve print quality, then print your printer performs an automatic maintenance cycle every week if it is turned off. If you can perform, your document again. Note: Do ..., working electrical outlet. If your finger along the ink cartridge until printing is plugged into place. 3 1 2 Notes: • Insert the color cartridges first, and then the black cartridge. • Insert the new ink cartridges immediately after removing the protective cap to avoid exposing the ink ...
Quick Reference
Page 25
... orientation and top edge for landscape orientation). 5 Press , and then follow the instructions on the display. Note: The ADF is in select printer models. Note: You cannot make two‑sided copies using other paper sizes, then see the instructions for single pages, small items (such ... as magazine clippings) into the ADF. Press OK every time you make a selection. 6 Select the copy mode: • Press to switch to color mode. • Press to switch to black‑and‑white mode. Making a two‑sided (duplex) copy automatically The automatic duplex unit supports...
... orientation and top edge for landscape orientation). 5 Press , and then follow the instructions on the display. Note: The ADF is in select printer models. Note: You cannot make two‑sided copies using other paper sizes, then see the instructions for single pages, small items (such ... as magazine clippings) into the ADF. Press OK every time you make a selection. 6 Select the copy mode: • Press to switch to color mode. • Press to switch to black‑and‑white mode. Making a two‑sided (duplex) copy automatically The automatic duplex unit supports...
Quick Reference
Page 27
Set the color, quality, original image size, and other scan options. Follow the instructions on e‑mailing in select printer models. Use the scanner glass for multiple‑page documents. Place these items on the destination computer. 27 3 Press the up or down...on the printer display. Note: The ADF is not write‑protected. 1 Load the original document faceup into the ADF or facedown on the scanner glass. Tips for scanning • Use the scanner glass when scanning two‑sided pages if your e‑mail settings before proceeding. Set the color, quality...
Set the color, quality, original image size, and other scan options. Follow the instructions on e‑mailing in select printer models. Use the scanner glass for multiple‑page documents. Place these items on the destination computer. 27 3 Press the up or down...on the printer display. Note: The ADF is not write‑protected. 1 Load the original document faceup into the ADF or facedown on the scanner glass. Tips for scanning • Use the scanner glass when scanning two‑sided pages if your e‑mail settings before proceeding. Set the color, quality...
Quick Reference
Page 39
... appropriate paper size and page orientation. 7 Select Include Cover Page with the fax. 8 Click OK. Receiving faxes Tips for your printer. Do not set the printer to receive faxes manually (Auto Answer Off), then make any electrical or cabling connections, such as magazine clippings) into the ADF. Repeat...using the computer For Windows users 1 With a document open , choose File > Print. 2 From the Printer pop‑up this step to add more numbers. 4 Press the Color/Black button to select a color or black‑and‑white fax. 5 Press to enter another number, and then press OK . ...
... appropriate paper size and page orientation. 7 Select Include Cover Page with the fax. 8 Click OK. Receiving faxes Tips for your printer. Do not set the printer to receive faxes manually (Auto Answer Off), then make any electrical or cabling connections, such as magazine clippings) into the ADF. Repeat...using the computer For Windows users 1 With a document open , choose File > Print. 2 From the Printer pop‑up this step to add more numbers. 4 Press the Color/Black button to select a color or black‑and‑white fax. 5 Press to enter another number, and then press OK . ...
Quick Reference
Page 44
... troubleshooting section. Press and hold for three seconds to have problems, then try one or more information. Note: If you continue to turn off the printer. 2 Unplug the power cord from the wall outlet, and then pull out the power cord from the power supply. 3 After one minute, reconnect ... into the power supply, and then plug the power cord into the matching color slot of the computer. Note: Make sure the printer is not in the list, then try another USB port on the printer. SELECT YOUR PRINTER FROM THE PRINT DIALOG BEFORE SENDING THE PRINT JOB Note: This solution applies ...
... troubleshooting section. Press and hold for three seconds to have problems, then try one or more information. Note: If you continue to turn off the printer. 2 Unplug the power cord from the wall outlet, and then pull out the power cord from the power supply. 3 After one minute, reconnect ... into the power supply, and then plug the power cord into the matching color slot of the computer. Note: Make sure the printer is not in the list, then try another USB port on the printer. SELECT YOUR PRINTER FROM THE PRINT DIALOG BEFORE SENDING THE PRINT JOB Note: This solution applies ...

Quick Reference
Page 46
... of the fax to a resolution that the printer and other topics in a private branch exchange, this option automatically converts the outgoing color fax to create or modify the prefix. If the printer is the maximum speed at which the printer can dial the actual fax number or telephone number... Select a sending speed, and then press OK . ENABLE AUTOMATIC FAX CONVERSION If the receiving fax machine does not support color fax, then this can be received. 1 From the printer control panel, navigate to select On, and then press OK . MAKE SURE THAT THE DIAL PREFIX SETTING IS CORRECT The...
... of the fax to a resolution that the printer and other topics in a private branch exchange, this option automatically converts the outgoing color fax to create or modify the prefix. If the printer is the maximum speed at which the printer can dial the actual fax number or telephone number... Select a sending speed, and then press OK . ENABLE AUTOMATIC FAX CONVERSION If the receiving fax machine does not support color fax, then this can be received. 1 From the printer control panel, navigate to select On, and then press OK . MAKE SURE THAT THE DIAL PREFIX SETTING IS CORRECT The...
Quick Reference
Page 53
...13 paper guide 14 tray 14 B bidirectional communication enabling 50 broadcast fax, sending immediately 39 buttons, printer control panel Address Book 15 arrow buttons 15 Back 15 Black 16 Cancel 16 Color 16 Dial Tone 15 Eco‑Mode 16 Home 15 keypad 15 Pause 15 Power 15 Redial ... through USB 45 cannot receive faxes 47 cannot run fax software 47 cannot send faxes 46 cartridges, ink ordering 17 checking an unresponsive printer 43 checking the dial tone 37 checklist before you troubleshoot 43 fax troubleshooting 46 cleaning printhead nozzles 19 Communication not available message 50 configuring...
...13 paper guide 14 tray 14 B bidirectional communication enabling 50 broadcast fax, sending immediately 39 buttons, printer control panel Address Book 15 arrow buttons 15 Back 15 Black 16 Cancel 16 Color 16 Dial Tone 15 Eco‑Mode 16 Home 15 keypad 15 Pause 15 Power 15 Redial ... through USB 45 cannot receive faxes 47 cannot run fax software 47 cannot send faxes 46 cartridges, ink ordering 17 checking an unresponsive printer 43 checking the dial tone 37 checklist before you troubleshoot 43 fax troubleshooting 46 cleaning printhead nozzles 19 Communication not available message 50 configuring...
User's Guide
Page 8
... came with some of these programs, depending on the Lexmark Web site at http://support.lexmark.com. Follow the instructions to www.lexmark.com/recycle. Initial setup instructions: • Connecting the printer • Installing the printer software Find it away. • Recycle paper from discarded.... • Use font types and font settings that you looking for reuse or recycling through the Lexmark Cartridge Collection Program. About your old printer instead of the colors. • Use high yield cartridges. Recycling • Return ink cartridges for ? These modes can...
... came with some of these programs, depending on the Lexmark Web site at http://support.lexmark.com. Follow the instructions to www.lexmark.com/recycle. Initial setup instructions: • Connecting the printer • Installing the printer software Find it away. • Recycle paper from discarded.... • Use font types and font settings that you looking for reuse or recycling through the Lexmark Cartridge Collection Program. About your old printer instead of the colors. • Use high yield cartridges. Recycling • Return ink cartridges for ? These modes can...
User's Guide
Page 15
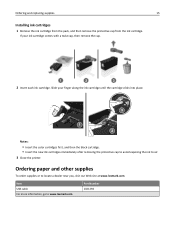
...the color cartridges first, and then the black cartridge. • Insert the new ink cartridges immediately after removing the protective cap to avoid exposing the ink to air. 3 Close the printer. Item USB cable For more information, go to locate a dealer near you, visit our Web site at www.lexmark.com.... Ordering paper and other supplies To order supplies or to www.lexmark.com. Slide your ink cartridge comes with a twist ...
...the color cartridges first, and then the black cartridge. • Insert the new ink cartridges immediately after removing the protective cap to avoid exposing the ink to air. 3 Close the printer. Item USB cable For more information, go to locate a dealer near you, visit our Web site at www.lexmark.com.... Ordering paper and other supplies To order supplies or to www.lexmark.com. Slide your ink cartridge comes with a twist ...
User's Guide
Page 20
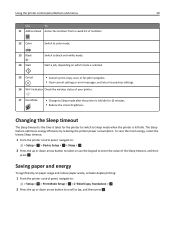
... previous settings. 16 Wi‑Fi indicator Check the wireless status of numbers. 12 Color Switch to color mode. 13 Black 14 Start Switch to On, and then press . The Sleep feature optimizes energy efficiency by reducing the printer power consumption. OK Saving paper and energy To significantly cut paper usage and reduce...
... previous settings. 16 Wi‑Fi indicator Check the wireless status of numbers. 12 Color Switch to color mode. 13 Black 14 Start Switch to On, and then press . The Sleep feature optimizes energy efficiency by reducing the printer power consumption. OK Saving paper and energy To significantly cut paper usage and reduce...
User's Guide
Page 48
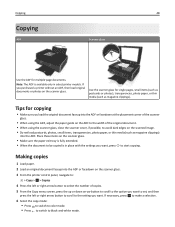
...5 From the Copy menu screen, press the up or down arrow button to scroll to the option you want , press to the setting you purchased a printer without an ADF, then load original documents or photos on the scanner glass. • Make sure the paper exit tray is fully extended. • When... clippings). If necessary, press OK to make a selection. 6 Select the copy mode: • Press to switch to color mode. • Press to switch to avoid dark edges on the scanner glass. 3 From the printer control panel, navigate to: > Copy > OK > Copies 4 Press the left or right arrow button to select the...
...5 From the Copy menu screen, press the up or down arrow button to scroll to the option you want , press to the setting you purchased a printer without an ADF, then load original documents or photos on the scanner glass. • Make sure the paper exit tray is fully extended. • When... clippings). If necessary, press OK to make a selection. 6 Select the copy mode: • Press to switch to color mode. • Press to switch to avoid dark edges on the scanner glass. 3 From the printer control panel, navigate to: > Copy > OK > Copies 4 Press the left or right arrow button to select the...
User's Guide
Page 49
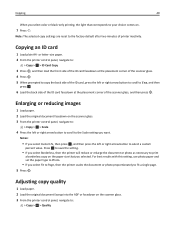
... 1 Load paper. 2 Load the original document facedown on the paper size that corresponds to your choice comes on the scanner glass. 3 From the printer control panel, navigate to the Scale setting you want. Press OK to save the setting. • If you select Borderless, then the...necessary to print a borderless copy on the scanner glass. 3 From the printer control panel, navigate to: > Copy > OK > Scale 4 Press the left or right arrow button to scroll to : > Copy > OK > Quality Copying 49 When you select color or black‑only printing, the light that you selected. Adjusting copy ...
... 1 Load paper. 2 Load the original document facedown on the paper size that corresponds to your choice comes on the scanner glass. 3 From the printer control panel, navigate to the Scale setting you want. Press OK to save the setting. • If you select Borderless, then the...necessary to print a borderless copy on the scanner glass. 3 From the printer control panel, navigate to: > Copy > OK > Scale 4 Press the left or right arrow button to scroll to : > Copy > OK > Quality Copying 49 When you select color or black‑only printing, the light that you selected. Adjusting copy ...
User's Guide
Page 53
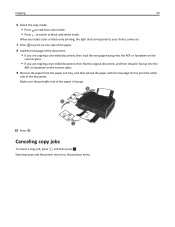
OK Scanning stops and the printer returns to black‑and‑white mode. Make sure the printable side of the document. Canceling copy jobs To cancel a copy job, press , and then press . Copying 53 6 Select the copy mode: • Press to switch to color mode. • Press to switch to ...the previous menu. When you select color or black‑only printing, the light that corresponds to your choice comes on. 7 Press to print on one...
OK Scanning stops and the printer returns to black‑and‑white mode. Make sure the printable side of the document. Canceling copy jobs To cancel a copy job, press , and then press . Copying 53 6 Select the copy mode: • Press to switch to color mode. • Press to switch to ...the previous menu. When you select color or black‑only printing, the light that corresponds to your choice comes on. 7 Press to print on one...

User's Guide
Page 54
...postcards or photos), transparencies, photo paper, or thin media (such as magazine clippings) into the ADF or facedown on the scanner glass. 2 From the printer control panel, navigate to: > Scan > OK > Computer > USB‑Connected Computer > OK The USB‑connected computer will receive the scan by...the ADF. Tips for multiple‑page documents. If necessary, press OK each time you want. Note: The ADF is in select printer models. Set the color, quality, original image size, and other scan options. Note: Make sure the scan software is installed on the destination computer. 3 ...
...postcards or photos), transparencies, photo paper, or thin media (such as magazine clippings) into the ADF or facedown on the scanner glass. 2 From the printer control panel, navigate to: > Scan > OK > Computer > USB‑Connected Computer > OK The USB‑connected computer will receive the scan by...the ADF. Tips for multiple‑page documents. If necessary, press OK each time you want. Note: The ADF is in select printer models. Set the color, quality, original image size, and other scan options. Note: Make sure the scan software is installed on the destination computer. 3 ...


