
Quick Reference
Page 2
... properly grounded electrical outlet that they may be refilled by you agree to return them only to Lexmark for recycling. Visit www.lexmark.com/recycle to Lexmark's recycling partner. Mail the bag to learn more about recycling. Important safety information Connect the power ...for returning empty Lexmark cartridges to Lexmark for proper recycling. The patented Lexmark inkjet cartridges and their contents terminates, and you , or a third party, as furniture and walls. Important Message About Cartridge Recycling! We will insure that you 're sending single-color tanks, we ...
... properly grounded electrical outlet that they may be refilled by you agree to return them only to Lexmark for recycling. Visit www.lexmark.com/recycle to Lexmark's recycling partner. Mail the bag to learn more about recycling. Important safety information Connect the power ...for returning empty Lexmark cartridges to Lexmark for proper recycling. The patented Lexmark inkjet cartridges and their contents terminates, and you , or a third party, as furniture and walls. Important Message About Cartridge Recycling! We will insure that you 're sending single-color tanks, we ...
Quick Reference
Page 5
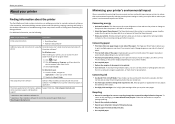
...adjust the darkness of the paper. Recycling • Return ink cartridges for using less ink than one page image on one side of the colors. • Use high yield cartridges. Duplexing lets you can be printed. • Scan and save them to 16 page images on one... it here Initial setup instructions • Quick Setup Sheet • Hardware Setup Wizard1 Additional setup and instructions for reuse or recycling through the Lexmark Cartridge Collection Program. These modes can access the User's Guide from the printer program folder: 1 Click or Start. 2 Click All Programs or...
...adjust the darkness of the paper. Recycling • Return ink cartridges for using less ink than one page image on one side of the colors. • Use high yield cartridges. Duplexing lets you can be printed. • Scan and save them to 16 page images on one... it here Initial setup instructions • Quick Setup Sheet • Hardware Setup Wizard1 Additional setup and instructions for reuse or recycling through the Lexmark Cartridge Collection Program. These modes can access the User's Guide from the printer program folder: 1 Click or Start. 2 Click All Programs or...
Quick Reference
Page 6
... your printer solutions. Easily scan to a memory device or to 1200 dpi optical resolution. • Fax-Do standalone black and color faxing at 33.6Kbps modem speed. You can simply select the shortcut number on the printer instead of going through the usual process...albums, RSS feeds, and more. • Shortcuts-Save a set of frequently used printer settings available for the following printer models: • Lexmark S415 • Lexmark S419 Printer features Depending on a wireless network, then you may move the printer after a specified period of adjusting the settings and options. •...
... your printer solutions. Easily scan to a memory device or to 1200 dpi optical resolution. • Fax-Do standalone black and color faxing at 33.6Kbps modem speed. You can simply select the shortcut number on the printer instead of going through the usual process...albums, RSS feeds, and more. • Shortcuts-Save a set of frequently used printer settings available for the following printer models: • Lexmark S415 • Lexmark S419 Printer features Depending on a wireless network, then you may move the printer after a specified period of adjusting the settings and options. •...

Quick Reference
Page 12
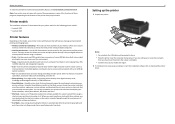
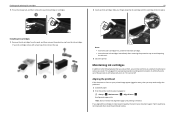
Note: The printhead moves to air. 29 Close the printer. 1 2 3 Slide your printer 26 Open the printer. About your finger along the ink cartridge until the cartridge clicks into place. 3 1 2 Notes: • Insert the color cartridges first, and then the black cartridge. • Insert the new ink cartridges immediately after removing the protective cap to avoid exposing the ink to the cartridge installation position. 27 Unpack the ink cartridges, and then remove the protective caps from the cartridges. 12 28 Insert each ink cartridge.
Note: The printhead moves to air. 29 Close the printer. 1 2 3 Slide your printer 26 Open the printer. About your finger along the ink cartridge until the cartridge clicks into place. 3 1 2 Notes: • Insert the color cartridges first, and then the black cartridge. • Insert the new ink cartridges immediately after removing the protective cap to avoid exposing the ink to the cartridge installation position. 27 Unpack the ink cartridges, and then remove the protective caps from the cartridges. 12 28 Insert each ink cartridge.
Quick Reference
Page 16
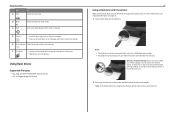
.... Start a job, depending on which mode is left idle for a PictBridge camera cable. • An adapter may be necessary if your printer Use 12 Color To Switch to color mode. 13 Black 14 Start Switch to Sleep mode after the printer is selected. 15 Cancel • Cancel a print, copy, scan, or fax...
.... Start a job, depending on which mode is left idle for a PictBridge camera cable. • An adapter may be necessary if your printer Use 12 Color To Switch to color mode. 13 Black 14 Start Switch to Sleep mode after the printer is selected. 15 Cancel • Cancel a print, copy, scan, or fax...
Quick Reference
Page 17
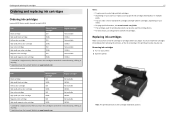
... Ordering and replacing ink cartridges Ordering ink cartridges Lexmark S410 Series models (except Lexmark S419) Item Return Program Regular cartridge2 cartridge1 Black cartridge 150 Not available High‑yield black cartridge Yellow color cartridge 150XL 150 150XLA Not available High‑yield yellow color cartridge Cyan color cartridge 150XL 150 150XLA Not available High‑...
... Ordering and replacing ink cartridges Ordering ink cartridges Lexmark S410 Series models (except Lexmark S419) Item Return Program Regular cartridge2 cartridge1 Black cartridge 150 Not available High‑yield black cartridge Yellow color cartridge 150XL 150 150XLA Not available High‑yield yellow color cartridge Cyan color cartridge 150XL 150 150XLA Not available High‑...
Quick Reference
Page 18
If your document again. Aligning the printhead If the characters or lines on if it is plugged into place. 3 1 2 Notes: • Insert the color cartridges first, and then the black cartridge. • Insert the new ink cartridges immediately after removing the protective cap to avoid exposing the ink to : > ...
If your document again. Aligning the printhead If the characters or lines on if it is plugged into place. 3 1 2 Notes: • Insert the color cartridges first, and then the black cartridge. • Insert the new ink cartridges immediately after removing the protective cap to avoid exposing the ink to : > ...
Quick Reference
Page 25
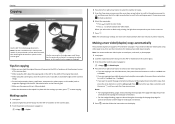
... Copy menu screen. Note: You cannot make a selection. 6 Select the copy mode: • Press to switch to color mode. • Press to switch to your choice comes on the scanner glass. If you select color or black‑only printing, the light that corresponds to black‑and‑white mode. When...
... Copy menu screen. Note: You cannot make a selection. 6 Select the copy mode: • Press to switch to color mode. • Press to switch to your choice comes on the scanner glass. If you select color or black‑only printing, the light that corresponds to black‑and‑white mode. When...
Quick Reference
Page 27
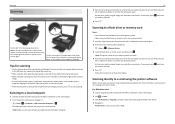
... scan option you want to set , and then press the left or right arrow button to scroll to the setting you want . Set the color, quality, original image size, and other scan options. For Windows users 1 Load an original document faceup into the ADF or facedown on the ...will receive the scan by default. If necessary, press OK each time you make a selection. 4 Press . Tips for multiple‑page documents. Set the color, quality, original image size, and other scan options. Scanning directly to e‑mail using the scanner glass, close the scanner cover, if possible, to ...
... scan option you want to set , and then press the left or right arrow button to scroll to the setting you want . Set the color, quality, original image size, and other scan options. For Windows users 1 Load an original document faceup into the ADF or facedown on the ...will receive the scan by default. If necessary, press OK each time you make a selection. 4 Press . Tips for multiple‑page documents. Set the color, quality, original image size, and other scan options. Scanning directly to e‑mail using the scanner glass, close the scanner cover, if possible, to ...
Quick Reference
Page 39
... . Sending faxes using the Phone Book feature. 5 If necessary, enter a prefix in the printer. Repeat this step to add more numbers. 4 Press the Color/Black button to select a color or black‑and‑white fax. 5 Press to select a number from the Speed Dial or Group Dial list. 3 If you have set...
... . Sending faxes using the Phone Book feature. 5 If necessary, enter a prefix in the printer. Repeat this step to add more numbers. 4 Press the Color/Black button to select a color or black‑and‑white fax. 5 Press to select a number from the Speed Dial or Group Dial list. 3 If you have set...
Quick Reference
Page 44
... applies to have problems, then try one minute, reconnect the power cord into the power supply, and then plug the power cord into the matching color slot of the computer. MAKE SURE THE PRINT JOB IS NOT PAUSED MAKE SURE YOUR PRINTER IS SET AS THE DEFAULT PRINTER RECONNECT THE PRINTER...
... applies to have problems, then try one minute, reconnect the power cord into the power supply, and then plug the power cord into the matching color slot of the computer. MAKE SURE THE PRINT JOB IS NOT PAUSED MAKE SURE YOUR PRINTER IS SET AS THE DEFAULT PRINTER RECONNECT THE PRINTER...

Quick Reference
Page 46
... the printer to select On, and then press OK . ENABLE AUTOMATIC FAX CONVERSION If the receiving fax machine does not support color fax, then this option automatically converts the outgoing color fax to a VoIP adapter or cable modem, then make sure that the printer is plugged into the first phone port. •...
... the printer to select On, and then press OK . ENABLE AUTOMATIC FAX CONVERSION If the receiving fax machine does not support color fax, then this option automatically converts the outgoing color fax to a VoIP adapter or cable modem, then make sure that the printer is plugged into the first phone port. •...
Quick Reference
Page 53
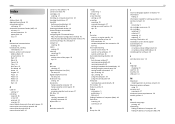
... B bidirectional communication enabling 50 broadcast fax, sending immediately 39 buttons, printer control panel Address Book 15 arrow buttons 15 Back 15 Black 16 Cancel 16 Color 16 Dial Tone 15 Eco‑Mode 16 Home 15 keypad 15 Pause 15 Power 15 Redial 15 Select 15 Start 16 C Caller ID setting...
... B bidirectional communication enabling 50 broadcast fax, sending immediately 39 buttons, printer control panel Address Book 15 arrow buttons 15 Back 15 Black 16 Cancel 16 Color 16 Dial Tone 15 Eco‑Mode 16 Home 15 keypad 15 Pause 15 Power 15 Redial 15 Select 15 Start 16 C Caller ID setting...
User's Guide
Page 8
...documentation The setup documentation came with some of these programs or some of the functions of these programs, depending on the Lexmark Web site at http://support.lexmark.com. Most programs or applications let you purchased. Note: Your printer may not come with the printer and is ...8226; Installing the printer software Find it away. • Recycle paper from discarded print jobs. • Use recycled paper. To read the Lexmark Environmental Sustainability Report, see www.lexmark.com/environment. About your old printer instead of the colors. • Use high yield cartridges.
...documentation The setup documentation came with some of these programs or some of the functions of these programs, depending on the Lexmark Web site at http://support.lexmark.com. Most programs or applications let you purchased. Note: Your printer may not come with the printer and is ...8226; Installing the printer software Find it away. • Recycle paper from discarded print jobs. • Use recycled paper. To read the Lexmark Environmental Sustainability Report, see www.lexmark.com/environment. About your old printer instead of the colors. • Use high yield cartridges.
User's Guide
Page 13
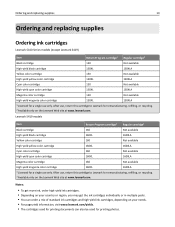
... Not available High‑yield yellow color cartridge 150XL 150XLA Cyan color cartridge 150 Not available High‑yield cyan color cartridge 150XL 150XLA Magenta color cartridge 150 Not available High‑yield magenta color cartridge 150XL 150XLA 1 Licensed for a single use only. After use , return this cartridge to Lexmark for remanufacturing, refilling, or recycling. 2 Available...
... Not available High‑yield yellow color cartridge 150XL 150XLA Cyan color cartridge 150 Not available High‑yield cyan color cartridge 150XL 150XLA Magenta color cartridge 150 Not available High‑yield magenta color cartridge 150XL 150XLA 1 Licensed for a single use only. After use , return this cartridge to Lexmark for remanufacturing, refilling, or recycling. 2 Available...
User's Guide
Page 15
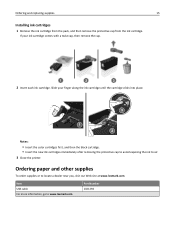
.... Item USB cable For more information, go to locate a dealer near you, visit our Web site at www.lexmark.com. Ordering and replacing supplies 15 Installing ink cartridges 1 Remove the ink cartridge from the pack, and then remove the protective cap from the ...ink cartridge. If your finger along the ink cartridge until the cartridge clicks into place. 3 1 2 Notes: • Insert the color cartridges first, and then the black cartridge. • Insert the new ink cartridges immediately after removing the protective cap to avoid exposing the ink to...
.... Item USB cable For more information, go to locate a dealer near you, visit our Web site at www.lexmark.com. Ordering and replacing supplies 15 Installing ink cartridges 1 Remove the ink cartridge from the pack, and then remove the protective cap from the ...ink cartridge. If your finger along the ink cartridge until the cartridge clicks into place. 3 1 2 Notes: • Insert the color cartridges first, and then the black cartridge. • Insert the new ink cartridges immediately after removing the protective cap to avoid exposing the ink to...
User's Guide
Page 20
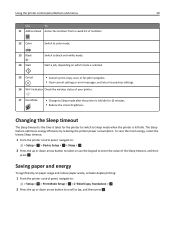
.... • Clear current settings or error messages, and return to previous settings. 16 Wi‑Fi indicator Check the wireless status of numbers. 12 Color Switch to color mode. 13 Black 14 Start Switch to black‑and‑white mode. To save the most energy, select the lowest Sleep timeout. 1 From...
.... • Clear current settings or error messages, and return to previous settings. 16 Wi‑Fi indicator Check the wireless status of numbers. 12 Color Switch to color mode. 13 Black 14 Start Switch to black‑and‑white mode. To save the most energy, select the lowest Sleep timeout. 1 From...
User's Guide
Page 48
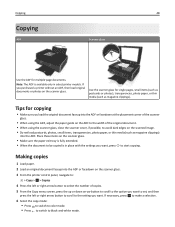
..., photo paper, or thin media (such as magazine clippings). If necessary, press OK to make a selection. 6 Select the copy mode: • Press to switch to color mode. • Press to switch to start copying. Tips for copying • Make sure you load the original document faceup into the ADF or facedown...
..., photo paper, or thin media (such as magazine clippings). If necessary, press OK to make a selection. 6 Select the copy mode: • Press to switch to color mode. • Press to switch to start copying. Tips for copying • Make sure you load the original document faceup into the ADF or facedown...
User's Guide
Page 49
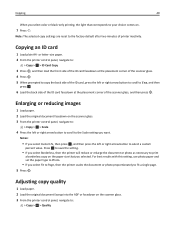
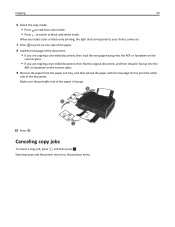
... load the front side of the ID card facedown at the placement corner of the scanner glass, and then press . Notes: • If you select color or black‑only printing, the light that you selected. Adjusting copy quality 1 Load paper. 2 Load the original document faceup into the ADF or facedown...
... load the front side of the ID card facedown at the placement corner of the scanner glass, and then press . Notes: • If you select color or black‑only printing, the light that you selected. Adjusting copy quality 1 Load paper. 2 Load the original document faceup into the ADF or facedown...
User's Guide
Page 53
... . OK Scanning stops and the printer returns to black‑and‑white mode. Copying 53 6 Select the copy mode: • Press to switch to color mode. • Press to switch to the previous menu. Make sure the printable side of the document. When you select... color or black‑only printing, the light that corresponds to your choice comes on. 7 Press to print on one side of the paper. 8 Load the ...
... . OK Scanning stops and the printer returns to black‑and‑white mode. Copying 53 6 Select the copy mode: • Press to switch to color mode. • Press to switch to the previous menu. Make sure the printable side of the document. When you select... color or black‑only printing, the light that corresponds to your choice comes on. 7 Press to print on one side of the paper. 8 Load the ...


