User's Guide
Page 7
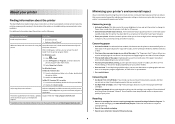
... more pages with the printer and is also available on the Lexmark Web site at http://support.lexmark.com. To read the Lexmark Environmental Sustainability Report, see www.lexmark.com/environment. Follow the instructions to print documents using the "Clean Printhead" and "Deep Clean Printhead" features. These modes can be used to request a postage-paid bag...
... more pages with the printer and is also available on the Lexmark Web site at http://support.lexmark.com. To read the Lexmark Environmental Sustainability Report, see www.lexmark.com/environment. Follow the instructions to print documents using the "Clean Printhead" and "Deep Clean Printhead" features. These modes can be used to request a postage-paid bag...
User's Guide
Page 11
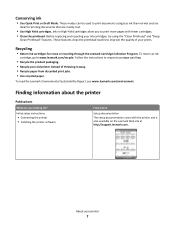
... line (through a standard wall jack, DSL filter, or VoIP adapter) to the printhead access area when a printhead is installed on the printer. Install the printhead. Install, replace, or remove ink cartridges. • Access the ink cartridges and printhead. • Remove paper jams. About your printer 11 Warning-Potential Damage: Do not... when plugging in or removing a USB cable or installation cable. Note: The carrier moves to send and receive faxes. LINE 7 USB port 8 Printhead access 9 Ink cartridge access 10 Scanner unit Connect the printer to a computer using a USB cable.
... line (through a standard wall jack, DSL filter, or VoIP adapter) to the printhead access area when a printhead is installed on the printer. Install the printhead. Install, replace, or remove ink cartridges. • Access the ink cartridges and printhead. • Remove paper jams. About your printer 11 Warning-Potential Damage: Do not... when plugging in or removing a USB cable or installation cable. Note: The carrier moves to send and receive faxes. LINE 7 USB port 8 Printhead access 9 Ink cartridge access 10 Scanner unit Connect the printer to a computer using a USB cable.

User's Guide
Page 13
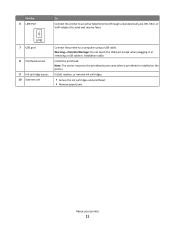
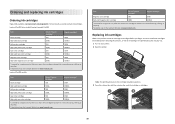
WI F I PRINTING Note: The printhead moves to the cartridge installation position. 3 Press the release tab, and then remove the used ink cartridge or cartridges. 1 2 4 Remove the ink cartridge from the ... and replacing supplies 13 If your printer. 2 Open the printer. Lexmark's warranty does not cover damage caused by non-Lexmark ink or ink cartridges. You must install new cartridges immediately after removing the old ones, or the ink remaining in the printhead nozzles may dry out. 1 Turn on your ink cartridge comes with...
WI F I PRINTING Note: The printhead moves to the cartridge installation position. 3 Press the release tab, and then remove the used ink cartridge or cartridges. 1 2 4 Remove the ink cartridge from the ... and replacing supplies 13 If your printer. 2 Open the printer. Lexmark's warranty does not cover damage caused by non-Lexmark ink or ink cartridges. You must install new cartridges immediately after removing the old ones, or the ink remaining in the printhead nozzles may dry out. 1 Turn on your ink cartridge comes with...
User's Guide
Page 24
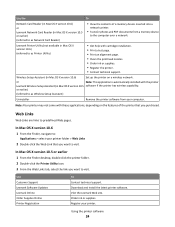
...This application is automatically installed with cartridge installation. • Print a test page. • Print an alignment page. • Clean the printhead nozzles. • Order ink or supplies. • Register the printer. • Contact technical support. Download and install the latest printer ... earlier) (referred to as Wireless Setup Assistant) Uninstaller Remove the printer software from a memory device to the computer over a network. Lexmark Printer Utility (not available in Mac OS X version 10.6) Set up the printer on the features of a memory device inserted into ...
...This application is automatically installed with cartridge installation. • Print a test page. • Print an alignment page. • Clean the printhead nozzles. • Order ink or supplies. • Register the printer. • Contact technical support. Download and install the latest printer ... earlier) (referred to as Wireless Setup Assistant) Uninstaller Remove the printer software from a memory device to the computer over a network. Lexmark Printer Utility (not available in Mac OS X version 10.6) Set up the printer on the features of a memory device inserted into ...

User's Guide
Page 116
... Click or Start. 3 Click All Programs or Programs, and then select the printer program folder from the list. 4 Navigate to align the printhead. For Macintosh users Note: This feature is finished. Note: Do not remove the alignment page until printing is available only in Maci OS ... Page. 5 Follow the instructions on the computer screen. Maintaining the printer 116 If print quality has not improved, then clean the printhead nozzles. Aligning the printhead If the characters or lines on your printed image appear jagged or wavy, then you aligned the cartridges to : > Maintenance > ...
... Click or Start. 3 Click All Programs or Programs, and then select the printer program folder from the list. 4 Navigate to align the printhead. For Macintosh users Note: This feature is finished. Note: Do not remove the alignment page until printing is available only in Maci OS ... Page. 5 Follow the instructions on the computer screen. Maintaining the printer 116 If print quality has not improved, then clean the printhead nozzles. Aligning the printhead If the characters or lines on your printed image appear jagged or wavy, then you aligned the cartridges to : > Maintenance > ...
User's Guide
Page 117
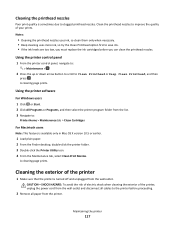
...from the wall outlet and disconnect all paper from the printer. Cleaning the printhead nozzles Poor print quality is sometimes due to the printer before you can clean the printhead nozzles. Notes: • Cleaning the printhead nozzles uses ink, so clean them only when necessary. • Deep ...save ink. • If the ink levels are too low, you must replace the ink cartridges before proceeding. 2 Remove all cables to clogged printhead nozzles. Using the printer software For Windows users 1 Click or Start. 2 Click All Programs or Programs, and then select the printer program folder ...
...from the wall outlet and disconnect all paper from the printer. Cleaning the printhead nozzles Poor print quality is sometimes due to the printer before you can clean the printhead nozzles. Notes: • Cleaning the printhead nozzles uses ink, so clean them only when necessary. • Deep ...save ink. • If the ink levels are too low, you must replace the ink cartridges before proceeding. 2 Remove all cables to clogged printhead nozzles. Using the printer software For Windows users 1 Click or Start. 2 Click All Programs or Programs, and then select the printer program folder ...
User's Guide
Page 119
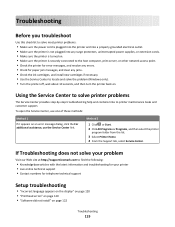
... any errors. • Check for telephone technical support Setup troubleshooting • "Incorrect language appears on the display" on page 120 • "Printhead errors" on page 120 • "Software did not install" on . If Troubleshooting does not solve your printer • Live online technical support... the following: • Knowledgebase articles with the latest information and troubleshooting for your problem Visit our Web site at http://support.lexmark.com to printer maintenance tasks and customer support. To open the Service Center, use one of these methods: Method 1 If ...
... any errors. • Check for telephone technical support Setup troubleshooting • "Incorrect language appears on the display" on page 120 • "Printhead errors" on page 120 • "Software did not install" on . If Troubleshooting does not solve your printer • Live online technical support... the following: • Knowledgebase articles with the latest information and troubleshooting for your problem Visit our Web site at http://support.lexmark.com to printer maintenance tasks and customer support. To open the Service Center, use one of these methods: Method 1 If ...
User's Guide
Page 120
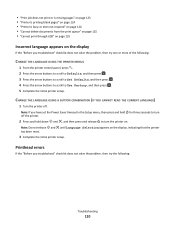
Printhead errors If the "Before you troubleshoot" checklist does not solve the problem, then try the following : CHANGE THE LANGUAGE USING THE PRINTER MENUS 1 From the ...
Printhead errors If the "Before you troubleshoot" checklist does not solve the problem, then try the following : CHANGE THE LANGUAGE USING THE PRINTER MENUS 1 From the ...
User's Guide
Page 121
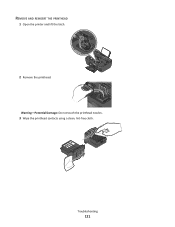
REMOVE AND REINSERT THE PRINTHEAD 1 Open the printer and lift the latch. 2 WI F I PRINTING 2 Remove the printhead. Troubleshooting 121 Warning-Potential Damage: Do not touch the printhead nozzles. 3 Wipe the printhead contacts using a clean, lint-free cloth.
REMOVE AND REINSERT THE PRINTHEAD 1 Open the printer and lift the latch. 2 WI F I PRINTING 2 Remove the printhead. Troubleshooting 121 Warning-Potential Damage: Do not touch the printhead nozzles. 3 Wipe the printhead contacts using a clean, lint-free cloth.
User's Guide
Page 122
4 Reinsert the printhead, and then close the latch until it . 3 Plug the power cord into the USB port of the computer. Note: If you continue to a defective port. ... the wall outlet. 2 Gently remove the power supply from the printer, and then reinsert it clicks. 5 Close the printer. Note: If removing and reinserting the printhead does not resolve the error, then contact technical support. Before you encountered problems while installing, or if your printer does not appear in the list...
4 Reinsert the printhead, and then close the latch until it . 3 Plug the power cord into the USB port of the computer. Note: If you continue to a defective port. ... the wall outlet. 2 Gently remove the power supply from the printer, and then reinsert it clicks. 5 Close the printer. Note: If removing and reinserting the printhead does not resolve the error, then contact technical support. Before you encountered problems while installing, or if your printer does not appear in the list...
User's Guide
Page 123
... solution applies to turn off the printer. Note: Make sure the printer is wirelessly connected, see the Wireless troubleshooting section. From the list of the printhead. 3 Close the printer. MAKE SURE THE PRINT JOB IS NOT PAUSED MAKE SURE YOUR PRINTER IS SET AS THE DEFAULT PRINTER RECONNECT THE PRINTER POWER...
... solution applies to turn off the printer. Note: Make sure the printer is wirelessly connected, see the Wireless troubleshooting section. From the list of the printhead. 3 Close the printer. MAKE SURE THE PRINT JOB IS NOT PAUSED MAKE SURE YOUR PRINTER IS SET AS THE DEFAULT PRINTER RECONNECT THE PRINTER POWER...
User's Guide
Page 124
... of the USB cable into the wall outlet, and then turn on the computer. If the cartridges do not seem to fit, make sure the printhead is busy or does not respond If the "Before you continue to have connected to wake up the If this problem persists, then check our...: Do not remove the alignment page until printing is marked with a USB symbol. A cleaning page prints. 6 Press the arrow buttons to scroll to Deep Clean Printhead, and then press . If the printer will not come out of Power Saver mode, then reset the power: 1 Unplug the power cord from the wall...
... of the USB cable into the wall outlet, and then turn on the computer. If the cartridges do not seem to fit, make sure the printhead is busy or does not respond If the "Before you continue to have connected to wake up the If this problem persists, then check our...: Do not remove the alignment page until printing is marked with a USB symbol. A cleaning page prints. 6 Press the arrow buttons to scroll to Deep Clean Printhead, and then press . If the printer will not come out of Power Saver mode, then reset the power: 1 Unplug the power cord from the wall...
User's Guide
Page 130
... as possible from your system. SELECT A HIGHER PRINT QUALITY FROM THE PRINTER SOFTWARE MAKE SURE THE INK CARTRIDGES ARE PROPERLY INSTALLED ALIGN THE PRINTHEAD CLEAN OR DEEP CLEAN THE PRINTHEAD NOZZLES Note: If these solutions do not remove the streaks or lines on printed image If the "Before you troubleshoot" checklist does...
... as possible from your system. SELECT A HIGHER PRINT QUALITY FROM THE PRINTER SOFTWARE MAKE SURE THE INK CARTRIDGES ARE PROPERLY INSTALLED ALIGN THE PRINTHEAD CLEAN OR DEEP CLEAN THE PRINTHEAD NOZZLES Note: If these solutions do not remove the streaks or lines on printed image If the "Before you troubleshoot" checklist does...
User's Guide
Page 176
...run fax software 138 cannot scan to computer over a network 133 cannot send faxes 135 cartridges, ink ordering 12 using genuine Lexmark 12 changing Power Saver timeout 19 changing printing mode 52 changing temporary settings into default 18 changing wireless settings after installation (Mac...you troubleshoot 119 fax troubleshooting 134 memory card troubleshooting 141 choosing a splitter, faxing 85 cleaning exterior of the printer 117 cleaning printhead nozzles 117 Club Internet 95 collating copies 58 Color/Black button 17 Communication not available message 155 computer slows down when printing...
...run fax software 138 cannot scan to computer over a network 133 cannot send faxes 135 cartridges, ink ordering 12 using genuine Lexmark 12 changing Power Saver timeout 19 changing printing mode 52 changing temporary settings into default 18 changing wireless settings after installation (Mac...you troubleshoot 119 fax troubleshooting 134 memory card troubleshooting 141 choosing a splitter, faxing 85 cleaning exterior of the printer 117 cleaning printhead nozzles 117 Club Internet 95 collating copies 58 Color/Black button 17 Communication not available message 155 computer slows down when printing...
User's Guide
Page 180
...problems, basic solutions 119 Printer Settings 80 printer software installing 27 uninstalling 26 printer, setting as default 52 printhead aligning 116 printhead access 11 printhead error 120 printhead nozzles cleaning 117 printing collate 34 custom-size paper 38 documents 33 documents from memory card or flash ... 113 publications finding 7 R received history report 90 receiving faxes Auto Answer setting 84 automatically 84 manually 84 tips 84 recycling 6 Lexmark products 15 WEEE statement 163 redial attempts, fax setting 79 redial time, fax setting 79 reducing an image 57 registering fax user...
...problems, basic solutions 119 Printer Settings 80 printer software installing 27 uninstalling 26 printer, setting as default 52 printhead aligning 116 printhead access 11 printhead error 120 printhead nozzles cleaning 117 printing collate 34 custom-size paper 38 documents 33 documents from memory card or flash ... 113 publications finding 7 R received history report 90 receiving faxes Auto Answer setting 84 automatically 84 manually 84 tips 84 recycling 6 Lexmark products 15 WEEE statement 163 redial attempts, fax setting 79 redial time, fax setting 79 reducing an image 57 registering fax user...

User's Guide
Page 181
...USB 125 incorrect language appears on display 120 page does not print 123 printer does not respond 124 printer printing blank pages 124 printhead error 120 software did not install 122 shared printing 103 sharing printer in Windows 102 software Service Center 119 software did not install...through USB 125 incorrect language appears on display 120 page does not print 123 printer does not respond 124 printer printing blank pages 124 printhead error 120 software did not install 122 troubleshooting, wireless cannot print over wireless network 144 changing wireless settings after installation (Mac) 96...
...USB 125 incorrect language appears on display 120 page does not print 123 printer does not respond 124 printer printing blank pages 124 printhead error 120 software did not install 122 shared printing 103 sharing printer in Windows 102 software Service Center 119 software did not install...through USB 125 incorrect language appears on display 120 page does not print 123 printer does not respond 124 printer printing blank pages 124 printhead error 120 software did not install 122 troubleshooting, wireless cannot print over wireless network 144 changing wireless settings after installation (Mac) 96...
Quick Reference
Page 4
...8226; Return ink cartridges for 10 minutes. • Select the lowest Power Saver timeout. It also includes information on the Lexmark Web site at http://support.lexmark.com. For Macintosh users In Mac OS X version 10.6 1 From the Applications folder in High-Yield cartridges allow you... to protecting the environment and are continually improving our printers to reduce your printer's environmental impact even further. These features clean the printhead nozzles to print more than normal and are ideal for printing documents that are mostly text. • Use High Yield cartridges. ...
...8226; Return ink cartridges for 10 minutes. • Select the lowest Power Saver timeout. It also includes information on the Lexmark Web site at http://support.lexmark.com. For Macintosh users In Mac OS X version 10.6 1 From the Applications folder in High-Yield cartridges allow you... to protecting the environment and are continually improving our printers to reduce your printer's environmental impact even further. These features clean the printhead nozzles to print more than normal and are ideal for printing documents that are mostly text. • Use High Yield cartridges. ...

Quick Reference
Page 6
...14 Paper guides To Load original documents in the ADF. Scan, copy, or fax multiple-page letter-, legal-, and A4-size documents. Install the printhead. Connect the printer to an active telephone line (through a standard wall jack, DSL filter, or VoIP adapter) to a computer using a USB... cable. Install, replace, or remove ink cartridges. • Access the ink cartridges and printhead. • Remove paper jams. 6 Note: Do not load postcards, photos, small items, or thin media (such as magazine clippings) into the paper slot...
...14 Paper guides To Load original documents in the ADF. Scan, copy, or fax multiple-page letter-, legal-, and A4-size documents. Install the printhead. Connect the printer to an active telephone line (through a standard wall jack, DSL filter, or VoIP adapter) to a computer using a USB... cable. Install, replace, or remove ink cartridges. • Access the ink cartridges and printhead. • Remove paper jams. 6 Note: Do not load postcards, photos, small items, or thin media (such as magazine clippings) into the paper slot...
Quick Reference
Page 10
...108XL 108XLA 1 Licensed for a single use , return this cartridge to Lexmark for remanufacturing, refilling, or recycling. 2 Available only on the Lexmark Web site at www.lexmark.com. Lexmark Pro200 Series models (except Lexmark Pro208) Item Return Program Regular cartridge2 Cartridge1 Black cartridge 100 100A High... old ones, or the ink remaining in the printhead nozzles may dry out. 1 Turn on the Lexmark Web site at www.lexmark.com/pageyields. WI F I PRINTING Note: The printhead moves to Lexmark for a single use only Lexmark ink cartridges. For best results, use only. ...
...108XL 108XLA 1 Licensed for a single use , return this cartridge to Lexmark for remanufacturing, refilling, or recycling. 2 Available only on the Lexmark Web site at www.lexmark.com. Lexmark Pro200 Series models (except Lexmark Pro208) Item Return Program Regular cartridge2 Cartridge1 Black cartridge 100 100A High... old ones, or the ink remaining in the printhead nozzles may dry out. 1 Turn on the Lexmark Web site at www.lexmark.com/pageyields. WI F I PRINTING Note: The printhead moves to Lexmark for a single use only Lexmark ink cartridges. For best results, use only. ...
Quick Reference
Page 11
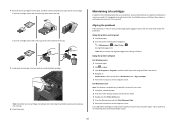
... an electrical outlet. If print quality has not improved, then clean the printhead nozzles. 11 Using the printer control panel 1 Load plain paper. 2 From the printer control panel, navigate... to align the printhead. If your ink cartridge comes with a twist cap, then twist and remove the cap. 5... ink cartridge. If your ink cartridge comes with a muzzle cap, then remove the cap. Aligning the printhead If the characters or lines on if it is finished. If you may need to : > Maintenance > > Align Printer...
... an electrical outlet. If print quality has not improved, then clean the printhead nozzles. 11 Using the printer control panel 1 Load plain paper. 2 From the printer control panel, navigate... to align the printhead. If your ink cartridge comes with a twist cap, then twist and remove the cap. 5... ink cartridge. If your ink cartridge comes with a muzzle cap, then remove the cap. Aligning the printhead If the characters or lines on if it is finished. If you may need to : > Maintenance > > Align Printer...


